Physical Address
304 North Cardinal St.
Dorchester Center, MA 02124
Physical Address
304 North Cardinal St.
Dorchester Center, MA 02124

Your Aeron should feel like it was made just for you so let’s get it dialed in. Start by adjusting the seat height so your feet rest flat on the floor and your knees are about at a 90-degree angle that keeps your lower back comfortable and supported.
Next, tweak the lumbar support to sit about a third up the backrest; it should gently hug your spine without pinching. Then, set the armrest height so your elbows are at a relaxed 90° angle, which helps prevent shoulder strain.
Finally, find the tilt tension and recline limiter that let you lean back comfortably without feeling like you’re fighting the chair think of it as giving your back a supported stretch. Keep going, and you’ll discover more ways to turn your Aeron into the perfect partner for your posture.
This article contains affiliate links. If you purchase through them, I may earn a small commission at no extra cost to you. I only recommend products I genuinely believe in.
Ever try adjusting your chair and suddenly realize how weirdly high or low it feels after a few minutes? That’s your body telling you something’s off. When you adjust the Herman Miller Aeron, you want to find that sweet spot where your feet rest flat no dangling and your knees form about a 90-degree angle. According to OSHA ergonomic guidelines, a proper seat height should support a comfortable seated posture that maintains the lumbar spine’s natural curves.
All right, if you’re the average height, your seat should be around 15–17 inches this helps keep thighs parallel to the floor, reducing pressure on the sacral region. For taller individuals those with heights exceeding 6 feet consider a seat height of 18 inches or more, as the goal is to keep the thighs parallel to the floor, not slumped or dangling.
Research on spinal biomechanics suggests that maintaining this neutral thigh-to-hip relationship helps prevent lower back strain and promotes proper circulation. Ensuring your chair allows for correct adjustment can significantly influence long-term comfort and spinal health.
If your chair is maxed out or you’re above the seat height limit, a footrest might save you some headaches, though it’s just a workaround. Many ergonomists recommend using foot support to achieve proper lower limb positioning, which can alleviate pressure on the lumbar and sacral regions.
Your body will thank you for maintaining the correct seat height and supporting your posture throughout extended periods of sitting.
When setting up your footrest, the primary goal is to provide a comfortable, flat surface for your feet to rest think of it as giving your legs a little break from gravity. According to OSHA ergonomic guidelines, you want your knees at or just below hip level (roughly 90 to 100 degrees of knee flexion), so your feet aren’t hanging or squished, which helps reduce pressure on your calves and lower back.
If your footrest height isn’t correct, you might feel discomfort or strain, potentially leading to muscle fatigue or circulatory issues. Most footrests rotate counterclockwise to lower and clockwise to raise, so find that optimal position where your feet stay flat without strain.
Check if your model supports tilt adjustment; a forward tilt (around 5 to 15 degrees) can help relax your calf muscles this feature is especially useful during long work hours. Lock the tilt in place once you find a comfortable angle. Safety is essential: stay within the weight limits specified by the manufacturer and ensure your footrest is kept clean and properly lubricated to prevent malfunction.
Maintaining correct footrest ergonomics can help prevent lower limb discomfort and support better lumbar alignment during prolonged sitting. Additionally, proper footrest use can contribute to maintaining good posture throughout the workday, which is vital for overall comfort and health.
Regularly adjusting your footrest based on your body’s needs can help mitigate issues related to lumbar disc pressure and nerve irritation, ensuring ongoing comfort. Remember, customizing your footrest setup each day fosters comfort and reduces the risk of musculoskeletal issues.
You’ve probably noticed that when your arms aren’t just the right height, your shoulders tingle or creep up toward your ears per Mayo Clinic recommendations, this is a clear sign something’s off. Adjust the paddle-shaped lever on each arm support to release it.
Then, gently raise or lower the arm until your elbows form about a 90° angle (which allows for optimal forearm positioning and reduces shoulder strain). Keep in mind, the arm height should be between 6.8 and 10.8 inches above the seat, depending on your torso length, to promote proper ergonomic alignment. Next, slide the armpad forward or back so your forearms rest comfortably over your thighs.
This positioning helps prevent trunk twisting and reduces unnecessary lumbar or thoracic spine strain. Additionally, properly adjusted arm support can help reduce repetitive strain injuries over time. Proper arm positioning also encourages spinal alignment by supporting the natural lumbar support curve during extended sitting.
Finally, pivot the arm pads inward or outward until they support your natural shoulder roll, which aids in maintaining thoracic spine alignment and shoulder comfort. This combination of adjustments supports proper posture, reduces muscle fatigue, and promotes spinal health during long hours of sitting. As research on spinal biomechanics suggests, aligning your seated posture helps prevent musculoskeletal issues like lower back pain and thoracic kyphosis.
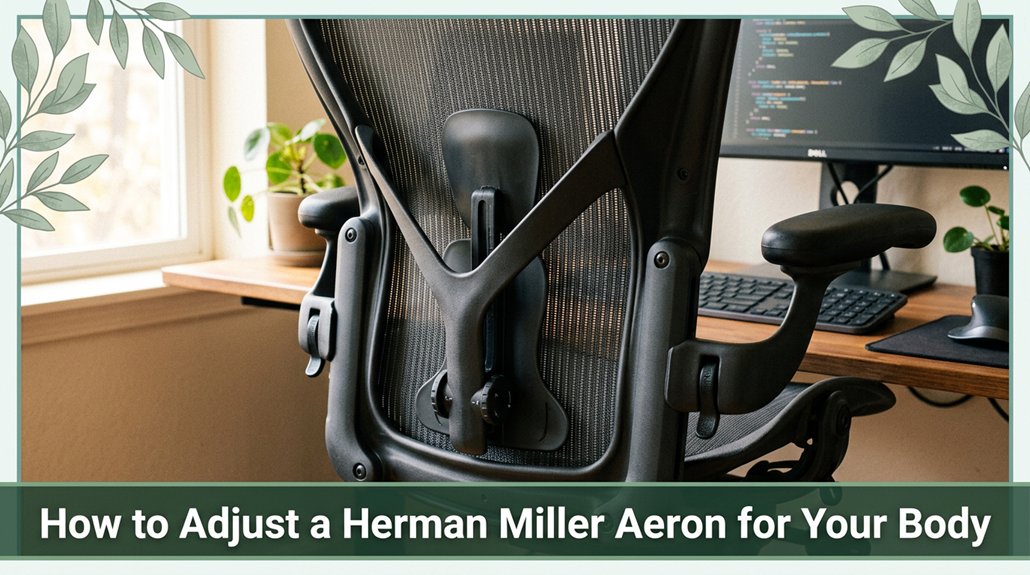
Alright, here’s the truth: customizing your lumbar support isn’t just about flipping a lever or sticking it in a random spot it’s about giving your lower back exactly what it needs to stay healthy throughout your day. You’ve probably felt that weird tension snagging just above your waist after hours at your desk, right? That’s your lumbar region, part of your lower back, signaling that it’s crying out for proper support.
Adjust the strap on the back of your Aeron chair so the support hits about a third up from the bottom of the backrest, which corresponds to the natural lumbar curve located roughly between the L1 and L5 vertebrae, according to ergonomic guidelines. Make sure the support contacts your lumbar region without squeezing too tightly, as excessive pressure can impair circulation and cause discomfort.
Also, double-check that your feet stay flat on the floor to maintain proper pelvic and spinal alignment. Being mindful of lumbar support contact helps ensure you provide effective backing where your spine naturally curves, preventing strain and promoting better posture throughout your workday.
Getting these adjustments right will provide relief from lower back tension and promote better posture throughout your workday.
Maintaining appropriate lumbar support can help prevent strain-related conditions such as lumbar disc herniation or muscle fatigue.

Getting your recline just right on your Herman Miller Aeron isn’t a magic trick. It’s about fine-tuning a few simple adjustments so sitting feels more like a break rather than a back assault.
Perfect your Aeron recline with simple adjustments for lasting comfort and support.
Here’s what to do:
When you start adjusting the forward tilt of your Aeron chair, you’re essentially giving your pelvis a slight forward shift to promote better lumbar support and spinal alignment according to OSHA ergonomic guidelines.
The adjustment knob is located on the left side beneath the cushion; turn it forward while sitting, leaning back just enough to release the mechanism. This tilt helps your pelvis tilt slightly forward, supporting the natural curve of your lower back and encouraging hips and knees to rest at roughly 90 degrees (which is optimal for reducing lower back strain).
Be sure to lock in the tilt once you find a comfortable position. Too much tilt may cause your thighs to feel compressed; if that happens, consider adjusting the seat height or depth to maintain proper circulation and comfort.
Finding the right tilt angle creates a balanced posture, reducing the risk of discomfort or musculoskeletal issues during prolonged sitting. Ultimately, the goal is to discover the position where your posture feels natural and well-supported.
Additionally, ensuring your ergonomic setup aligns with your posture needs helps prevent discomfort caused by poor sitting habits.

Ensuring your Aeron chair is set up for maximum overall ergonomics might sound like a lot of fiddling, but honestly, it’s worth the effort. First, set the seat height so your knees are at 90°, your thighs are parallel to the floor, and your feet rest flat this promotes proper circulation and reduces pressure on the lower back and legs. According to OSHA ergonomic guidelines, maintaining this position helps prevent discomfort and long-term musculoskeletal issues.
Second, adjust the lumbar support to align with the natural curve of your lower back, typically around the L3-L4 region this supports the lumbar lordosis and reduces strain on the sacral and lumbar regions. Proper lumbar support can diminish muscle fatigue and help prevent lower back pain, especially for those who sit for extended periods.
Adjust lumbar support to match your lower back curve at L3-L4, reducing strain and preventing muscle fatigue.
Third, tweak your armrest height so that your elbows form approximately a 90-degree angle, supporting your forearms comfortably. This prevents shoulder strain and reduces the risk of carpal tunnel syndrome by keeping your wrists in a neutral position during work.
Finally, fine-tune the tilt tension and limiter so your chair moves smoothly but not too freely allowing your pelvis and thoracic spine to shift naturally without instability. Research on spinal biomechanics suggests that controlled tilt movement promotes dynamic sitting, which reduces stiffness and encourages active posture adjustments throughout the day.
These small adjustments can significantly decrease discomfort making you feel less like a pretzel and more like yourself.
Performing regular cleanings and maintenance on your Aeron mightn’t sound like your idea of a thrilling Saturday, but trust me, it’s the kind of small effort that keeps your chair feeling like new and, more importantly, keeps you feeling good while you sit.
You’ve likely noticed how dust and spills sneak into fabric and metal parts, causing surfaces to feel less fresh and potentially impacting your chair’s longevity. According to OSHA ergonomic guidelines, maintaining clean and well-maintained furniture can reduce the risk of developing discomfort or musculoskeletal problems associated with prolonged sitting.
Vacuum the fabric regularly with the upholstery attachment no rotary brush, please to remove dust, skin particles, and allergens that can accumulate in foam and fabric padding. Spot clean stains immediately to prevent them from setting and affecting the fabric’s integrity, which can otherwise lead to premature wear.
For the metal parts of your Aeron, use a mild detergent and rinse to keep them shiny and free of grime. In humid environments, waxing the metal components every three months helps prevent corrosion and rust formation. Keep an eye out for signs of corrosion or rust, especially around the adjustment mechanisms and base, and address these issues promptly to maintain structural integrity.
Tighten adjustment knobs monthly, as loose components can compromise ergonomic support and negatively impact lumbar and thoracic stability. Because loose adjustment parts can result in suboptimal posture and increased strain on the lumbar spine, regular checks are essential for ongoing comfort and support.
Although these maintenance steps require a little effort, your back will thank you for a supportive, clean, and well-maintained chair.

All right, let’s talk about those annoying adjustment issues that can turn your Aeron from a trusty sidekick into a rickety old chair okay, maybe not that dramatic, but it can definitely mess with your comfort and support.
Here’s the thing: sometimes the tilt tension is too loose or too tight, and your chair doesn’t support your back correctly. According to OSHA ergonomic guidelines, improper tilt tension can contribute to lower back strain and discomfort.
If the tilt tension is too loose, turn the knob forward a couple of increments. Check by leaning back gently your recline should feel just right, not like you’re falling into a lake. Conversely, if it’s too tight, turn the knob backward a little until you can move smoothly without exerting extra effort.
Next, examine the lumbar support with the PostureFit SL if it’s not engaging properly, turn the lumbar adjustment knob forward until you feel resistance. Proper lumbar support helps maintain the natural curve of your lower back, reducing risks of anterior pelvic tilt and lumbar strain.
Is your arm height drifting? Re-lock the arm height lever and make sure the arms support a comfortable, relaxed elbow angle about 90 degrees (per Mayo Clinic recommendations for optimal arm positioning).
This helps prevent shoulder and cervical strain over prolonged sitting.
Ever noticed how your chair can feel totally different depending on what you’re doing? It’s like switching gears mid-road trip. For keyboard work, you want your elbows around 90°, feet flat on the floor, and knees slightly below your hips basic comfort according to OSHA ergonomic guidelines, which help reduce strain on the lumbar and cervical spine.
When video conferencing, a slight tilt forward, about 5° (which encourages an upright posture and minimizes neck strain), keeps you alert without overextending your neck muscles.
Reading or whiteboard work? Lower the seat 1–2 inches so you can lean in comfortably, which supports the lumbar lordosis and maintains good support for your thoracic spine. Staying supported prevents unnecessary fatigue in the trapezius and rhomboid muscles.
Now, when shifting to a standing desk, set the height just below your standing level this allows your hips and knees to remain in a neutral position, reducing pressure on the sacroiliac joints and promoting proper spinal alignment.
You should aim for the desk height to allow your elbows to be at about 90° which reduces shoulder and wrist tension.
For brainstorming sessions, keep your seat in the middle of its range. This position makes it easier to move around freely without feeling locked in place, encouraging dynamic postures that can help prevent thoracic kyphosis and promote circulation.
These ergonomic tweaks help your body work with, not against, your tasks, reducing discomfort and long-term musculoskeletal risks.
You know your seat is right when your thighs are nearly parallel to the floor, and your knees are at a 90-degree angle with feet flat.
Check if your hips are a little higher than your knees that’s the sweet spot for lumbar support.
Sit back, relax, then peek at your height using a ruler or guide.
If your feet start to dangle or hunching happens, tweak the height!
Yes, armrest positions can definitely influence shoulder strain. If your armrests are too high, you’ll lift your shoulders, inviting tension and discomfort.
Too wide or too narrow, and your shoulders either stretch out or squeeze in, causing fatigue. Proper height, width, and angle keep your arms close to your sides and shoulders relaxed.
It’s like giving your muscles a gentle break they’ll thank you, and your pain levels might even drop.
You’ll want your tilt tension around the mid‑range, roughly 40–60% of the dial, for long tasks.
That’s because too tight, and you’ll feel like you’re bracing every time you lean back exhausting.
Too loose, and you slouch, putting strain on your neck and shoulders.
Find that sweet spot where leaning feels natural, but you’re still supported.
Trust me, the right tension makes those long hours way more bearable.
You should inspect your chair’s components at least quarterly yes, every three months because overlook minor wear and tear, and it might turn into a bigger, more expensive problem later.
All right, I get it life gets busy, but catching loose screws or worn casters early keeps your chair stable and safe.
Regular checks also help guarantee your lumbar support, tilt tension, and arm pads stay in top shape, keeping you comfy and preventing those nagging aches.
There isn’t a one-size-fits-all lumbar support position, and that’s the truth. You want it to align with your natural lumbar curve usually at your belt line or just above so it supports that gentle inward bend.
Adjust it to prevent your pelvis from tilting backward, which causes lower-back strain. Play around a bit, and listen to your back, because comfortable posture is the one that makes you forget you’re sitting.
Alright, so you’ve tweaked your Herman Miller Aeron, and maybe you feel a little more like yourself at your desk good! But remember, your body’s a work in progress, not a one-and-done setup. Keep listening to it, make tiny adjustments as needed, and don’t forget to take breaks. After all, a comfortable chair is just the start; good posture and movement? That’s the real magic. Now go enjoy your newfound ergonomic superpower!


