Physical Address
304 North Cardinal St.
Dorchester Center, MA 02124
Physical Address
304 North Cardinal St.
Dorchester Center, MA 02124

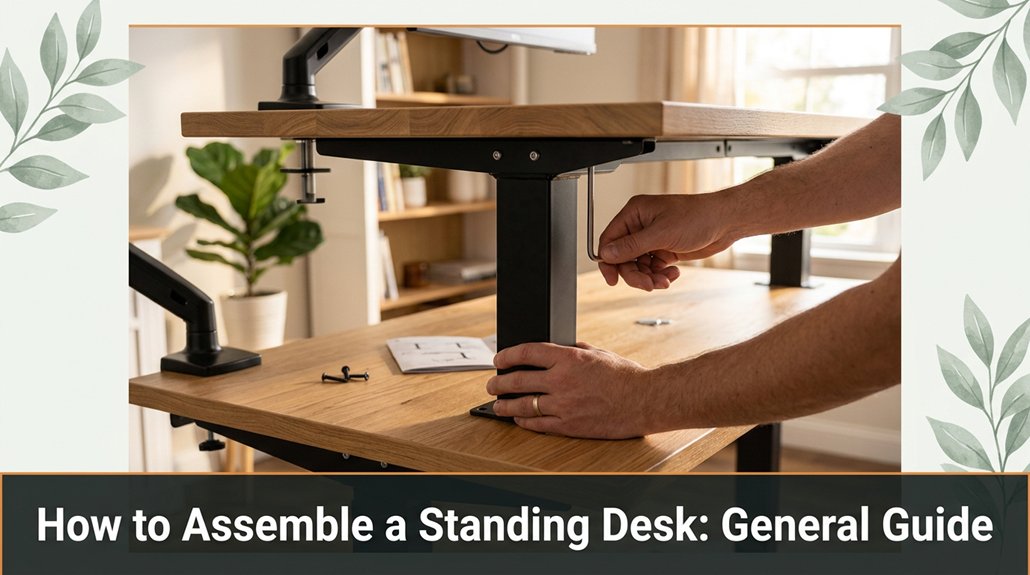
Got a new standing desk and feeling a bit overwhelmed about putting it together? Don’t worry you’re not alone, and I’ll help you avoid common pitfalls. Start with a big, flat space and lay out every piece don’t toss the packaging just yet, you’ll need the packing list.
Carefully check all components, because I promise it’s usually missing something or you’ll find a dent when you’re already halfway through. Use the right tools an Allen wrench and screwdriver, no hammer, trust me and tighten things just enough to hold, but not so tight you warp the frame.
Attach the legs, then the desktop, and double-check the stability. Keep wiring neat, test the height adjustment, and tighten everything one last time. Stick with me, and you’ll pick up tips to avoid frustrations and make the assembly smooth and straightforward.
This article contains affiliate links. If you purchase through them, I may earn a small commission at no extra cost to you. I only recommend products I genuinely believe in.
Before you open the box and start asking, “Where’s that Allen wrench?” it’s helpful to do some preparation. First, clear a workspace large enough to spread out all the parts because having space makes assembly easier and safer.
Make sure the surface is flat and free of clutter or distractions to keep your focus sharp during assembly.
Check that you have all the pieces listed in the assembly manual because missing a bolt or washer halfway through can cause delays and frustration.
Verify the presence of each component to ensure a smooth process from start to finish.
Gather your tools ahead of time; having your Allen wrenches, screwdrivers, and a level ready will save time because searching for tools during assembly interrupts your workflow and can lead to errors.
Confirm that your tools are appropriate for the fasteners and hardware included in your standing desk kit.
Read the instructions thoroughly before beginning because even if parts seem obvious, following the detailed steps prevents missed actions and mistakes.
Pay attention to each step, noting any specific cautions or tips provided in the manual, because skipping steps or rushing can compromise the stability and safety of your assembled desk.
Additionally, stability and durability are crucial factors to consider when assembling a standing desk, as a well-constructed frame supports healthy posture and extended use.

When you open the box containing your new UPLIFT V2 Standing Desk, don’t just toss the packaging aside and start assembly take a moment to carefully lay out all the components. This helps prevent frantic searches for missing screws and small parts later.
Check each item against the packing list, which is usually attached to the box or enclosed in an envelope.
| Item | Count | Check |
|---|---|---|
| Desktop panel | 1 | Look for any damage, scratches, or dents |
| Legs and frame | 1 set | Verify all pieces are present and free of dents |
| Hardware kit | 1 kit | Ensure screws, bolts, and tools are included and undamaged |
| Power supply | 1 | Look for any visible damage or frayed wires |
| Accessories Varies | Check for items like monitor arms, cable trays, and controller units, ensuring all are accounted for |
Now, verify each part’s integrity because missing screws or damaged surfaces complicate the assembly process and can compromise the desk’s stability and safety.
Important: For the desktop panel, ensure the surface is free of cracks, chips, or warping, because a damaged top can affect aesthetics and structural integrity.
Note: For the frame and legs, confirm that all pieces are present as listed because missing components make assembly impossible. If any piece is missing or damaged, contact the manufacturer before proceeding.
Tip: Confirm that the hardware kit contains all screws, bolts, washers, and tools specified in the instructions because missing hardware results in incomplete assembly or instability.
Fact: The power supply should have no visible damage such as bent connectors or frayed wires; damaged power supplies may cause operational failure or safety hazards.
Verify accessories by checking that monitor arms, cable trays, and control panels are included and in good condition, because these components contribute to ergonomic setup and cable management.
Additional tips:
A set of reliable tools is your best friend during this whole assembly saga. You’ll want these three essentials:
Now, don’t just grab any screwdriver. Ensure it matches the screw sizes specified in the assembly manual usually indicated as #2 Phillips or 5/16 inch hex. Use a screwdriver with a comfortable, non-slip grip to prevent slips that could damage components or cause injury.
Match your screwdriver to specified screw sizes for a secure, damage-free assembly.
All right, you might need a hammer for some stubborn joints, but I’ll warn you use it sparingly and only if explicitly instructed, because excessive force may damage parts. Usually, the instructions specify which tools are essential and which are optional.
The manual may not specify torque settings, but generally, tighten fasteners hand-tight plus a quarter turn, because over-tightening can strip threads or warp parts. Additionally, paying attention to ergonomic correctness during assembly ensures better comfort and health once the desk is in use.
Important measurement fact:
– For ergonomic correctness, set the desk height so that your elbows are at a 90-degree angle when your hands rest on the work surface.
Now, follow these steps carefully:

Grab the desk frame and base components first, because laying out everything helps prevent items from getting lost or mixed up. This organized setup makes the assembly process smoother and reduces errors. Identify the main frame parts typically a pair of side pieces and crossbars.
Attach the legs to the crossbars first, because doing so keeps the frame stable during assembly. Tighten the bolts just enough to hold everything firmly over-tightening can strip threads or warp the frame. Remember, all the holes probably won’t line up perfectly at first; don’t force it use a gentle touch.
Double-check that all bolts are secure. Don’t over-tighten, because it can damage the threads and compromise the frame’s integrity. You’re halfway there keep going!

Once you’ve got the frame stable and the bolts snug, it’s time to attach the desktop surface because securing it properly prevents wobbling and ensures stability.
1. Line up the pre-drilled holes on the desktop with the frame’s top brackets or supports because proper alignment ensures the desktop sits flush and is securely attached.
2. Gently lower the desktop, making sure it seats flat and doesn’t wobble because a stable seating prevents uneven stress that could cause warping or damage.
Most desktops have a slight overhang; this is normal and typically ranges from 0.5 to 1 inch beyond the frame edge.
Measurement Fact: The desktop overhang should be between 0.5 and 1 inch for optimal stability and aesthetic balance.
3. Secure the surface with screws or bolts, tightening evenly to prevent warping because uneven tightening can cause stress points that deform the desktop.
Before tightening everything down, double-check the alignment because precise placement avoids issues like uneven overhang or gaps, which could cause the desktop to wobble or feel uneven during use.
Common Mistake: Rushing to tighten screws without confirming alignment leads to misaligned surfaces, which can cause instability or aesthetic issues. Always verify the desktop’s position before securing completely.
Tip: Use a carpenter’s level to ensure the desktop is perfectly horizontal, because a level surface improves ergonomics and prevents items from rolling off.
Additional Tip: Proper cable management can help maintain a cleaner workspace and prevent unnecessary stress on the desktop edges.
You’ll want to start by locating the adjustable mechanism components usually a motor, control box, and mounting brackets and spreading them out where you can see everything clearly.
I’m sure you’ve been 45 minutes into assembling something when you realize step 4 assumed something step 2 never told you, so don’t rush. Take a moment to look over each piece because understanding each component reduces errors later.
The motor should be positioned near the center of the assembly because this balance helps distribute weight evenly and ensures smooth operation.
Align the motor with your mounting points on the underside of your desktop because proper alignment prevents mechanical strain and potential failure.
Now, attach the motor to the mounting brackets, ensuring all screws are tightened securely because loose mounts can cause wobbling or instability.
Secure the brackets to the desktop using appropriate fasteners preferably #8 wood screws or machine screws, depending on your material and verify each screw is tight because loose mounts can lead to a wobbly desk or mechanical failure.
The technique for mounting depends on your exact setup; therefore, verify you’re hitting the correct holes and angles.
*Note:* The motor should be aligned so that the shaft is perpendicular to the desktop surface to prevent uneven wear, with a tolerance of ±2 degrees.
Remember: Each screw should be tightened to approximately 15 inch-pounds of torque to ensure secure attachment without damaging the components.
Common mistake: Using too much torque when tightening screws can strip threads or warp plastic components. Do a light initial tighten, then tighten incrementally until snug around 15 inch-pounds using a torque driver if available.
Measurement Fact: The desktop surface should be at a height of 28-30 inches from the floor, consistent with ergonomic standards for an average adult, and the monitor should be positioned so the top is at or just below eye level, approximately 20-30 inches from the face, to reduce neck strain.
A thorough understanding of the ergonomic principles ensures your standing desk setup provides maximum comfort and health benefits.
As you move on to connecting the electrical components, keep in mind that this part can turn into a tangled mess pretty quickly if you don’t stay organized, because disorganized wiring can lead to connection errors and make troubleshooting difficult. First, lay out all wires and connectors neatly on a flat surface, so nothing gets lost or confused. Before making any connections, trace each wire to identify its purpose and destination to prevent mistakes.
Next, match the connectors to their corresponding ports these are usually color-coded or labeled, but don’t rely solely on those indicators because labels can fade or colors can be misleading. Verify each connection by checking the documentation or schematics of your system to ensure proper matching.
Connect power and control cables carefully, because improper connections can cause short circuits or damage components. Ensure each connector is inserted fully and securely to prevent intermittent connections.
Test the system before tightening any connections permanently or closing up the enclosure. Run a quick power-on test to verify that all components respond correctly, and that no wires are overheating or emitting smoke, because early testing can identify issues before final assembly.
When managing wiring slack, remember that wires longer than necessary may droop or get caught in moving parts, causing potential damage, whereas wires that are too short may pull on connectors and cause disconnections.
Use cable ties or clips to secure excess slack neatly, maintaining at least 1 inch of extra length to accommodate movement without strain.
Specific measurement fact:
Manage slack by leaving at least 1 inch of extra length in each wire to prevent tension and damage.
Adjusting your desk height is where things start to feel real, because you finally get that work surface perfectly in reach without bouncing your knees or straining your neck.
1. Set your desk so that your elbows are at about a 90-degree angle when typing, because this position minimizes strain on your shoulders and arms.
2. Adjust the height to ensure your wrists stay straight, not bent or angling up, because neutral wrist position reduces the risk of repetitive strain injuries.
All right, don’t forget to check eye level your monitor should be roughly at eye height to avoid that neck-crank.
3. Raise or lower your monitor until the top of the screen is at or just below your eye level, because looking slightly down is less fatiguing on the cervical spine than looking straight ahead or upward.
4. Position the monitor directly in front of you, not off to the side, because this prevents neck twisting and promotes good posture.
Key Measurement:
– Distance from your eyes to the monitor should be approximately 20 to 30 inches, because this distance allows comfortable viewing without eye strain.
Remember, everyone’s setup is different, so expect some trial and error to find exactly what works best for your body.
This setup ensures proper ergonomic alignment, helping your back and neck avoid unnecessary strain and fatigue.
Here’s the thing: even the simplest standing desk assembly can turn into a frustrating game of hide-and-seek with missing screws or parts that don’t quite fit. You’re probably holding a piece and thinking, “This should slide right in,” but nope.
Note: When assembling a standing desk like the *Uplift V2* or *Fully Jarvis*, ensure you have all the components listed in the manual, including the necessary screws, nuts, and brackets.
Key Measurement for Proper Ergonomics: Position the desk height so that your elbows are at a 90-degree angle when your hands rest on the work surface, which typically corresponds to a desk height of about 28 to 30 inches from the floor for most users.
Additional Tips:
Patience is your best tool here; take your time, double-check each step, and ensure all parts are correctly assembled before proceeding.
One of the biggest pitfalls during desk setup is neglecting to clear enough space around your workstation, because this prevents accidents and makes the assembly process smoother.
Make sure the floor is clutter-free, with no stray cables or boxes, because clutter can cause trips or accidental knocking over of your new setup.
Ensure the work area is organized: keep tools and parts nearby but out of the way, because you’ll likely need to move things around to fit everything properly.
Measure your space carefully to ensure your monitor, keyboard, and other equipment fit comfortably, because proper measurements help prevent strain and improve ergonomics.
Key Measurement Fact:
– The monitor height should be adjusted so that the top of the screen is at or just below eye level, approximately 20 to 30 inches from your face.
Lower the monitor to just below eye level, because looking slightly down reduces strain on your neck compared to looking straight ahead or upward.
Keep your workspace flexible, because this allows for adjustments during setup, making the process more efficient.
Sometimes, despite your best efforts, parts go missing in action (MIA) or arrive damaged. This situation is common, especially when you’re eager to complete your project before your next Zoom call.
First, thoroughly check the packaging because small parts can hide in corners or behind foam padding.
If you still can’t locate the needed part, contact the manufacturer immediately because they can assist you in resolving the issue.
Here’s what to do next:
All right, don’t panic. Most companies are effective at rectifying these mishaps.
Ensuring your standing desk is stable and safe isn’t just about avoiding wobbles while you work; it’s about preventing accidents or damage in the long run.
First, double-check all bolts and screws yes, all of them because even the tiniest looseness can turn into a wobble nightmare.
Make sure to tighten each bolt and screw completely, as loose fasteners compromise the structural integrity of the desk.
If your desk has adjustable parts, ensure they’re locked tightly because an unlocked adjustable component can suddenly collapse during use.
To do this, verify that the locking mechanisms on height-adjustable legs or movable trays are fully engaged.
Step back and give it a gentle shake don’t be shy because if it wiggles, there’s a loose connection somewhere.
If you feel movement, identify the loose joint or screw and tighten it securely.
Inspect for uneven surfaces your floor’s probably not perfectly flat so consider shimming or adjusting those leveling feet.
Use shims or adjust the height of the leveling feet to achieve stability and prevent wobbling caused by surface irregularities.
The recommended height adjustment for leveling feet is typically within 0.5 inch (1.27 cm), depending on your floor.
And obviously, don’t ignore weight limits your desk isn’t a superhero; it’s only as strong as its weakest point.
Check the manufacturer’s specified maximum weight capacity, such as 250 pounds (113 kilograms), and distribute heavy items evenly across the surface.
Important note:
A correctly set up standing desk ensures safety and optimal ergonomic positioning, reducing strain and enhancing productivity.
You’ll probably spend about an hour assembling a standing desk, give or take. Usually, it’s faster if you don’t get distracted fiddling with screws or wondering why the hell step 3 doesn’t match your parts.
All right, expect some minor surprises like that one bolt that’s just a millimeter off. The key? Stay patient, read instructions twice, and don’t tighten everything until the end.
Yes, you can, but it’s not always easy. You’ll probably want a second pair of hands for tricky parts lifting the top, holding pieces steady, or tightening bolts in tight spots.
All right, maybe you can do it alone if you have good grip strength and patience, but don’t be surprised if your back complains or you spend extra time wrestling parts into place. Trust me, a friend makes it smoother.
Yes, there are weight limits for the desktop surface.
Think of it like a teeter-totter you don’t want to overload one side or it’ll tip over. Most desks specify a maximum load, usually around 50 to 100 pounds, but check your specific model.
You’ll want to avoid stacking heavy monitors or books without considering the limit because, trust me, a collapsing desktop at a barbecue isn’t fun.
After assembling your standing desk, you’ll want to keep it in top shape with a little routine maintenance.
Dust the surfaces regularly it’s surprising how quickly dust settles, especially in a home office.
Check the screws and bolts every few months because, let’s face it, things loosen over time especially if you’re shifting to standing.
And don’t forget to wipe down the motor if it feels gritty obviously, a clean desk works better.
Yes, you can customize or upgrade parts later, but here’s the deal: it depends on your desk model.
All right, if you’re eyeing a new monitor arm or a better cable management system, check if your desk’s compatible or if you’ll need adapters.
Sometimes, upgrading the countertop or legs isn’t straightforward so do your homework first.
Most importantly, don’t assume everything’s universal; measure twice, buy once.
So, there you have it assembling your standing desk might not be the 20-minute miracle the manual promises, but with a little patience, you’ll get it done. Just roll with the tweaks and missteps, because every screw tightened and every misaligned piece gets you closer to that perfect, ergonomic workstation. Trust me, once it’s set up right, you’ll wonder why you didn’t do this sooner. Happy standing!


