Physical Address
304 North Cardinal St.
Dorchester Center, MA 02124
Physical Address
304 North Cardinal St.
Dorchester Center, MA 02124

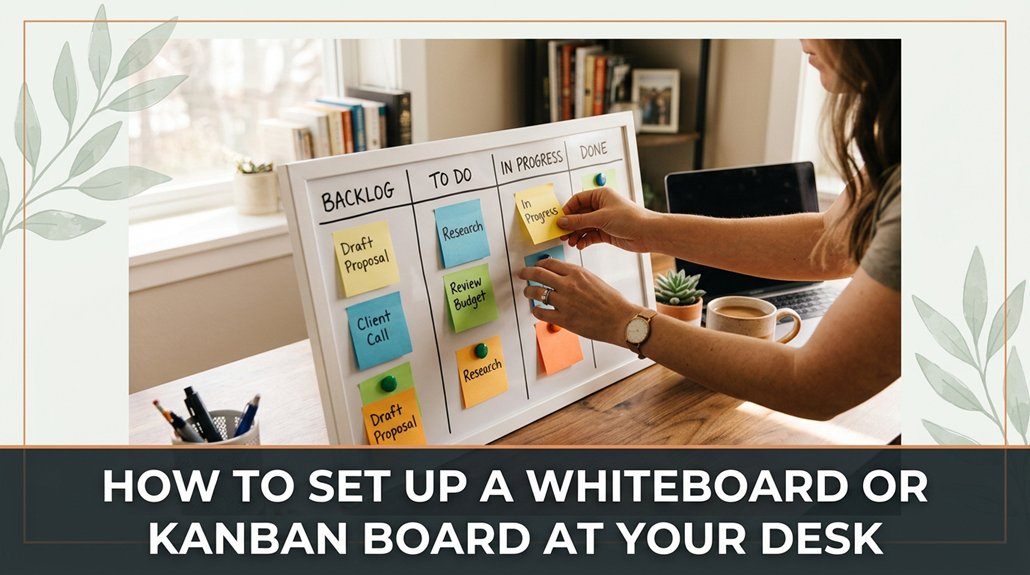
If your desk feels cluttered or you’re struggling to keep track of your tasks, setting up a whiteboard or Kanban board can be a game-changer. First, choose a sturdy one wall-mounted if you have space, or a smaller desk version if you’re tight on room. Position it so the top is at eye level trust me, neck strain isn’t worth it. Grab some colorful markers, magnets, or sticky notes to make it pop. Design your columns “To-Do,” “In Progress,” “Done” and keep your labels clear and simple. Customize with priorities and deadlines, but don’t overcomplicate things. Stick to daily updates and clear rules, and you’ll stay organized without losing your mind. Keep going if you want the full scoop on making this thing actually work.
This article contains affiliate links. If you purchase through them, I may earn a small commission at no extra cost to you. I only recommend products I genuinely believe in.
Let’s be honest if you’re anything like me, the whole idea of staying productive can feel like trying to herd cats. That’s where a whiteboard desk setup comes in. You’ll find quickly that having a visual organizer helps keep tasks front and center. You don’t have to chase emails or hunt through endless tabs you just glance at your board. It’s like having a digital sidekick, but in real life.
A whiteboard keeps tasks visible and reduces clutter, making productivity feel less chaotic and more manageable.
Setting it up might seem trivial, but it’s important to get it right. Pinning notes at the wrong height causes you to crane your neck, which can lead to neck strain and fatigue. Therefore, lower the whiteboard or note holder to eye level, because looking slightly downward is less fatiguing on the cervical spine than looking straight ahead or upward.
Highlight Fact:
*Position the top of the whiteboard at or just below your eye level for optimal ergonomics.*
– To determine the best height, measure your eye level when seated comfortably and set the whiteboard’s top edge accordingly.
Follow these steps to set up your whiteboard or Kanban board effectively:
1. Raise the whiteboard until the top is at or just below your eye level, because this reduces neck strain while giving you a clear view of your tasks.
2. Use magnets or painter’s tape to secure notes, because this makes it easy to update and rearrange tasks without damaging the surface.
3. Ensure that your whiteboard is positioned approximately 20 to 30 inches from your eyes, because this distance provides an optimal viewing angle and reduces eye strain.
4. Additionally, consider the ergonomic standards that define a safe computer workstation, because proper setup supports overall comfort during extended periods of work.
Common mistake to avoid:
*Mounting the whiteboard too high, which causes you to look upward and strain your neck.*
Instead, measure your seated eye level and mount the board accordingly, because this maintains a comfortable, ergonomic viewing position.
Trust me, the easier it’s to glance at your board, the more time you save convincing your brain this is productive instead of clutter.

Have you ever bought a whiteboard or digital Kanban tool, only to be overwhelmed by endless options and unsure which one actually fits your needs? You’re not alone. First, consider your space do you want a large, wall-mounted whiteboard or a compact desktop model?
Because the size should match your available wall space or desk area to ensure it fits comfortably without crowding your environment. Next, think about your workflow: Do you prefer visual clarity for quick understanding, or do you need integrations with other apps like Trello, Jira, or Slack to streamline your process?
For digital tools, select one based on how much organization and features you require. It’s also important to consider price because more functionalities typically mean higher costs, but sometimes a basic, less expensive option will meet your needs just as well. When choosing, prioritize ergonomic workspace factors to ensure the setup supports your comfort during long work sessions.
Gathering your supplies is the easy part, because forgetting the one thing that makes your whole setup work smoothly can derail your progress. You’ll probably spend about 10 minutes hunting down markers or sticky notes, then swear you saw a pack yesterday.
First, grab a sturdy whiteboard or a reliable digital planning tool, such as Trello or Microsoft Planner, because having a central visual workspace keeps your projects organized and accessible.
Use a whiteboard or digital planner to keep your projects organized and easily accessible.
Next, collect your supplies: markers (preferably fine tip for clarity), pens, magnets, or digital sticky notes whichever suits your style because they help you categorize and prioritize tasks visually.
Step 1: Pick a set of colorful markers, such as Sharpie or Staedtler Lumocolor, because they improve visibility and motivation.
Step 2: Gather pens, which should have smooth ink flow, such as Pilot G2 or Uni-Ball Signo, because they ensure consistent writing quality.
Step 3: Collect magnets if you’re using a magnetic whiteboard, or digital sticky notes if working digitally, because they facilitate easy movement and organization of ideas.
Step 4: Get a ruler or painter’s tape for drawing straight lines because tidy outlines improve overall clarity and professionalism in your layout.
Additionally, ensuring your workspace posture awareness is optimal can help prevent discomfort and keep you focused on your planning tasks.
Set up your workspace by ensuring the surface is clutter-free; a clean desk makes setup easier, because it minimizes distractions and prevents tools from getting lost.
Arrange your tools within arm’s reach place markers, pens, magnets, or sticky notes close enough so you don’t have to search for them during work.
Keep cables, cords, and other accessories out of your workspace because tangled cables can cause delays and clutter.
Important Measurement:
Position your workspace so that the monitor is at eye level, with the top of the screen approximately 20 to 30 inches from your face, because this distance reduces eye strain and promotes good posture.
Trust me, your future organized self will thank you for taking these steps now.

Designing your workflow stages might seem like overthinking, but trust me, skipping this step or rushing through it results in a jumble of tasks and no clear path forward.
All right, start by identifying your main process points think “to-do,” “in progress,” “done” because these serve as foundational stages for your workflow.
Then, tweak from there based on your project’s complexity do you need more columns for different phases? For example, “waiting on review” or “client feedback.”
Next, assign clear, actionable names to each column because descriptive labels help prevent confusion.
Here’s the thing: don’t go overboard keep it simple enough to scan quickly and understand at a glance.
Remember, your goal is to create a visual flow that makes sense for you, not a complicated maze that hampers productivity.
Finally, double-check that each column has enough space for future tasks, not just current ones, because this ensures your workflow can scale and adapt.

Once your columns are set up and you’ve labeled them clearly, it’s time to make your task cards visually informative so you can spot priorities at a glance.
First, pick colors because assigning one color per priority level or task type simplifies visual scanning. Don’t overthink it; for example, use red for urgent tasks and blue for routine ones. This approach is a game-changer in quickly identifying what needs immediate attention.
Next, add labels use short keywords like “Client,” “Admin,” or “Deadline.” Keep these labels consistent across all cards so your eyes can scan and process information efficiently. Consistency ensures quick recognition and reduces confusion during busy periods.
Key details, such as due dates or responsible persons, should be written clearly but briefly on each card because providing concise information ensures immediate clarity.
Additional guidelines:
– Regularly review and update rules as your team gets used to the system, because adapting rules ensures they remain effective.
Measurable and Specific Rules:
– When moving a task from “In Progress” to “Done,” ensure all acceptance criteria are met, and the task has been reviewed and approved by a team lead, because this maintains quality standards.
Common mistakes and corrections:
Summary visualization:
When you start customizing your board with priorities and deadlines, it’s tempting to just slap on labels and call it a day, but trust me, that’s where chaos sneaks in.
You’ll want clear categories because vague labels cause confusion such as using “urgent” without specifying what makes it urgent. Assign deadlines, but don’t overcomplicate; too many will make your board look like a traffic jam.
Clear categories prevent confusion; specify urgency and keep deadlines simple to stay organized and avoid chaos.
Think about your workflow: which tasks need immediate focus? Those get top priority. Use color-coding if you can red for urgent, yellow for upcoming because it provides a visual shortcut your brain will thank you for.
Important Measurement:
– The typical distance between your eyes and the monitor should be 20 to 30 inches because this range minimizes eye strain and promotes good posture.
All right, don’t forget to adjust your system as you go because deadlines shift, and priorities change. Your board isn’t static, and neither should your system be.
Keep it flexible, keep it practical.
It’s easy to set a whiteboard or Kanban board on a shelf and forget about it, but if you want it to actually boost your productivity, you need to incorporate it into your daily routine preferably without turning it into a full-time chore.
All right, here’s the key: schedule a quick review at the same time every day because consistency is what transforms a good idea into a habit.
Keeping your whiteboard or Kanban board in check might seem straightforward just glance at it and update what’s needed. But trust me, a quick look can sometimes turn into 10 minutes of trying to decode your own chicken-scratch. Here’s what works for me: Set a recurring review daily or weekly because regular checks prevent tasks from slipping through the cracks.
Now, don’t just erase and rewrite; verify stalled tasks, move cards, and update statuses. When reviewing, ensure each task’s status accurately reflects its current state. For example, move tasks from “In Progress” back to “To Do” if they’re blocked or postponed.
Here’s a quick peek at how I keep mine tidy:
| Task | Status | Notes |
|---|---|---|
| Submit Report | In Progress | Due Friday |
| Call Client | Done | Afternoon call |
| Brainstorm Ideas | To Do | Next Monday |
Regularly review your board, stay honest about progress, and avoid the “I’ll do it tomorrow” trap.
—
1. Schedule your review sessions at consistent times, such as every morning at 9:00 AM or every Friday afternoon at 4:00 PM, to reinforce routine and accountability because consistent timing helps embed the habit.
2. During each review, verify each task’s status because outdated statuses can cause confusion or duplicated effort. If a task is stalled, consider moving it to a “Blocked” or “On Hold” column and add a note explaining the delay.
3. Move cards or sticky notes to reflect their current progress, for example, shifting a task from “In Progress” to “Done” once completed, because visual movement provides immediate clarity on project status.
4. Update notes with relevant details, such as deadlines or blockers, to ensure everyone understands context. For example, add a note if a task is waiting for client feedback so that the team knows its current state.
5. Remove completed or obsolete tasks weekly, because clutter can reduce your board’s effectiveness. Archiving completed items once a week helps keep your workspace focused.
Set your workspace at ergonomic standards: Position your whiteboard or Kanban board so that the top of the board is at or just below eye level; approximately 57-63 inches from the floor, if seated, or aligned with your eye level if standing. This reduces neck strain because maintaining a neutral head position minimizes musculoskeletal discomfort.
Vague updates like “Working on it” lead to confusion about task progress because they lack specific information. Instead, specify what has been done or what remains, such as “Drafted initial report sections,” to clarify progress.
Updating infrequently or irregularly causes incomplete project visibility because stale information breeds miscommunication. Schedule dedicated review sessions to ensure updates happen consistently.
Leaving tasks unverified or unrefreshed can result in stale or misplaced items; instead, verify task statuses during each review, confirming that each card reflects the real-time progress.
Troubleshooting your whiteboard or Kanban board is like trying to find a lost sock in a laundry basket: you know it’s there somewhere, but figuring out where the mess started can be a headache.
To effectively troubleshoot these issues:
Conducting a workspace ergonomic assessment can further prevent physical discomfort and boost productivity, ensuring your workspace supports both your mental and physical well-being.
You should review your Kanban board at least once a week, but honestly, more often if you’re juggling lots of tasks.
Why? Because priorities shift, and there’s nothing worse than staring at a stale board of completed work while new stuff piles up.
All right, maybe that’s just me. So, set a recurring reminder Monday mornings work well and keep it fresh.
Trust me, it saves you from chaos later.
Absolutely, you can use a whiteboard for remote teams. Just get a digital whiteboard app like Miro or Microsoft Whiteboard they let your team collaborate in real-time, no matter where they are.
All right, now don’t forget to set permissions and organize sections. It’s basically a shared workspace don’t make it a digital clutter dump, or you’ll spend more time searching than working.
You avoid common setup mistakes by keeping it simple and clear.
Don’t clutter your board less is more, or you’ll drown in chaos faster than you can manage. Make sure task labels are consistent and visual cues are obvious; otherwise, you’ll spend more time deciphering than working.
Position your board for easy reach and visibility trust me, no one wants to stand on their chair every time they need a glance.
All right, handling tasks across multiple stages is trickier than it looks. You want to assign a label or tag to each task, then move it through the stages without losing it.
Now, don’t just slap a sticky note on everything it gets confusing fast. Instead, use different colored magnets or sticky notes.
Why? It’s a visual cue, so you instantly see where the task stands, saving you from chasing ghosts.
You’ll want tools that sync seamlessly with your physical setup, like Trello or Jira. They integrate well via apps or plugins, so you can drag tasks offline and sync later.
Google Keep’s simple, checks quick, and works with reminders. All right, don’t forget, it’s about what makes your flow smoother I’ve wasted hours trying to force gadgets that don’t play nice.
Choose what fits your style.
Alright, setting up your whiteboard or Kanban isn’t rocket science it’s actually pretty straightforward, even if you hit a few snags along the way. Remember, it’s about making your workflow visible, not perfection. Embrace the mess, tweak as you go, and don’t worry if your first setup looks more art project than productivity machine. Because in the end, the goal’s simple: stay organized, get stuff done, and have a little fun doing it.


