Physical Address
304 North Cardinal St.
Dorchester Center, MA 02124
Physical Address
304 North Cardinal St.
Dorchester Center, MA 02124

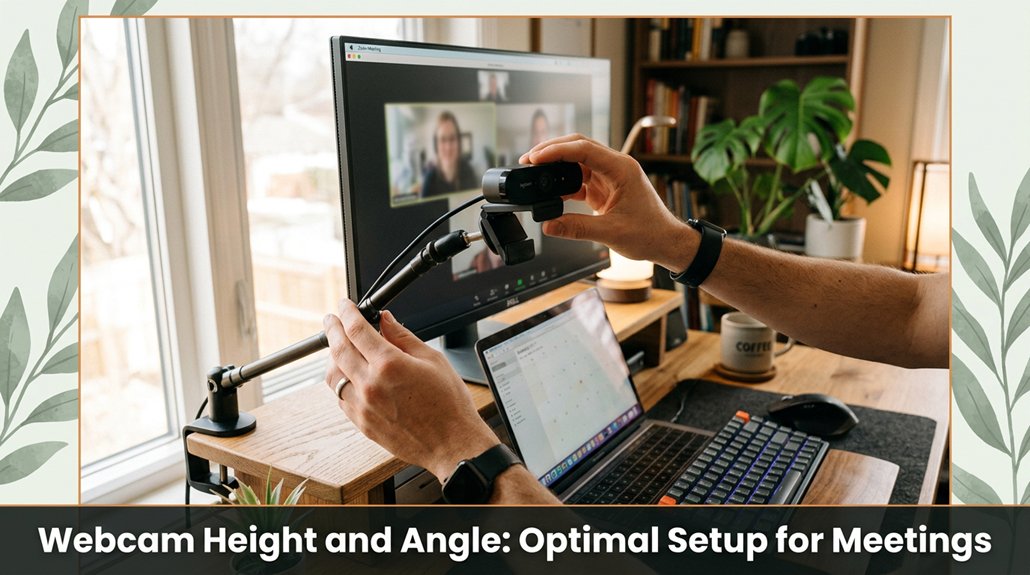
Struggling to look confident and professional on your video calls? The secret is positioning your webcam just right. Keep it at eye level trust me, anything lower or higher makes you look unsteady or awkward, like you’re talking to aliens or hiding something.
Adjust your monitor or mount until your eyes are roughly in the top third of the lens. Keep the camera about 20-30 inches from your face, tilting it slightly downward if you’re presenting, or keeping it level for casual chats.
Avoid auto-adjustments manual focus and good lighting can make a huge difference. To dodge glare and shadows, get the angle and light just right. Use a sturdy mount or tripod to keep everything steady. Want to turn on the charm during meetings? More tips are just beyond this one.
This article contains affiliate links. If you purchase through them, I may earn a small commission at no extra cost to you. I only recommend products I genuinely believe in.
Alright, let’s talk about webcam height. It’s that tiny detail that can make or break your on-camera presence without you even realizing it. When it comes to the webcam angle in your home office setup, where your camera sits can totally change how you come across.
If the webcam is too low, you’re looking up your nose, which isn’t a good look trust me. If it’s too high, you end up squinting or appearing detached. The ideal position is at eye level because it helps the webcam capture your face straight on. This makes you look engaged and confident during meetings.
To achieve the perfect webcam height:
Remember these key points:
Fact: The optimal webcam height positions the camera so your eyes are level with the top third of the lens.
Measurement: Keep the camera 20 to 30 inches from your face, which corresponds to an arm’s length, providing a natural perspective.
Maintaining proper camera angle and positioning can significantly improve your on-camera presence and make your meetings more effective and polished.
A common mistake is placing the camera too low, which causes you to look up your nose, or too high, making you appear distant or squinting. Fix these by adjusting your setup to achieve eye-level positioning.
Once you nail this, your virtual presence will instantly look more professional and confident simple as that.

Wondering how to find the perfect webcam angle without turning it into a full-blown engineering project? Here’s the deal: your goal is a natural, professional look eyeline, not a news anchor. Now, grab a mirror or check your own face on camera.
Ideally, the lens should be level with your eyes because looking slightly up or down creates an unflattering or distracting effect. Too high and you look down at viewers; too low and you look up someone’s nose.
Here is a quick guide:
| Your Head Position | Webcam Angle | Effect |
|---|---|---|
| Slightly tilted | Slightly downward | Engages viewers, projects confidence |
| Eye-level | Straight ahead | Natural, professional appearance |
| Too high or low | Excessive tilt | Distracting, unprofessional look |
Specific measurement:
– Position the webcam so the lens is at or just above eye level. For most desk setups, this typically means placing the camera about 48 to 52 inches from the floor, depending on your chair height and setup.
How to adjust:
All right, then:
– Adjust until the image feels natural and comfortable. Trust me, it’s worth the fuss!

Different seating setups call for different webcam positions because it’s not one size fits all. If you’re solo at a desk, position your webcam at eye level, about 2-3 inches above your monitor. For a small round table, place the camera slightly overhead, capturing everyone face-on.
And if you’re in a flexible workspace with multiple arrangements, use a movable mount so you can adapt quickly trust me, the last thing you want is to scramble mid-meeting.
All right, now that’s the basics. Remember, the goal is to look natural and avoid awkward angles human eyes don’t need to feel like they’re catching a secret.
Key measurements and tips:
Common mistakes to avoid:

One of the biggest annoyances when on a video call is dealing with glare bouncing off your face or shadows that make you look like you work in a dungeon.
All right, first, soften harsh shadows by placing a lamp behind your webcam, because diffused light reduces shadow severity. If your face’s illumination is uneven, tweak the angle of your light. You can also add a second light on the opposite side for balanced lighting.
Now, glare? Make sure direct sunlight or those bright kitchen LEDs aren’t hitting your face head-on.
Adjust the position or angle of your setup until the light hits at an angle, because this reduces glare and improves visibility.
Here’s the goal: you want your face evenly lit, because nobody’s coffee in focus. Use trial and error, make adjustments, and take breaks to assess your setup.
Remember, setting up your lighting properly is worth the effort for a polished appearance.
Highlighted Fact:
– Position your light source so that it hits your face at an angle of approximately 45 degrees or less to minimize glare.

Adjusting your webcam height is all about eyeball level, or close enough that you don’t feel like you’re gazing up at a star or down into a wormhole. Because a proper height prevents neck strain and ensures you appear engaged during video calls, use your screen and desk to help.
1. Raise your monitor until the top of the screen is at or just below eye level.
Because looking slightly downward is less fatiguing on the cervical spine than looking straight ahead or upward, this position promotes comfort during extended meetings.
2. Place your monitor on a stand or stack books such as hardcover books like those from the “ErgoStand” series if needed, to achieve the desired height.
3. Position your webcam on top of or just below the monitor.
If it sits too low, you’ll tilt your head upward unnaturally; if it’s too high, you’ll appear to be peering down, which can come off as unengaging or unprofessional.
4. Elevate your webcam to an eye level that aligns with your natural gaze, typically around 4 to 6 inches above the top of your monitor, depending on your monitor’s height.
5. Adjust your chair height so your eyes are parallel to the camera lens.
Because slumping or craning your neck causes discomfort and affects your presentation, ensure your eyes meet the camera straight-on without tilting your head.
In addition, aligning your monitor height with ergonomic guidelines, such as the top of the screen being at or just below eye level, helps promote a comfortable and professional appearance.
Ever find yourself wobbling between your webcam looking too high or too low because you never quite settled on a common mistake most people make? Yeah, I’ve been there. The biggest mistake? Ignoring your lighting or not adjusting the angle to frame properly.
You might think, “It’s just a webcam,” but don’t be that person with the awkward chin shot or a glaring glare behind you.
First, avoid mounting your webcam too high. Mounting it excessively above eye level causes an unflattering downward angle that emphasizes your chin. Instead, position the webcam at or just above your eye level, because this angle creates a natural and flattering perspective.
Avoid mounting your webcam too high; aim for eye level for a more flattering, natural look.
Second, don’t set your webcam too low. Mounting it below eye level causes an upward shot that looks unprofessional and can distort facial features. Instead, place it at or just above eye level.
Third, ensure your webcam is stable. Wobbly mounts are distracting and unprofessional because they cause jittery video. Secure your webcam on a flat, stable surface or use a mount with a screw-tight clamp.
Fourth, check your background. Clutter is distracting during video calls and makes you look unprepared. Keep your background tidy and well-lit.
Fifth, pay attention to your lighting. Proper lighting illuminates your face evenly, reducing shadows and glare. Natural light from a window or soft diffused light from a ring light such as the Neewer 18-inch LED Ring Light helps achieve an even complexion.
Key Measurement Fact:
Position the monitor 20 to 30 inches from your face, because this distance reduces eye strain and provides a clear view of your screen without the need to lean forward or backward.
A great webcam setup doesn’t happen by chance; it’s about having the right tools and accessories to hold everything steady and exactly where you want it.
First, get a solid tripod, because a shaky shot or a camera slipping mid-meeting can be disruptive. Choose a tripod made of durable aluminum or magnesium alloy, and ensure it has adjustable height and a stable base to prevent wobbling.
Second, a clamp mount can let you attach your webcam to your monitor or desk, saving space and keeping it stable. Select a clamp with a rubberized grip to prevent damage to your monitor or desk surface. Clamp the mount securely, ensuring it’s tight enough to prevent slipping during use.
Third, consider a flexible arm these allow precise adjustments of height and angle without fumbling with screws every time. Use a flexible arm with a sturdy clamp at one end and a universal mounting screw at the other, so you can fine-tune the position easily.
Important Measurement and Positioning Fact:
Position your webcam so that the lens is at or just slightly above eye level about 2 to 3 inches higher than your seated eye line for a natural, engaging look.
Common Mistakes and Fixes:
– Mistake 1: Having the webcam angled downwards, which creates an unflattering view of your nostrils.
Solution: Elevate the webcam to eye level or slightly above, aiming the lens straight ahead or slightly downward to achieve a more flattering angle.
– Mistake 2: Using a tripod that’s too short or uneven, resulting in unstable footage.
Solution: Use a tripod with adjustable height (preferably 20 to 60 inches) and a tripod head with a locking mechanism to prevent accidental shifts.
– Mistake 3: Attaching the webcam directly to a monitor without a stable mount, which can wobble or fall.
Solution: Use a clamp mount designed for monitors or desks, ensuring a tight grip and stable support.
Number one, lighting is the biggest game-changer for your webcam quality more than the resolution or the fancy mic you just bought.
All right, if your face’s shadowed or blown out, it’s not your camera. It’s your lighting. You want soft, even light, not a spotlight or backlighting that turns you into a silhouette. Ideally, face a window or use a ring light because natural or diffused lighting enhances your appearance and reduces harsh shadows.
Avoid placing the light directly behind you or too high, as this causes backlighting or unflattering shadows. Think of it as giving your face a natural glow no Hollywood drama required.
Now, don’t forget, the angle matters. You don’t want the light glaring or casting harsh shadows. It’s all about illuminating you, not just your background. Proper lighting accentuates your facial features and ensures your face appears clear and professional on camera.
Lighting facts:
Common mistakes include:
Adjusting your webcam for different virtual meeting scenarios isn’t just about zooming in or pulling back like you’re taking a family photo. Now, you need to think about each situation.
Remember, your distance from the camera affects how confident you appear. Position yourself approximately 20 to 30 inches from the camera, because this distance fills the frame without causing distortion or making you appear distant.
Key Measurement:
– Distance from the camera: 20 to 30 inches (about 50 to 75 centimeters) for optimal framing.
All right, don’t forget: adjusting your webcam’s height and angle relative to your face ensures a natural, confident appearance across various scenarios.
You’re probably nodding along, thinking you’ve set up your webcam just fine, only to find your face is all shadowy or… weirdly pixelated. Now, here’s the real trick: lighting is everything. Make sure your light source is facing you, not behind you because backlighting creates silhouettes that obscure your face. Illuminate your face with a soft, diffused light, ideally positioned about 3 feet in front of you at eye level, to ensure even lighting and reduce harsh shadows.
If you’re getting pixelation or jitter, check your connection speed because internet bandwidth directly impacts stream quality. You can also lower your camera resolution in software settings for example, reduce from 1080p to 720p to prevent stalls caused by high data demands.
Raise your monitor until the top of the screen is at or just below your eye level, because looking slightly downward reduces neck strain and creates a more natural appearance on camera. Position yourself about 20 to 30 inches from the webcam, which is generally optimal for clear, detailed video without exaggerating facial features or creating a blurry effect.
If your picture still looks wonky, play with the focus and exposure settings in your webcam software manual adjustments can sharpen the image and ensure proper brightness. For example, setting focus to infinity or adjusting exposure to auto can help achieve a clearer picture.
Troubleshooting common webcam issues:
Your webcam height greatly impacts viewer engagement. When you place it at eye level, you appear more confident and approachable people connect better.
If it’s too high or low, you look awkward or unprofessional, and your audience zones out. All right, you want your eyes to meet the camera naturally think of it like eye contact.
Adjust until you’re slightly looking into the lens, not down or up; it’s all about that natural vibe.
Think of your webcam as a window to your world.
For different models, you’ll want to match the lens and mounting options. All right, if you’ve got a DSLR or mirrorless, angle it slightly downward think of it as a power pose.
With built-in webcams, keep them at eye level no tilt, no surprise shots. The trick? Adjust for your environment, because a setup that works on one desk might be awkward on another.
You’ll want software like OBS, Streamlabs, or a virtual camera tool that lets you switch webcams on the fly. Install it first.
Then, set up each webcam as a separate source. During your meeting, just tap the hotkey or click through the software interface to toggle views.
It keeps things quick and smooth no scrambling to unplug or reconfigure cameras mid-presentation. Trust me, it saves more stress than you’d think.
If space’s tight, you’re gonna want a sleek, adjustable mount or a mini tripod that doesn’t hog much desk real estate.
Pack your gear in corners or wall mounts if possible; it keeps your main workspace open.
All right, just remember: keep everything close enough for easy adjustments, but not so crowded that you’re juggling cables and risking a fall.
You’ve got this space-saving is an art, not a science.
You should reassess your webcam setup every few months or sooner if your lighting or desk arrangement changes. Trust me, it’s easy to get complacent, then suddenly realize your face is half in shadow or you’re only visible from the nose up.
Keep an eye out for comfort too, because if it causes neck strain, it’s time for an adjustment. Small tweaks now save embarrassment later.
Look, setting your webcam just right isn’t rocket science, but it’s close. You’ll tilt, tweak, and probably curse the angle a few times before it clicks. Just remember, your goal is simple: eyes level, relaxed, and ready for whatever meeting tosses your way. Think “professional,” not “pulling a crane shot.” Once you’ve got it right, you’ll wonder why you ever struggled until next time, when your lighting’s weird or shadows slide in.


