Physical Address
304 North Cardinal St.
Dorchester Center, MA 02124
Physical Address
304 North Cardinal St.
Dorchester Center, MA 02124

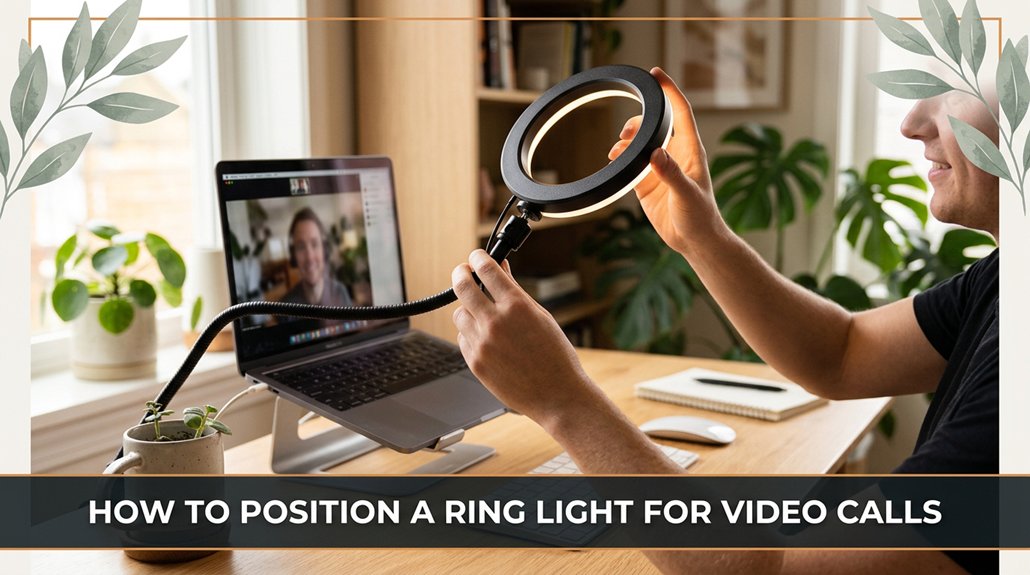
If you want your ring light to make you look good on video calls, getting the positioning just right makes all the difference. Start by placing it slightly above eye level, about 6 to 12 inches away, so the light hits your face evenly and helps avoid shadows.
Keep it about 2 to 3 feet from you closer if you look dull, and farther if the light feels too harsh. Tilt the light downward at a 15 to 30-degree angle to prevent shadows under your nose. Finally, tweak the brightness and color temperature until you achieve a natural, flattering glow. Get these details right, and you’ll look great on every call.
This article contains affiliate links. If you purchase through them, I may earn a small commission at no extra cost to you. I only recommend products I genuinely believe in.
Alright, let’s start with the basics: you want a ring light that makes you look good, not like you’re trapped under a spotlight at a bad theater production.
When setting up your ring light for video calls, position it slightly above eye level about 6 to 12 inches higher than your eyes because this angle creates flattering, natural lighting.
Place the ring light so the light hits your face evenly, avoiding harsh shadows or unflattering glare.
A common mistake is sticking the light too low, which makes it look like you’re under interrogation rather than having a friendly chat.
The goal is soft, flattering illumination.
Don’t set the light so close that it causes excessive brightness or glare, or so far that the light loses its impact.
Adjust the angle of your ring light until your face receives a consistent, gentle glow that’s easiest to verify when you’re on screen.
Trust me, a bit of trial and error improves your setup.
It saves the embarrassment of looking like you’re under floodlights or half-lit.
Important measurement:
Position the ring light so that its center is approximately at your eye level, which typically means placing it 6 to 12 inches above your eyes, depending on your height and the phone or camera angle.

The truth is, figuring out the perfect height for your ring light is often where beginners get tripped up, because nothing is as straightforward as the manual claims. You want it to hit your face just right too high, and you get shadows; too low, and it’s awkward looking up. Usually, eye level is a safe bet, but depending on your setup, it might need adjusting.
| Tip | Why it matters |
|---|---|
| Keep the light slightly above eye level | Avoid shadows and dark spots because lighting from above produces more natural, even illumination. |
| Adjust until your face is evenly lit | No one wants a shiny forehead and shadowed chin because uneven lighting creates unflattering contrasts. |
| Test with a quick call | Confirm it looks natural because what appears good on the monitor may differ on camera or in person. |
| Make small tweaks | Tiny changes make a big difference because subtle adjustments refine the overall look. |
Specific measurements and adjustments:
Position the ring light so that its height aligns with or is just slightly above your eye level roughly 4 to 6 inches above your eyes because this reduces harsh shadows and creates a flattering glow.
Adjust the height until your face is evenly lit, ensuring there are no hot spots on your forehead or shadows under your chin.
Test the setup by doing a quick video call or recording a short clip to verify the lighting appears natural on camera.
Make small, incremental adjustments raise or lower the light by 1-inch increments because small tweaks significantly improve the overall lighting balance.
Common mistakes to avoid:

Ever wonder why sometimes your face looks good on camera, but other times, it’s just a glare-fest or flat as a pancake? Here’s the deal: the distance between you and your ring light really matters.
Too close, and you get harsh shadows and that “glow” that makes your face look like a glazed doughnut. To avoid this, position your ring light about 2 to 3 feet from your face that’s roughly an arm’s length and adjust from there.
Position your ring light 2 to 3 feet away for soft, flattering, and even lighting.
Highlighted Fact:
Position your ring light 2 to 3 feet away from your face for optimal lighting.
Your goal is to have the light wrap around your face evenly, not just highlight your nose tip or cast shadows under your chin.
Follow these steps:
If your face looks too flat or under-lit:
If your face appears overly highlighted or shadowy:
– Adjust the distance gradually until your face is evenly lit without glare or flatness.
Common Mistakes (and How to Correct Them):

Adjusting the angle of your ring light is where things start to come together, because it ensures even, soft illumination without harsh shadows. You want that beautiful, gentle glow, and that means getting the light’s tilt just right.
Tilt the ring light so it feels like your face is evenly kissed with illumination. If it’s too direct, you’ll get harsh shadows that can create unflattering contrast. Mount the ring light so the light hits your face at approximately 15 to 30 degrees above eye level, because this angle produces a natural, flattering glow.
Ensure the light is angled slightly downward, because a downward tilt from above eye level helps avoid unflattering shadows under the nose and chin. If the light is too low below your chin it will only illuminate the lower face, leaving the forehead in shadow.
If it’s too high directly overhead it can cause unappealing shadows under the brow and nose, or create a washed-out appearance.
For optimal results, aim the ring light so that it hits your face from just above eye level, angled down about 15 to 30 degrees. This setup produces a dreamy, evenly lit look without making you appear underwater or under a spotlight. Proper positioning also involves considering light diffusion, which helps soften the light further for a more natural look.

You might be surprised how many people dim their video quality simply by not paying attention to lighting placement or making avoidable mistakes. Here’s what trips you up:
1. Ignoring the background lighting: If your room has harsh shadows or uneven light, your face will look flat or unflattering. Even a little ambient light helps balance the shot.
*Tip:* Use a soft, diffuse light source behind or beside your camera such as a floor lamp with a shade or a ring light to create even background lighting because it reduces harsh shadows and adds depth.
2. Using the wrong brightness level: Too dim, and you’re struggling to be seen; too bright, and your face’s details get washed out.
*Action:* Start with a moderate brightness setting on your camera or light (around 50-75% of maximum).
3. Adjust the brightness until your face is clearly visible without overexposure, then tweak as needed.
4. Positioning the light too far or too close: Distance matters. If it’s too close, you’re washed out; if it’s too far, the glow is weak and uneven.
*Tip 1:* Place your light between 24 to 36 inches from your face, because this range offers soft, even illumination without harsh shadows.
*Tip 2:* Adjust the distance so that your face is evenly lit, avoiding stark shadows or bright spots on your skin and clothing.
*Additional:* Elevate the light to be slightly above your eye level about 6 to 12 inches higher because this reduces under-eye shadows and produces a more flattering appearance.
—
Bonus Fact:
The optimal distance between your light and your face is 24 to 36 inches. This distance balances enough brightness with softness, preventing overexposure or insufficient lighting.
All right, now you’re aware of these pitfalls setting up your lighting system is much smoother when you dodge these common mistakes.
Sometimes, adding extra lighting might seem like overkill, because after all, a single ring light should do the trick. Well, not quite. You might find your face half-lit or shadows creeping in.
Here’s the thing: good lighting isn’t just about the ring light. You can add small desk lamps, LED strips, or even bounce some daylight using a white sheet or foam board. Why? Because multiple light sources create softer, more even illumination.
All right, guarantee these extra lights aren’t creating glare or unwanted shadows. Adjust their intensity so they complement your ring light, not compete with it. Trust me mixing sources takes a bit of fiddling, maybe seconds, but it pays off.
More light? Keep it natural. Your face will thank you.
—
Key measurements and tips:
—
Common mistake to avoid:
– Using harsh, direct lights close to the face can cause glare and sharp shadows. Instead, position lights at a distance and bounce or diffuse them to ensure even, gentle lighting.
Since the background behind your face can make or break the vibe of your video, it’s worth giving some thought to where your ring light points in relation to that backdrop. Here’s the thing:
Important measurement fact:
– Keep the ring light at a distance of approximately 3 to 6 feet from your face for optimal even lighting.
To ensure your setup stays professional, consider the lighting placement in relation to your background to achieve balanced and flattering illumination.
The first thing to remember here is that brightness and color temperature are like the seasoning of your lighting because they can make or break the overall appearance of your video. You want your face to look natural and inviting, not like you’ve been stuck in a cave or lit by fluorescent bulbs.
Adjust brightness so your face is not washed out but still illuminated enough to see your features clearly because proper brightness prevents harsh shadows or overexposure.
Set the color temperature between warm and neutral tones ideally matching your ambient light because this creates a balanced and natural look.
Use this table as a quick reference:
| Environment | Brightness Recommendation | Color Temperature |
|---|---|---|
| Daylight, bright room | Lower brightness | Cooler (5000K–6500K) |
| Evening, dim room | Higher brightness | Warmer (3200K–4500K) |
Remember: it’s a process of trial and error until you find the setting that results in the most flattering reflection.
Being aware of ergonomic standards can also help you set up your workspace to reduce strain and discomfort during longer video sessions.
When you’re ready to get serious about your lighting, don’t just turn on the ring light and call it a day; test it out. Here’s how to fine-tune for the perfect glow:
Important Measurements and Formulas:
Yes, you can totally use a ring light with your smartphone.
All you need is a compatible phone holder or a clamp mount that fits your device. Just attach the ring light to a sturdy surface or tripod, then clip your phone into the holder.
All right, now you’ve got even, flattering light. Just make sure the ring light doesn’t cast weird shadows or blind you that’s the part most people forget.
Ever wonder how to avoid reflections on your glasses? It’s simple angle your ring light slightly away from your face, so it illuminates you without bouncing off your glasses.
You can also tilt the light downward or upward. All right, it might take a couple of tries to get it just right, but trust me, the less glare, the clearer your face looks no more squinting at your reflection mid-call.
Yes, using a ring light with adjustable color temperature is a game-changer. It lets you fine-tune the light to match your environment cool for a professional look or warm for a cozy vibe.
All right, you’ll appreciate it when you realize that fixed settings just can’t cover every room’s quirks. Honestly, it’s about avoiding that washed-out or yellowish hue, and adjustable temps make that a no-brainer.
You should turn off the ring light after your call wraps up or every 20-30 minutes if you plan to keep it on longer.
Keep in mind, the longer it stays on, the more power it uses and yes, it’s a tiny fire hazard if left unattended.
Trust me, nothing’s more annoying than scrambling to find the switch mid-recall because your light’s been running all day while you forgot about it.
Yes, different shapes can affect your video quality. A circular ring light produces even, soft illumination that minimizes shadows.
An oval or elongated shape might cast uneven light or highlight imperfections in weird ways. Honestly, I’ve found the circular ones more reliable for a natural look.
But try both if you can your face, room, and preferred vibe will tell you what’s best. The shape alone isn’t everything, but it can make a noticeable difference.
All right, so your ring light’s set up almost. Here’s what I’ve learned: a good setup can boost your video quality by up to 80%. That’s no joke. You’ll look sharper, more professional, and way less like you’re hiding in the shadows. Trust me, once you get the hang of positioning and brightness, it’s like flipping a switch. Now go ahead, get those calls glowing literally.