Physical Address
304 North Cardinal St.
Dorchester Center, MA 02124
Physical Address
304 North Cardinal St.
Dorchester Center, MA 02124

Setting up your laptop with a monitor at home can feel overwhelming especially if you want everything to look sharp and work smoothly. First, pick a monitor that fits your desk space and offers at least 1080p resolution trust me, blurry images are a pain.
Clear some space, then position the monitor about 20-30 inches away from you, with the top of the screen aligned to your eye level. Connect your laptop to the monitor using HDMI or DisplayPort cables, and calibrate brightness and color to make everything look crisp.
Finally, adjust your chair and desk height so your neck stays comfortable during long work sessions. Since most issues crop up at the setup stage, take your time, and you’ll become more confident faster than you think.
This article contains affiliate links. If you purchase through them, I may earn a small commission at no extra cost to you. I only recommend products I genuinely believe in.
Ever wondered how to pick the perfect monitor for your laptop without ending up with something that looks great on paper but feels like a betrayal in practice? Well, that’s where your laptop monitor setup comes into play.
You want a screen size that fits your desk but isn’t so big it makes your neck ache.
Resolution is key. Aim for at least 1080p. If your eyes demand it, opt for higher resolutions such as 1440p or 4K for sharper images and more screen real estate.
Brightness and color accuracy matter too, especially if you’re editing photos or binge-watching shows. A monitor with 300 nits or higher brightness and a color accuracy of Delta E less than 2 ensures vibrant and consistent colors.
Ports are essential. Make sure your monitor has the right HDMI or DisplayPort options compatible with your laptop. For example, if your laptop has HDMI 2.0, select a monitor that supports HDMI 2.0 or higher to ensure smooth video transmission.
When setting up your monitor, position it 20 to 30 inches from your face. The top of the screen should be at or just below your eye level because looking slightly downward reduces neck strain.
Adjust the monitor height so that your eyes look straight at the top of the screen or just below, promoting ergonomic comfort.
Keep in mind, what looks perfect in-store can be a pain in the neck when you actually set it up. Proper monitor positioning is crucial to prevent neck pain and improve your overall comfort.
Choose wisely; your eyes will thank you.

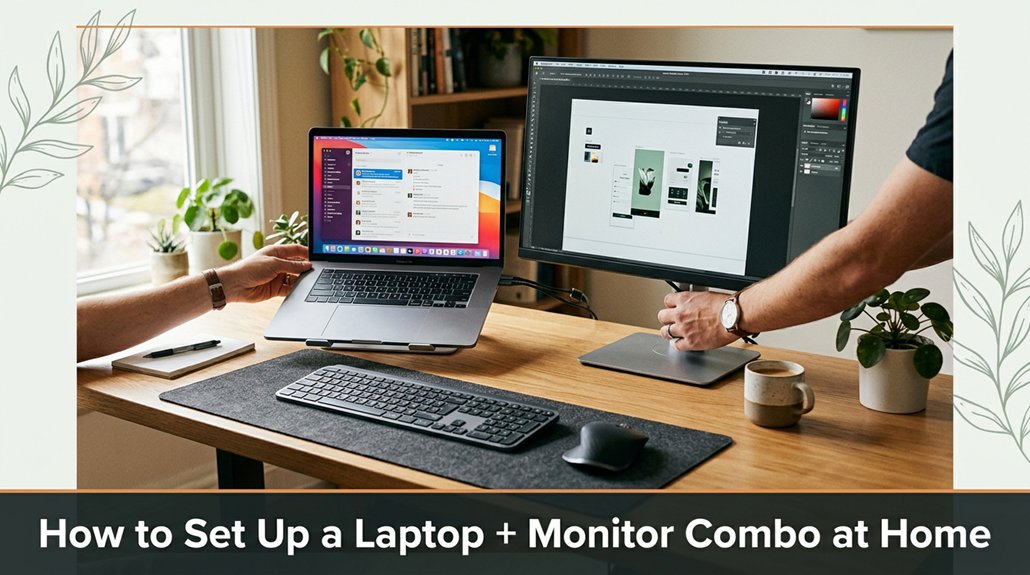
The first thing you want to do when arranging your desk is clear the clutter, because nothing kills productivity like a mountain of stray chargers and half-eaten snacks.
Clear clutter first organized space boosts productivity and keeps distractions at bay.
Find a clean, flat surface to work on. All right, place your monitor and laptop at eye level use a stand if needed that’s how you avoid neck cramps after a long day.
Raise the top of your monitor until it’s at or just below your eye level, which helps prevent neck strain; for most users, this is approximately 20 to 30 inches from your face.
Keep your keyboard and mouse within easy reach. If you’re stretching to reach, you’ll regret it.
Position your keyboard and mouse so that your elbows are at a 90-degree angle, close to your body, to reduce strain and improve efficiency.
Look, it’s about efficiency, not aesthetics, though a tidy desk helps your brain breathe.
Leave room for essentials like a notepad or a coffee cup because misplacing your coffee can disrupt your workflow and decrease productivity.
Ensure your notepad is within arm’s reach, ideally on your dominant side, and keep your coffee cup on a stable surface to avoid accidental spills.
Additionally, using an ergonomically designed setup can help prevent wrist and neck pain during long work sessions.

Plugging in your laptop and monitor might seem straightforward, but don’t rush just yet. First, connect the cables HDMI, DisplayPort, or VGA whichever fits your gear.
Because the ports may not be labeled correctly, double-check the port types to ensure proper connection; I’ve been there.
Next, turn everything on. You’ll probably see your laptop screen plus an extra display. If not, open your display settings by right-clicking on the desktop and selecting “Display Settings” (Windows) or “System Preferences” then “Displays” (Mac).
Here’s the thing: calibration is key. Adjust brightness and contrast to match your environment.
Because proper brightness reduces eye strain, set your monitor brightness between 120 and 150 cd/m², depending on ambient lighting.
Take a moment to tweak the color calibration. Most monitors, like Dell UltraSharp or ASUS ProArt series, have built-in controls, but you can also calibrate via software like Windows Color Calibration or CalMAN.
When calibrating, aim for the colors to appear natural and accurate; avoid overly saturated or dull tones. This ensures your images and videos look right, not pixelated or washed out.
Measurement Fact:
– Recommended monitor brightness: 120–150 cd/m², depending on ambient light conditions.
Additionally, ensuring your display’s monitor height is properly adjusted helps prevent neck strain during long work sessions.
Finally, position your monitor at eye level, raising or lowering it until the top of the screen is at or just below your eye level.
Its distance from your face should be approximately 20 to 30 inches to minimize neck and eye strain.
Done? Good. You’re now ready to get productive with a well-calibrated and ergonomically set up workspace.
Setting up dual monitors can seem like a straightforward upgrade, but trust me, it’s where things get interesting and a little tricky. First, place your monitors where they’re comfortable eyeball level, not staring down your nose or craning your neck. It’s tempting to slap them on the edges of your desk, but balance does matter.
Position your monitors at eye level for comfort and better ergonomics, avoiding awkward neck strain.
All right, connect each monitor to your laptop or docking station, but don’t forget to check if your ports support dual outputs some laptops just aren’t that generous.
Now, you might think they should just “detect” each other automatically. Spoiler: you’ll probably need to tweak display settings afterward. And that’s where the fun begins alignment, resolution, and avoiding the disorienting “vertical-to-horizontal” confusion.
Step 1: Connect the first monitor to your laptop or docking station because this establishes a primary display.
Step 2: Connect the second monitor to your laptop or docking station because this enables dual display functionality.
Step 3: Ensure your laptop or docking station supports dual outputs by checking the specifications or available ports.
Step 4: Turn on both monitors and your laptop.
Step 5: If the monitors aren’t detected automatically, open your display settings to identify and configure each screen.
Step 6: Adjust each monitor’s position on your desk. Lower the monitor until the top of the screen is at or just below your eye level, measured approximately 20 to 30 inches from your face because looking slightly down reduces neck strain and improves ergonomics.
Step 7: Align the monitors so their edges are flush or staggered slightly, ensuring a seamless visual flow across screens without distracting gaps.
Step 8: Set the resolution of each monitor to its native setting (e.g., 2560×1440 pixels for QHD monitors) because native resolution produces the sharpest image, avoiding blurriness or distortion.
Step 9: Adjust the display orientation and scaling options to match your workflow. For example, set the primary monitor to landscape orientation and the secondary to either landscape or portrait as needed.
Step 10: Remember to check your ergonomic setup regularly to prevent discomfort during extended use, ensuring your workspace remains comfortable and healthy.
Common Mistakes to Avoid:

When you start adjusting your display settings, don’t assume everything will line up perfectly right away trust me, it rarely does. You’ll tweak the brightness, contrast, maybe the resolution, and wonder why it still doesn’t look right.
All right, set your monitor’s refresh rate to match the recommended setting because your eyes will thank you.
Now, adjust the font size and scaling settings so text is clearly readable and not overly large because default settings often don’t accommodate individual vision needs.
Note: When positioning your monitor, raise it until the top of the screen is at or just below your eye level. For ergonomic comfort, the monitor should be approximately 20 to 30 inches from your face, with the top of the screen at or just below eye level.
Color calibration: Use built-in tools or a hardware colorimeter, like the X-Rite i1Display series, to ensure reds and blues appear accurate.
Lighting tip: Perform calibration in your typical ambient lighting environment to avoid color perception errors caused by glare or insufficient light.
Vague instruction correction: Instead of “adjust to a comfortable height,” measure your eye level. The top of your monitor should be aligned with your eye level, which is typically about 57-63 cm (22-25 inches) from the floor for an average adult.
Clarity check: After adjustments, zoom in and out to verify readability from your usual viewing distance about 20 to 30 inches because this ensures text remains clear during regular use.
Common mistake example: Avoid having your monitor at a tilted upward or downward angle, which can cause neck discomfort and distorted viewing. Position your monitor directly in front of you on a stable surface at the correct height to prevent strain.
Additionally, considering ergonomic desk setup principles can help prevent strain and improve overall comfort during prolonged screen time.
All right, now that your display is finally looking good and you’re comfortable at your desk, it’s time to tackle the spaghetti mess behind your setup. That tangle of cables will make your workspace look cluttered and make troubleshooting a nightmare.
First, gather all your cords and identify what’s what label if needed. This helps prevent confusion later and makes troubleshooting easier.
Use cable ties or Velcro straps, such as Velcro One Wrap or ZebraTies, to bundle wires together because it keeps cords organized and prevents tangling.
Run cords through cable sleeves like the Joto Cable Sleeve or under desk grommets, such as the ECHOGEAR Grommet Kit, to hide them. This reduces visual clutter and minimizes the risk of damage.
For multiple devices, create designated zones to keep cables organized. Refer to the following table for best practices:
| Cable Type | Best Practice | Tips |
|---|---|---|
| Power cords | Bundle and hide | Avoid tangling with data cables because tangled cords can cause damage or disconnection. |
| HDMI/Display | Use clips | Keep connections accessible for easy plugging and unplugging. |
| USB devices | Shorten or extend using cable reels or right-angle adapters | Prevent tugging and disconnection, because excessive tension on cables can damage ports. |
Remember:
– Position the monitor so that the top of the screen is at or just below eye level, which is approximately 20 to 30 inches from your face, to promote ergonomic comfort and reduce neck strain.
Common mistakes to avoid:
Less mess, fewer headaches trust me.
If you’re not careful, your workspace can turn into an ergonomic nightmare faster than you can say “wrong chair height.” But here’s the scoop: creating a long-term comfortable setup isn’t about flipping a switch or tossing everything around until it vaguely feels right.
A comfortable workspace requires thoughtful adjustments, not quick fixes or guesswork.
All right, here’s what you need to do:
Vague or ambiguous instructions to avoid:
Common mistakes and corrections:
Troubleshooting connection and display issues can feel like trying to solve a riddle, especially when everything appears to be wired correctly, but nothing shows up on the screen. You’ve checked the cables, fiddled with the power button, and still see no display.
First, ensure your monitor’s input source is correct usually accessible through the monitor’s on-screen menu. Sometimes, the monitor switches itself to the wrong port, so verify it’s set to HDMI, DisplayPort, or whichever connection you’re using.
Next, double-check your cables because a loose HDMI or DisplayPort cable is often the culprit. A secure connection can make all the difference because a loose cable can prevent the signal from reaching the display.
Then, check your laptop’s display output settings. On Windows, press Windows + P to open the projection menu. Select “Extend” or “Duplicate” because these modes enable your screen to display the output from your primary device.
If the display still doesn’t appear, update your graphics driver. Driver issues are common causes because outdated or corrupted drivers can prevent displays from functioning correctly.
Important technical note:
Display output settings should be configured to match your desired setup. For example, selecting “Duplicate” displays the same image on both screens, while “Extend” allows you to use multiple monitors as one larger workspace.
Maintaining your laptop and monitor so they keep performing like champs is pretty straightforward if you know what to do, that is.
1. Keep them clean. Use a microfiber cloth because screens attract dust, fingerprints, and sneezes, which can slow down performance.
2. Update the drivers and firmware. These updates fix bugs and improve stability trust me, skipping them is like neglecting oil changes in your car.
3. Avoid overheating. Make sure vents aren’t clogged because dust buildup can block airflow, and use a cooling pad if necessary to help dissipate heat.
Overheating shortens lifespan and causes crashes.
4. Power down properly. Don’t just close the lid and walk away. Shut down correctly, especially if you’re not going to use them for a few days, because improper shutdowns can cause data corruption and hardware issues.
Specific Measurements and Guidelines:
– Position your monitor so that the top of the screen is at or just below eye level roughly 20 to 30 inches from your face to reduce neck strain and improve ergonomic comfort.
All right, that’s it. Follow these steps, and your gear will thank you.
You optimize Wi-Fi for multiple devices by placing your router central and off the floor obvious, but often overlooked when cluttered behind furniture.
Then, verify you’re on the latest firmware; it’s like giving your network some steroids.
Use a dual-band router 2.4GHz for distance, 5GHz for speed.
Limit bandwidth-heavy activities during peak hours, and consider a mesh system if one device doesn’t cut it.
Easy to fix, hard to ignore once you hit dead zones.
Yes, you absolutely can use a TV as a monitor for your laptop. Just make sure your laptop has the right ports HDMI, DisplayPort, or USB-C and your TV supports them.
All right, plug it in, select the correct input on your TV, and then go to your display settings on the laptop. Usually, you’ll need to tweak resolution and scaling, but it’s pretty straightforward once you’re set up.
Safety first, friend. Always unplug electronics before adjusting or connecting.
Be mindful of trip hazards cords can turn into trampoline traps when you’re rushing. Don’t overload outlets; spread the power it’s like spreading the chill.
Keep liquids away nobody needs a splashy surprise.
Use the right tools if a screw needs tightening, don’t force it or you’ll strip a slot.
And finally, respect static electricity touch a metal before fiddling with sensitive ports.
You prevent glare by positioning your monitor perpendicular to windows or bright lights.
All right, adjust the screen tilt and height so you’re not facing reflections directly. Use curtains or blinds if sunlight’s relentless.
Now, if glare still sneaks in, consider an anti-glare filter those are magic.
Be mindful of light sources behind you; shining directly into your eyes only makes your screen worse. Trust me, glare laughs in the face of good lighting.
Is it better to use a wireless or wired keyboard and mouse? Honestly, it depends on your setup wireless sounds tidy but can lag or drop out, and wired offers instant response but adds clutter.
You’ll mostly prefer wired if speed matters (like gaming or precision work), and wireless if you want a cleaner look or mobility.
Just remember, no matter what, don’t forget to check compatibility and battery life lost productivity isn’t fun.
Alright, so now you’re basically a home-office ninja. Just remember, no setup is perfect out of the gate trust me, I’ve frayed a few cables and misaligned a few screens myself. But with a little patience and a few adjustments, you’ll be sitting cozy at your desk, feeling like a productivity pro. Just keep tweaking, keep organizing, and enjoy that dual-monitor magic you’ve earned it. Now go conquer your workspace like the tech whiz you are.


