Physical Address
304 North Cardinal St.
Dorchester Center, MA 02124
Physical Address
304 North Cardinal St.
Dorchester Center, MA 02124

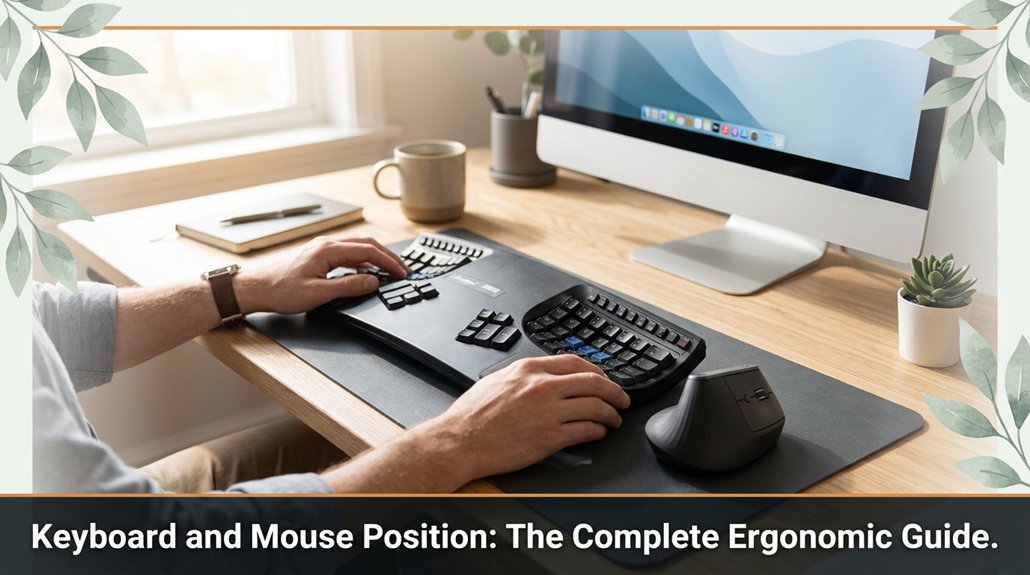
All right, here’s the deal: you want your keyboard and mouse in the right spot so you don’t hate your life after an hour. Keep your elbows at a comfy 90 degrees and your keyboard at elbow height no more shrugging or cranking your neck.
The mouse should be close enough so you’re not stretching, like 16 to 24 inches from your body. And remember, wrists stay straight no typing with them bent like a banana. Get this setup right, and you’ll avoid nightmares of pain. Stick around; the rest just makes sense.
This article contains affiliate links. If you purchase through them, I may earn a small commission at no extra cost to you. I only recommend products I genuinely believe in.
If you’ve ever spent hours typing away only to end up with a sore neck or aching wrists, you already understand why ergonomics matter. The keyboard and mouse position ergonomic setup isn’t just about comfort; it’s about preventing pain and lingering injuries. Your keyboard should be close enough so your elbows remain relaxed because reaching too far causes unnecessary strain.
Ergonomic setup prevents soreness and long-term injuries by keeping your keyboard close and elbows relaxed.
Your mouse should fall naturally under your hand, avoiding overextension or twisting because improper positioning increases wrist and shoulder stress. Keep everything within easy reach to prevent straining your shoulders or wrists.
Don’t assume you can just toss your keyboard and mouse anywhere. Proper placement keeps your wrists straight and your posture aligned.
Key measurements and guidelines:
Important steps for ergonomic setup:
Common mistakes and how to correct them:
Proper ergonomic setup may involve some trial and error but following these precise guidelines helps prevent discomfort and long-term injury.

Ever wonder how to find the perfect height and tilt for your keyboard without ending up with sore wrists or a cramped posture? I’m sure you’ve been 45 minutes into adjusting, only to realize the manual said “easy setup,” and you’re now elbow-deep in tangled cords.
Here’s the trick: your keyboard should be roughly at elbow height when you sit comfortably because this positioning minimizes strain on your shoulders and wrists.
Measurement tip:
– Your elbow height is measured from the floor to the bend of your elbow while sitting with your shoulders relaxed and arms resting naturally.
Your wrists should float above or rest softly on the desk no harsh bend because this prevents carpal tunnel stress and muscle fatigue.
Set your keyboard so it’s flat or slightly tilted down because steep angles can cause awkward wrist bends.
Adjustment Steps:
1. Raise or lower your keyboard so it’s approximately at your elbow height, because this helps keep your forearms parallel to the ground, reducing strain.
2. Adjust the tilt of your keyboard to be flat or slightly tilted downward, because this position promotes a natural wrist alignment and prevents upward bending.
3. Remember, choosing between a flat or tenting keyboard setup can significantly impact wrist comfort, because tented keyboards elevate the center, reducing wrist extension.
Now, test your setup: type a few words, and if your wrists twinge or you hunch forward, then:
4. Tweak the height or tilt slightly, because small adjustments can improve comfort and ergonomics.
Additional ergonomic facts:
Common mistakes and corrections:
– Mistake: Leaving the keyboard too high, causing your shoulders to elevate and your wrists to bend upwards, leading to discomfort.
Solution: Lower the keyboard so your elbows are at about a 90-degree angle and your wrists are in a neutral position.
– Mistake: Tilting the keyboard steeply downward, which causes your wrists to bend upward excessively.
Solution: Set the tilt to flat or slightly downward no more than 10 degrees to keep wrists straight.

When it comes to proper mouse placement, the first step is to position the mouse close enough so that you can easily reach it without stretching your arm or hunching your shoulder, because this prevents strain and discomfort. Keep the mouse within a comfortable arm’s reach, ideally directly under your hand, to minimize unnecessary muscle tension.
Quick reference:
| Reach Distance | Ideal Position |
|---|---|
| Close enough | Slight bend in your elbow, wrist in a neutral position |
| Too far | Shoulder hunched, arm extended, wrist twisted awkwardly |
Important measurement:
The mouse should be within a distance where your elbow maintains a slight bend (approximately 10 to 20 degrees), with your forearm resting comfortably on your desk or armrest.
Step 1: Place your mouse so it is within one arm’s length. This distance is typically 16 to 24 inches from your body, depending on your arm length.
Step 2: Ensure the mouse is positioned directly under your hand. This reduces the need to reach or stretch sideways, which can cause shoulder and wrist strain.
Focusing on proper ergonomic positioning can further reduce the risk of repetitive strain injuries over time. Keep your workspace ergonomic, and always position your mouse to promote natural arm and wrist alignment.

Most of us have been there: trying to keep our wrists feeling good while brain-dead tired after a long work session, so here’s the deal. Your goal is to maintain proper wrist alignment and avoid strain during extended typing sessions.

Adjusting your workspace for ergonomic comfort isn’t about throwing together the first desk you see and hoping for the best; it’s about fine-tuning every component so you don’t end up feeling like you’ve wrestled a bear after a marathon work session.
All right, start with your chair. It should support your lower back because proper lumbar support reduces strain on your spine. The chair height should allow your feet to rest flat on the floor because dangling toes can cause circulation issues. Adjust the seat height so your knees are approximately at a 90-degree angle.
Next, position your monitor so the top of the screen is roughly at eye level because looking slightly down reduces neck strain. The monitor should be approximately 20 to 30 inches from your face, measured from your eyes to the screen’s surface, because this distance helps prevent eye fatigue and maintains optimal viewing comfort.
Maintaining the correct monitor distance from your eyes is essential for avoiding unnecessary eye strain and ensuring comfortable viewing during long periods of work.
Highlighted Facts:
Avoid these common mistakes:
Remember, it’s tempting to just slap everything together and hope it works; trust me, I’ve been there.
Take your time, keep adjusting, and remember ergonomic comfort isn’t a myth.
You’ve probably held a keyboard tray or lumbar support pillow in one hand, thinking, “Will this actually make a difference?” The truth is, these accessories can seriously improve your setup if you pick the right ones. Here’s a quick rundown.
| Accessory | Why It Helps |
|---|---|
| Keyboard Tray | Keeps your keyboard at elbow height, reducing shoulder strain because your elbows are positioned at around a 90-degree angle. |
| Wrist Supports | Prevents unnecessary wrist fatigue and carpal tunnel because they provide cushioning and proper alignment during typing. |
| Monitor Stand | Lifts your screen to eye level, saving your neck from drooping because looking slightly downward reduces cervical strain. |
| Footrest | Keeps your feet flat on the ground and improves circulation because your feet should be positioned at a 90-degree angle at the knees. |
Specific measurements and guidelines:
Matching accessories to your body and workspace is key. For example, if your monitor is too low, you may need a taller monitor stand; if your feet don’t rest flat on the ground when seated, an adjustable footrest will help. These simple add-ons, used correctly, can make a noticeable difference over time by reducing strain and promoting better posture.
Common mistakes include:
Let’s talk about a mistake I see all the time: wiring your keyboard and mouse so you’re hunching over like Quasimodo after a long day. You’re probably reaching forward or resting your wrists in awkward angles because the desk or chair isn’t set up correctly.
First, adjust your keyboard and mouse height so that your elbows are bent at exactly 90 degrees because this position reduces strain on your shoulders and forearms. Don’t lower your keyboard and mouse too much or place them too high; maintaining this elbow angle allows for a natural arm position.
Next, position your keyboard and mouse close enough to your body so you don’t have to lean forward or stretch out your arms. An ideal distance is about 10–12 inches from the front edge of your desk to your keyboard and mouse because this minimizes reaching and maintains a neutral wrist posture.
Additionally, your wrists should be kept straight at all times. Avoid bending or resting them on sharp desk edges or mouse pads with a hard surface, as this can cause nerve compression or repetitive strain injuries.
Key measurements:
Chances are, you’ll find yourself stuck in long work sessions where discomfort gradually sneaks in. I’m sure you’ve been 45 minutes in, thinking, “Why does my neck feel like I just did a marathon?”
Here’s the secret take short breaks because they help prevent strain and fatigue. Every 30 minutes, stand up, stretch your arms overhead, and shake out your limbs to promote circulation and reduce muscle tension.
Taking regular short breaks every 30 minutes helps prevent strain and keeps you comfortable.
Adjust your chair height so your feet are flat on the floor and your knees are at a 90-degree angle. Because this position minimizes pressure on your lower back and ensures proper leg circulation.
Set your desk height or use an ergonomic chair with adjustable features to keep your elbows at a 90-degree angle when typing. Keep your forearms parallel to the floor because this reduces wrist strain and prevents repetitive stress injuries.
Position your monitor so that the top of the screen is at or just below your eye level, approximately 20 to 30 inches from your face. This setup minimizes neck strain because looking slightly downward is less fatiguing on the cervical spine than looking straight ahead or upward.
Ensure your keyboard and mouse are within easy reach, so you don’t have to stretch or twist unnaturally, which could cause shoulder or wrist pain.
Common mistakes and solutions:
Recognizing signs of strain is like having a built-in warning system that’s often ignored until it’s too late. You might notice your shoulders tensing, your wrists throbbing, or a dull ache creeping into your neck. All right, pay attention those are your signals.
Now, don’t keep going just because you’re in the zone. Reposition your keyboard or mouse immediately because your body’s trying to tell you something, and ignoring it only makes the problem worse.
Step 1: Check your wrist position. Keep your wrists straight and in line with your forearms because wrist extension or flexion can lead to strain.
Step 2: Adjust your keyboard and mouse height. Position your keyboard so that your elbows are bent at approximately 90 degrees, with your forearms parallel to the floor because this minimizes strain on your wrists and shoulders.
Step 3: Ensure your monitor is at eye level. Raise your monitor until the top of the screen is at or just below your eye level because looking slightly down reduces cervical strain.
Step 4: Position your monitor about 20 to 30 inches from your face because this distance helps maintain a comfortable viewing angle and reduces eye fatigue.
Step 5: Take regular breaks. Every 20 minutes, stand up, stretch, or walk around for at least 30 seconds because continuous sitting and typing can lead to muscular fatigue and discomfort.
Common mistake: Sitting too close to your monitor. This causes you to lean forward or strain your neck because the screen is too near your eyes. Instead, position your monitor 20 to 30 inches away from your face to maintain a comfortable distance without leaning forward.
Note: Incorporate these ergonomic practices into your workspace to prevent strain. Recognize warning signs early, and adjust your setup or take breaks proactively. Your body’s signals are essential guides to maintaining comfort and preventing injury.
Creating a personalized ergonomic setup isn’t about blindly following generic advice; it’s about customizing your workspace so it works with your body, not against it. You’ve probably realized by now that everyone’s height, reach, and workspace are different no one-size-fits-all guide cuts it.
First, adjust your chair so your feet are flat on the ground, and your knees are approximately at a 90-degree angle, because this position reduces pressure on your lower back and promotes circulation.
Next, set your monitor about 20 to 30 inches from your face, with the top of the screen at or just below your eye level, because looking slightly down minimizes neck strain.
Fact: The ideal monitor position places the top of the screen at or just below eye level, 20-30 inches from your face.
Lower the monitor until the top of the screen is at or just below your eye level, because looking slightly down is less fatiguing on the cervical spine than looking straight ahead or upward.
Position your keyboard so it’s close enough so your elbows stay relaxed, with approximately a 90-degree bend, because this prevents shoulder and forearm strain.
Fact: Your elbows should be bent at roughly 90 degrees when typing, with the keyboard about 4-6 inches from your body.
Ensure the keyboard is directly in front of you, and the mouse is within easy reach.
Adjust the monitor height, keyboard, and mouse repeatedly until your workspace feels natural and strain-free.
Common Mistake: Leaning forward or slouching over the desk because of an improperly positioned monitor or keyboard.
Why it happens: Incorrect setup causes you to stretch or crane your neck and shoulders.
Solution: Recheck and adjust chair height, monitor position, and keyboard placement so your body stays aligned and supported.
All these adjustments are worth the effort because a properly personalized ergonomic setup improves comfort, reduces fatigue, and prevents long-term musculoskeletal issues.
You should take a break every 30 to 60 minutes. I know, sounds like a lot, but trust me, your wrists and eyes will thank you.
Stand up, stretch, or walk around even if it’s just for a few minutes. The goal is to reset your posture and avoid those annoying aches.
Honestly, it’s like changing the oil; you don’t want to wait until it’s too late.
Yes, ergonomic setups can drastically cut your risk of carpal tunnel syndrome.
You’ll want your keyboard and mouse at a height where your wrists stay straight no awkward bends that make you feel like you’re holding a slice of overcooked pasta.
Keep your elbows close to your body, and take regular breaks.
All right, it’s not magic just smart placement and consistent habits, and you’ll save yourself from the fiery torment of nerve troubles.
You want the monitor about an arm’s length away roughly 20-30 inches. Too close and your eyes strain; too far and you hunch forward.
Look, the real trick is adjusting it so the top of the screen is at or just below eye level. Trust me, you’ll thank yourself when you’re not squinting or craning your neck after hours.
And yes, I’ve fought with this exact setup myself, so take my advice.
If you’re working on a small desk, focus on maximizing vertical space use monitor stands or wall mounts if you can.
All right, space is tight, but don’t forget to keep your keyboard close to your body no stretching or overreaching.
Look for compact, multi-functional gear and organize cables like a pro.
Honestly, keep essentials within arm’s reach, leave the clutter behind, and your setup will feel roomier even if it’s not.
When you adjust for different chair heights, you want your feet flat on the ground and knees at roughly a 90-degree angle.
Pulled out your chair and sat down? Perfect. Now, raise or lower the chair until your elbows sit comfortably at or just below desk level.
Obviously, your monitor’s eye level will change, so tweak that too.
Trust me, small adjustments make a massive difference.
Look, setting up your workspace right is like tuning a fine instrument sure, it takes some fiddling. But once you get it, you’ll zap through your day without cramping up or battling discomfort. Trust me, I’ve been there, holding a keyboard in one hand and silently cursing the desk for the tenth time. Do this right, and you’ll feel like you’re gliding on air no more stiff wrists or sore elbows. Just good, honest, ergonomic ease.