Physical Address
304 North Cardinal St.
Dorchester Center, MA 02124
Physical Address
304 North Cardinal St.
Dorchester Center, MA 02124

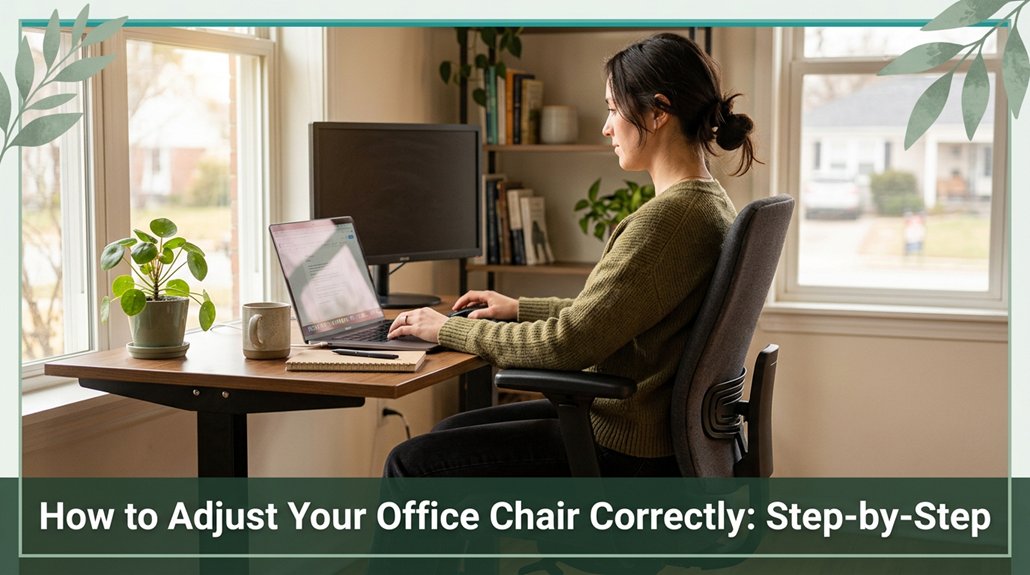
Feeling uncomfortable after hours at your desk? If your feet are dangling or your back is aching, you’re not alone and adjusting your office chair might be the fix. First, set your seat height so your feet rest flat on the floor, with your knees at a comfortable 90-degree angle no pinching thighs. Then, adjust the seat depth to leave a small gap behind your knees, supporting your thighs without pressure.
Next, fine-tune the lumbar support to align with your lower back’s natural curve, and set your armrests just below your elbows. Tilt, recline, and test until everything feels natural doing so helps prevent long hours from turning into pain or discomfort. Keep going, and you’ll discover more tips to keep your body comfortable and boost your productivity.
This article contains affiliate links. If you purchase through them, I may earn a small commission at no extra cost to you. I only recommend products I genuinely believe in.
Ever wondered if your chair is actually helping you sit comfortably or just secretly making things worse? Honestly, it’s common to underestimate how much your current setup might be off.
Think about your ears, shoulders, and hips according to OSHA ergonomic guidelines, they should be in a straight line when you relax. Are they aligned, or are your shoulders raised, hunched, or reaching for the desk?
Ensure your ears, shoulders, and hips are aligned for optimal comfort and posture.
Check if your hips are level with or slightly above your knees; if they’re significantly below, you might be slumping, which can contribute to lower back pain. Notice if you’re perched at the front of the seat rather than leaning back into the lumbar support, which is essential for maintaining proper spinal curvature.
Now, look at those controls are they easy to reach? If you’re unsure how to adjust your office chair, start by identifying what’s adjustable and whether those features function properly. Adjustability features are crucial because they allow you to personalize your chair setup for maximum comfort and support.
Many ergonomists recommend ensuring the seat height allows your feet to rest flat on the floor with knees at a 90-degree angle (which helps reduce pressure on the lower back). Checking your current setup against proper lumbar support positioning will help you make necessary adjustments to protect your lower back during long hours of sitting. Doing this simple audit will tell you exactly where to tweak things first, making your workspace healthier.

All right, let’s talk about setting that seat height so your feet are actually supporting you instead of just dangling in the air like a broken puppet. The trick is finding that sweet spot where your knees bend comfortably, roughly 90 degrees, and your feet stay flat and stable on the floor or footrest.
If your seat’s too high, your thighs will get pinched, and you might lose circulation or feel numb according to OSHA ergonomic guidelines, proper support prevents circulation issues. Too low, and your hips tilt, inviting poor posture and potential lumbar strain. To get it right, measure your sitting knee height, which considers the distance from the floor to the underside of your kneecap when seated.
Alternatively, sit with the seat just below your kneecaps for a natural, supported position. Remember, balance is everything for long-term comfort and spinal health. Ensuring a neutral sitting posture helps maintain proper spinal alignment and reduces fatigue.

Setting your seat depth just right is more essential than many people realize; it’s the secret to long-lasting comfort. If your seat is too deep, you’ll feel like you’re sitting on the edge of a cliff your lower back and thighs will fight for space, and your knees may get pinched, potentially leading to discomfort or circulation issues. According to OSHA ergonomic guidelines, an overly deep seat can compromise lumbar support and increase pressure on the sciatic nerve, raising the risk of lower back pain.
On the other hand, if the seat is too shallow, your thighs will hang off the edge, leaving your hips unsupported and your posture compromised. Proper seat depth supports the lumbar spine, distributes weight evenly across the thighs, and maintains healthy circulation. The goal is to achieve full contact between your buttocks, the backrest, and most of your thighs, with a small gap behind your knees about 1.5 to 2.5 inches, which ensures proper blood flow and reduces pressure on the popliteal artery.
Think of it like Goldilocks you want the seat depth to be just right. Measure your leg length, subtract a little such as a couple of fingers’ width and then smoothly slide the seat forward or backward until it fits.
Adjusting the seat depth correctly can also help maintain proper armrest height, which is crucial for supporting a neutral posture. Keep checking your comfort often because your body moves, and so should your chair. Maintaining proper seat depth can prevent issues like sciatic nerve compression, sacral discomfort, and aggravation of existing lower back conditions.

If you want your chair to feel like a partner, not an enemy, then properly positioning the backrest and lumbar support is essential. First, find your neutral lumbar curve by rocking your pelvis forward and backward, stopping at the mid-range position that’s your optimal position. Think of it as establishing a foundation for your spine; maintaining a neutral pelvis helps preserve the natural lordosis according to OSHA ergonomic guidelines, so you’re not slouching or over-arching.
Next, focus on the lumbar support: it should fill the hollow of your lower back without pushing you forward or collapsing your spine. Whether you prefer the classic “small of back” support or belt-line support, ensure it fits snugly and aligns with your natural lumbar curve. Many ergonomists recommend adjusting the support to match your lumbar lordosis, which helps prevent lower back strain or existing issues like sciatica.
Here’s a quick step-by-step guide:
| Step | Description | Tip |
|---|---|---|
| Find neutral pelvis | Rock your pelvis forward and backward to the midline | Use your hands on your hips for better control |
| Adjust lumbar height | Set the lumbar support to correspond with your lumbar lordosis | This helps avoid unsupported slumping, which can cause discomfort |
| Set support depth | Adjust so the support fills the curve without pressing too hard | Keep firmness comfortable to prevent pressure points |
| Check backrest contour | Ensure the backrest aligns with your spine’s natural shape | Move and adjust to make full contact along thoracic and lumbar regions |
| Final sit test | Sit upright and feel whether the support fully contacts your back | Stay relaxed and comfortable to verify proper support |
Following these steps ensures your chair provides dynamic, natural spinal alignment reducing fatigue and supporting your lower back health during prolonged sitting. Properly adjusting the support features of your chair is crucial to maintain comfort and prevent hip and back pain over time.

Sometimes, it’s the tiniest adjustment that makes the biggest difference, like fiddling with your armrests, for example. You want them just below your relaxed elbow height, about 1 to 2 centimeters lower this position helps ensure your upper arms hang naturally and reduces shoulder strain.
Properly adjusted armrest height can also prevent your wrists from bending awkwardly or experiencing unnatural pressure. Here’s the thing: if your armrests are too high, your shoulders shrug in protest, and your neck tightens up, according to OSHA ergonomic guidelines.
Too low, and your shoulders slump forward, putting extra load on your neck muscles, which can contribute to tension and discomfort. To picture it:
1. Keep your elbows bent at 90 to 100 degrees (which means your forearms are roughly parallel to the floor when seated comfortably), and adjust the armrest height accordingly.
2. Make sure your forearms stay parallel to the floor to maintain proper shoulder alignment and prevent unnecessary strain.
3. Keep both armrests at the same height to avoid leaning or twisting, which can lead to musculoskeletal issues.
4. Adjust the pivot or width so your upper arms stay close to your torso, reducing shoulder load and preventing unnecessary muscle tension.
All right, let’s talk about fine-tuning your chair’s tilt, recline, and mechanism settings because honestly, this might be the step that makes your whole sitting experience a lot more comfortable. You’ll want to recognize the common mechanisms: swivel or center tilt, synchro tilt, knee-tilt, and forward tilt. According to OSHA ergonomic guidelines, adjusting these features properly can reduce musculoskeletal strain and promote better spinal health.
Adjust the tilt tension using the large knob beneath your seat. A lighter tension is suitable for individuals with lighter body weights, while a tighter tension provides more support for heavier users. Lock it in a slight recline, around 100 to 120 degrees (which means leaning back slightly, not sitting bolt upright), to reduce pressure on your lumbar and sacral regions.
Maintaining this angle supports the natural curve of the lumbar spine and can help prevent lower back pain. The tilt tension also helps in distributing your weight evenly across the seat, enhancing comfort over longer periods. It’s important to understand ergonomic principles when setting up your chair to achieve optimal comfort and support.
Don’t forget to release and move the tilt periodically, as research on spinal biomechanics suggests that changing your seated position improves circulation and reduces muscle fatigue.
Here’s a quick glance at different mechanisms and their benefits:
| Mechanism Type | Benefit | Adjustment Tip |
|---|---|---|
| Center tilt | Standard functionality | Tighten or loosen for resistance, per Mayo Clinic recommendations |
| Synchro tilt | Supports back and pelvis | Keep the back near level with the seat for optimal lumbar support |
| Knee-tilt | Allows deep recline | Use for relaxed lounging or prolonged seated periods |
| Forward tilt | Facilitates leaning in | Engage when performing tasks that require forward reaching or typing |
Test different positions until you find the most comfortable setup. Your spine, especially your lumbar lordosis and thoracic kyphosis, will thank you.
Get your chair and desk to play nicely together, and you’ll notice a significant difference in how your body feels after a day of work. Imagine your forearms resting parallel or just slightly inclined downward about 0–20°. According to OSHA ergonomic guidelines, this position helps reduce strain on the wrist and forearm muscles. To achieve this, your chair height should support a 90–110° elbow bend when using your keyboard and mouse, facilitating a comfortable, neutral arm position.
Ensure your chair height allows a 90–110° elbow bend for a neutral, pain-free arm position while working.
Here’s what you want to picture:
All these adjustments are about creating harmony so your body can work without constantly fighting itself. Prioritizing ergonomic alignment helps prevent musculoskeletal disorders and promotes sustained comfort during long working hours.
Here’s the thing: sitting in the same position for hours on end is like telling your muscles, “Stay still, stay still,” and hoping they’re okay with that. You’ve probably felt that overwhelming stiffness in your lumbar, cervical, or thoracic regions by the time the clock hits hour three like they’re warning you, “Hey, maybe move a bit!” According to OSHA ergonomic guidelines, blood flow slows down, and muscles get tight from staying static, which can lead to discomfort or even musculoskeletal disorders.
The solution isn’t just adjusting your chair but also incorporating micro-movements. Every 45–60 minutes (which helps prevent muscle fatigue and maintains circulation), take a quick break stretch, walk, shift your weight to get circulation going again.
Moving frequently can prevent soreness, reduce the risk of developing conditions like sciatica or thoracic kyphosis, and keep your mind sharp, too. Regular movement breaks support your overall health and help sustain energy levels throughout the workday.
Research on spinal biomechanics suggests that these tiny pauses help maintain muscle flexibility and joint health. Incorporating movement intervention strategies into your daily routine can further enhance these benefits. Trust me, your body and productivity will thank you.
Once you’ve gone through all the adjustments and even tested the fancy recline and tilt functions, it’s time to see if everything truly supports long-term comfort. According to ergonomic best practices, this step is crucial for preventing musculoskeletal strain.
Ensure that your chair’s support features, like lumbar and armrest adjustments, are secure and functioning properly, as poor support can lead to discomfort over time. Start by running a whole-body posture check. Ensure your feet are flat on the ground, your knees are near a 90-degree angle (which helps maintain proper blood flow), your hips are pushed back into the seat, and your head is balanced directly over your shoulders. Think of it as giving your body a quick high-five, aligning the cervical, thoracic, and lumbar spine.
Next, verify the support points. Confirm the lumbar support aligns with the natural curve of your lower back to reduce the risk of lumbar disc strain, as research on spinal biomechanics suggests. Relax your arms on the armrests, ensuring they’re supported without causing shoulder elevation or tension. Additionally, check that your seat cushion is firm enough to hold your sit bones without sinking, providing stable pelvic support.
Test your recline, tilt, and tension adjustments. Move these features *freely and feel whether your body remains supported and comfortable during movement*. Be cautious your chair should support natural movements without feeling like it’s turning into a roller coaster, which can cause unnecessary strain on spinal structures.
Ensuring your adjustments are secure is also essential to prevent sudden shifts that could disrupt your posture. Finally, do a quick 10 to 20-minute trial during your typical tasks. Pay attention to how your body feels during extended periods of work, and don’t hesitate to make further adjustments if needed.
Many ergonomists recommend this real-world testing to fine-tune your setup and prevent long-term discomfort.
You should readjust your office chair whenever you notice discomfort or during those natural breaks every 20-30 minutes.
Think of it as fine-tuning your body’s comfort settings lumbar support, armrests, tilt.
Every few months, do a quick review, especially if your body’s changing, like after a workout or a few extra birthday slices.
Basically, stay tuned to your body’s signals it’s telling you what needs tweaking!
Absolutely, your body size affects your chair setup.
I’ve learned that if you’re tall, like over 6 feet, you need a higher seat and support to keep your feet flat and spine aligned otherwise, your back fights back.
For petite folks, a lower seat and footrest make all the difference.
Think of your chair like a tailored suit it should fit *your* body perfectly, or it just won’t work.
You’re better off leaning back slightly during long work hours, around 100–110°, rather than sitting completely upright.
It’s like giving your spine a little break the recline reduces disc pressure and muscle strain, freeing you from that constant fatigue.
But don’t go too far extreme recline shifts load to your neck and shoulders.
Find that comfy middle ground so your back feels supported without feeling like you’re melting into a lounge chair.
Your lumbar support is right if it hugs your lower back comfortably, like a warm hug from an old friend.
It should sit around your waist, not your ribs or pelvis, and fill your lower back’s curve without pressing too hard or leaving gaps.
If you notice your back feels filled-in and stays snug during small moves, you’ve nailed it.
Otherwise, tweak it up or down until your spine feels supported, not squished.
You’ll know your setup’s causing discomfort if you notice persistent aching in your back, shoulder tension when reaching for things, or numbness in your legs.
Maybe your neck feels strained after long periods, or you’re constantly shifting to find a comfy position.
These hints show your chair isn’t supporting your body well causing strain and fatigue. Trust me, making small adjustments can make a world of difference and keep you feeling good.
All right, so once you’ve tweaked your chair, isn’t it kind of a relief knowing you’ve set yourself up to actually stay comfortable? Of course, no chair can do all the work your body needs to move and take breaks too. Think of it like tuning a guitar; if one string’s off, everything sounds weird. Keep checking in, make those tiny adjustments when needed, and you’ll feel the difference less ache, more focus, and maybe even a little longer life for your posture.