Physical Address
304 North Cardinal St.
Dorchester Center, MA 02124
Physical Address
304 North Cardinal St.
Dorchester Center, MA 02124

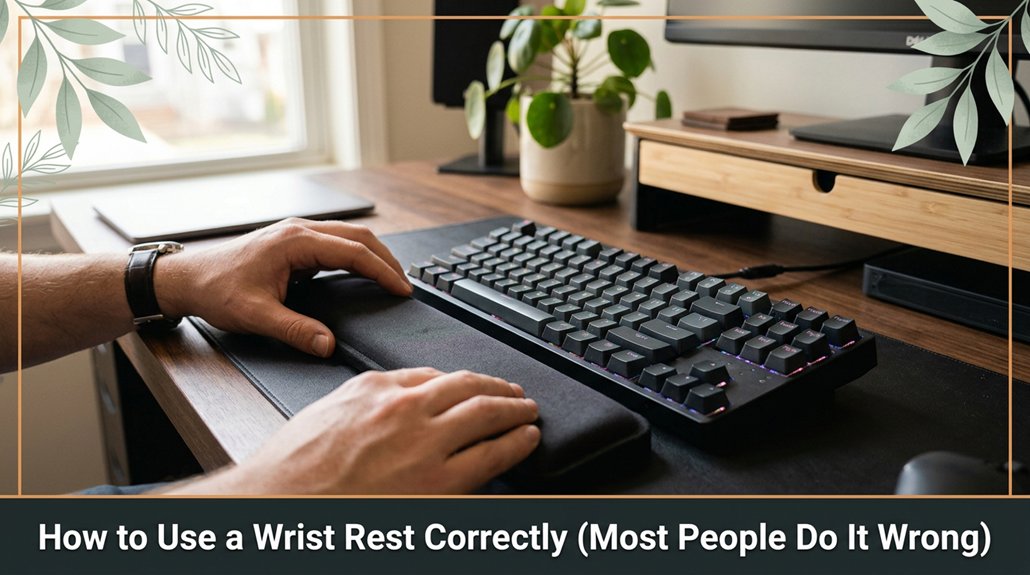
Most people get their wrist rest wrong because they think you should rest your palms flat on it that’s actually a mistake. Instead, keep your wrists floating just above the rest, lightly supported. This way, your wrists stay neutral and relaxed, not bent or pressed down.
The edge of the rest should be at or just below your wrist joint, and avoid tucking or tilting your wrists. Follow this simple rule, and you’ll significantly reduce strain trust me, it really makes a difference. Keep practicing, and you’ll master the right way to use your wrist rest.
This article contains affiliate links. If you purchase through them, I may earn a small commission at no extra cost to you. I only recommend products I genuinely believe in.
At first glance, it might seem like a wrist rest is just a little soft cushion sitting at the edge of your desk, because it appears harmless. But how to use a wrist rest properly is actually essential for your comfort and safety.
You don’t want your wrist resting on the pad all day, because that can cause strain and contribute to repetitive strain injuries (RSI). Instead, your wrist should hover just above the cushion, with your hand resting lightly on the support not sinking into it. Think of it as providing gentle support, not as cradling or hugging your wrist.
Keep your wrist lightly hovering above the cushion to prevent strain and support proper alignment.
Many people make the mistake of tucking their wrists in like they’re hiding, which can lead to injury. For example, wrapping your wrist tightly around the cushion or pressing your wrist firmly against the pad increases pressure and strain. Instead, keep your wrist relaxed and aligned with your forearm to maintain a neutral position, reducing stress on tendons and nerves.
Remember, the key is maintaining a balance: your wrist should neither rest heavily on the pad nor be held too high in the air, which can cause awkward angles. Keep your wrist in a neutral, relaxed position where it’s supported gently, because proper wrist elevation minimizes tension.
Important:
Ensure your desk height allows your forearms to be parallel to the floor when typing.
Position your keyboard so that your elbows are at roughly 90 degrees, with your forearms parallel to the ground, because this reduces strain on your wrists and shoulders.
In summary:
Following these guidelines will help prevent discomfort and injury while working at your desk.
 1")
Ever wonder how to pick the perfect wrist rest without turning it into a buying fiasco? Look, you want one that matches your setup soft enough, but firm enough to support your wrist’s natural position.
First, measure your desk height and keyboard height because selecting the appropriate wrist rest depends on how well it aligns with your keyboard and workspace.
Next, if your keyboard is at a steep angle, choose a wrist rest with some elevation or padding because this ensures your wrists stay in a neutral position, reducing strain.
Then, select a size that fits comfortably under your wrists avoid large pads if your work area is tight because a well-fitting pad prevents unnecessary movement and discomfort.
Absolutely, material choice matters: gel, memory foam, or silicone all have pros and cons. Gel wrist rests conform well and stay cool, memory foam provides excellent support and molds to your wrist, while silicone offers durability and easy cleaning.
The goal is comfort and support, not sacrificing your wrist’s alignment for style because proper fit reduces strain.
Remember, a good fit reduces fatigue and risk of repetitive stress injuries.
Additionally, choosing a durable material can ensure your wrist rest maintains its supportive qualities over time, especially if you work long hours.
Key Measurement Fact: To minimize wrist extension, the top of your keyboard should be at or just below elbow height, and your wrists should be in a neutral position when typing, which is roughly a 0-15 degree extension.
Following these guidelines ensures your ergonomic setup supports your health during long work hours.
Positioning your wrist rest properly is essential because it directly impacts comfort and ergonomics. You want your wrist to be supported without slipping into a bend or strain. First, place the rest so your forearms are parallel to the ground when typing no dipping or lifting. This ensures neutral wrist alignment, reducing fatigue during long periods of computer use.
Keep the edge of the wrist rest touching your palm or just slightly below your wrist joint because this helps maintain a natural wrist posture. It should neither push up against your wrist nor sink in excessively; aim for gentle contact that supports without constricting. Adjust the rest so your hand naturally rests on it no “sliding” into position to avoid unnecessary tension.
Specific measurements and adjustments:
Additional tips for optimal positioning:
Proper alignment for workstation ergonomics:
One of the quickest ways to throw your wrists into unnecessary strain is by using your wrist rest improperly yes, even if you think you’re doing it right.
All right, first, don’t just plant your palms on the rest like you’re about to do a push-up, because this can cause your wrists to bend unnaturally, increasing strain over time.
Your wrist should be floating just above the rest, with your hand aligned straight from your forearm, because this position helps maintain a neutral wrist posture and reduces the risk of repetitive strain injuries.
Some folks aim to “rest” their entire palm bad news. Your palm shouldn’t be heavy; just your wrist should lightly touch the rest, because pressing your palm down can cause your wrist to bend into a C-shape, which can lead to tendinitis.
Look, you don’t want to turn your wrist into a C-shaped bend every time you type that’s how tendinitis sneaks in.
Keep your wrists straight and avoid tilting or angling them while resting, because maintaining a neutral wrist position minimizes strain and fatigue.
Additionally, understanding the correct keyboard height relative to the elbow can further prevent wrist strain by promoting better posture.
All right, here’s what you do: check if the height still lines up with your keyboard. If it feels weird, adjust it because proper height ensures your wrist remains neutral and reduces strain.
Check and adjust your wrist rest height regularly to maintain a neutral, strain-free wrist position.
Look at the angle if your wrist bulges awkwardly, tweak it flat or slightly inclined because an optimal angle maintains a natural wrist position that minimizes discomfort.
Remember, your setup isn’t static; subtle shifts matter. Here’s the thing: your desk, chair, and even your posture can change, so your wrist rest needs to keep up. Additionally, ergonomic tips recommend maintaining a neutral wrist posture to prevent shoulder and trapezius strain.
Don’t wait until discomfort turns into pain adjust its position regularly, like tightening loose screws after a few uses. Being proactive makes life easier by maintaining ergonomic alignment and comfort.
Key fact:
– Optimal wrist rest height: align the top of the wrist rest with the height of your keyboard keys for neutral wrist posture.
Even if you have a comfortable wrist rest, it won’t be effective unless it works well with the rest of your ergonomic setup.
First, position your monitor so that its top edge is at or just below your eye level, because looking slightly downward reduces strain on your cervical spine. Raise the monitor until the top of the screen is at this level.
Next, adjust your chair so that your feet are flat on the floor or on a footrest, with knees bent at roughly 90 degrees. This helps maintain proper lower body posture and supports your overall ergonomic alignment.
Place your keyboard approximately 1 to 2 inches away from the edge of your desk, ensuring it’s close enough to allow your elbows to stay near your sides at a 90 to 110-degree angle during typing because reaching too far can cause shoulder strain.
Position your wrist rest so that your wrists are slightly elevated above the desk surface, with the wrists hovering just above the resting surface neither too high nor too low, because incorrect height can cause tension or undue bending.
Your mouse and keyboard should be at the same height, with your wrists supported during use, not collapsed or bent.
Make sure your arm angles are natural; a good rule is to keep your elbows close to your body and bent at about 90 to 110 degrees.
Adjust your setup until everything feels balanced, creating ergonomic harmony across your workstation because an unbalanced setup can lead to discomfort or repetitive strain injuries.
Have you ever felt a sudden twinge or soreness in your wrists after a long typing session? That’s a good sign your wrist rest might be doing more harm than good.
First, check if your wrists are elevated or bent at odd angles, because this can cause strain and discomfort. If your hand barely touches the rest or hovers above the keyboard, it’s ineffective because it doesn’t support proper wrist alignment.
Next, feel for persistent numbness or tingling in your wrists or hands these are red flags indicating nerve compression or nerve irritation.
Also, observe if you experience increased fatigue or discomfort during your workday, which suggests your wrist rest may be contributing to poor ergonomics.
Additionally, verify if your wrist rest pushes your keyboard away from the monitor, forcing you to reach forward or hunch over. This misalignment can cause neck and shoulder strain.
Important measurement:
– Position your monitor so the top of the screen is at or just below your eye level, approximately 20 to 30 inches from your face.
Key points:
All right, don’t ignore these signs your wrists will thank you when you catch early trouble and prevent long-term injuries.
A wrist rest can indeed boost your productivity if you use it right. It keeps your wrists neutral, reducing strain, so you can type longer without fatigue or discomfort.
Comfort directly translates to fewer breaks and better focus. Just make sure it’s positioned properly your hands should hover comfortably above it, not rest heavily on it.
Trust me, when your wrists aren’t aching, your work gets done faster and more accurately.
Absolutely, a gel wrist rest typically trumps foam. You want that perfect blend of cushioning and support gel conforms to your wrist’s shape, providing relief during long sessions, while foam’s steady but less adaptable.
Think of gel as giving way just enough without losing support. You’d hate to sink too deep or feel like you’re resting on marshmallows.
You should replace your wrist rest about every year, tops. The thing is, over time, the foam compresses and the gel may tear, turning your comfy support into a weird, lumpy relic.
All right, you can sometimes stretch it longer if it still feels firm, but if it loses shape or starts smelling funky, just swap it out. Trust me avoiding the “discomfort surprise” is worth it.
Not all wrist rests are created equal, and your keyboard type matters.
You want a gel or foam rest that matches your keyboard’s size and shape. Mechanical keyboards? Look for a rest designed specifically for full-sized or tenkeyless models. Chiclet or membrane keyboards? A slim, low-profile rest works best.
All right, now you’re probably thinking, “But will this make me a keyboard ninja?”
Well, it definitely helps prevent strain and keeps you comfortable.
Yes, wrist rests can help prevent long-term wrist injuries if you use them right.
You need to give your wrists a gentle lift, not rest them heavily on the pad, which can compress nerves or cause strain. Keep your wrists straight and relaxed while typing.
Think of the wrist rest as a supportive guide, not a crutch, helping you maintain better alignment and reduce repetitive stress over time.
Look, setting up your wrist rest right isn’t just about comfort it’s about avoiding that nagging pain and potential injuries down the line. I get it, you’ve probably spent more time fiddling with it than you thought, but trust me, a proper setup is worth that 20-minute trial and error. Once you get it right, your wrists stay happy, and you’ll wonder why you ever ignored it. So, give it a solid setup and keep an eye on it over time.


