Physical Address
304 North Cardinal St.
Dorchester Center, MA 02124
Physical Address
304 North Cardinal St.
Dorchester Center, MA 02124

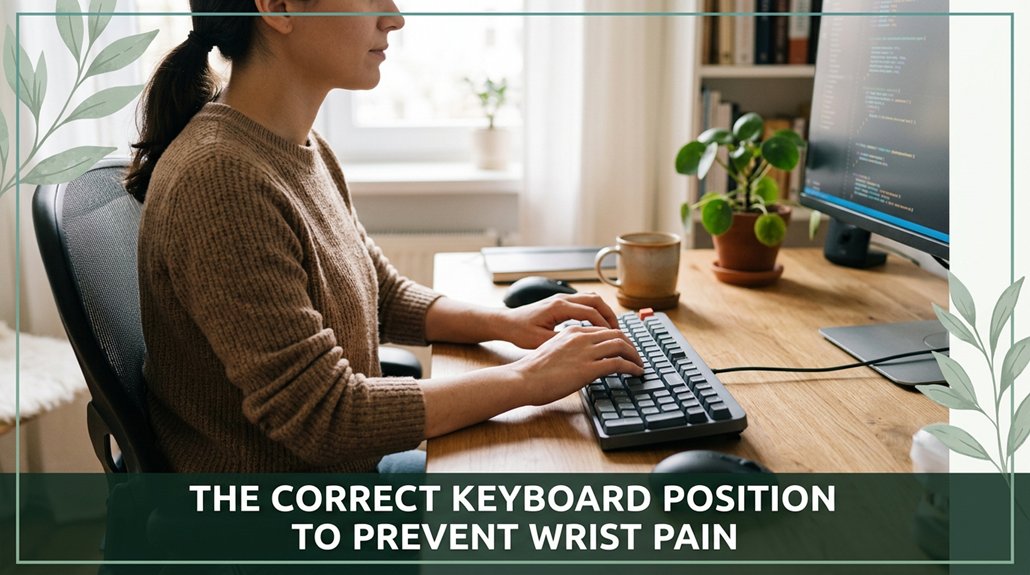
All right, here’s the deal: you want your wrists to stay happy, so keep your keyboard centered with the spacebar in line with your midline no twisty angles or reaching out. You should be able to keep your elbows at about 90 degrees and your wrists straight, not bent or resting on the desk. Adjust your chair height so your feet are flat, and your shoulders stay relaxed. Stick to these basics, and you’ll start feeling the difference. Keep going, and you’ll master all the little tweaks that really make a difference.
This article contains affiliate links. If you purchase through them, I may earn a small commission at no extra cost to you. I only recommend products I genuinely believe in.
If you’ve ever spent hours typing away and suddenly notice your wrists are stiff, sore, or tingling, you’re not imagining things your posture really does matter. That’s where correct keyboard position comes in.
When your wrists are in a neutral posture straight, like a chopstick you reduce pressure on the carpal tunnel, according to OSHA ergonomic guidelines, and keep nerves and tendons healthy. Bending your wrists up, down, or sideways squeezes the carpal tunnel, increasing the risk of pain, numbness, and irritation. Maintaining the correct keyboard angle can help achieve this neutral position and minimize strain.
Keeping wrists straight reduces pressure on the carpal tunnel and promotes overall nerve and tendon health while typing.
Think of it like trying to fit a square peg into a round hole unnatural angles cause strain, micro-tears, and inflammation in the tendons and median nerve.
Therefore, keeping your wrists straight while you type isn’t just about comfort; it’s the most effective way to prevent pain, numbness, and tingling sensations from worsening or developing into conditions like carpal tunnel syndrome. Proper keyboard placement can also reduce fatigue, allowing for longer and more comfortable working periods.

When it comes to finding the perfect keyboard height and tilt, the goal isn’t some magical number but rather tuning your workspace so your body feels like it’s in a relaxed, natural position. You want your elbows at roughly 90 to 100 degrees (which means your forearms are almost parallel to the floor or slightly inclined downward think of a gentle slope, not a hill you’re climbing).
According to OSHA ergonomic guidelines, maintaining this elbow angle helps reduce strain on the shoulder and neck muscles. Proper keyboard ergonomics are essential in minimizing repetitive strain injury risk over time. Your upper arms should hang near-vertical, supporting proper shoulder alignment.
Your wrists and hands should sit at or just below elbow height this position helps avoid wrist extension, which can lead to discomfort or conditions like carpal tunnel syndrome. It’s important that your forearms are parallel to the floor or slightly sloped downward, promoting a neutral wrist position. Tilt matters in keyboard positioning too; however, avoid positive tilt (where the keyboard is higher in the back).
Research on spinal biomechanics suggests that a neutral or slight negative tilt (where the front of the keyboard is slightly lower than the back) helps keep your wrists in a straight, comfortable line. Small adjustments in height and tilt can significantly reduce upper limb strain, and your wrists will thank you for it.

The most important step when setting up your keyboard for comfort is ensuring your wrists stay neutral meaning no bending up or down. According to OSHA ergonomic guidelines, maintaining a neutral wrist position reduces strain on tendons and nerves. Maintaining a neutral wrist position is crucial because prolonged improper positioning can lead to flexor tendon injuries and nerve pinching. Here’s how you can achieve this:
Following this setup helps keep tendons healthy and promotes healthy blood flow, reducing the risk of repetitive strain injuries and promoting productivity.

One thing you mightn’t think about right away is how your keyboard is positioned in relation to your body that directly impacts how comfortable you’ll feel throughout the day. Imagine your keyboard perfectly centered on your midline or nose–navel line; this means you’re not reaching sideways or twisting your shoulders to type. When the spacebar or the G-H split lines up with your midline, both hands stay equidistant, which can help ease shoulder strain.
Additionally, considering the ergonomic design of your keyboard, such as the EZR 2030 with its linear rows and columns, can further promote neutral hand and wrist positions while reducing fatigue. All right, keep your keyboard aligned with your monitor so your trunk remains stable and you avoid unnecessary spinal twists, according to OSHA ergonomic guidelines.
The front edge of your keyboard should sit about 5–10 centimeters from the edge of your desk that distance allows your elbows to stay relaxed at roughly 90–110 degrees (which avoids strain on your shoulder and forearm muscles). Keep the keys within a comfortable reach zone, usually 30–40 centimeters from your torso, to help prevent wrist and shoulder discomfort.
Proper keyboard placement is essential, as it can also influence other ergonomic factors like monitor height and arm support, contributing to overall comfort and reducing strain during long working hours. Ensuring proper positioning of your keyboard helps reduce the risk of repetitive strain injuries like carpal tunnel syndrome or thoracic kyphosis.

Adjusting your chair and arm supports mightn’t be the sexiest part of setting up your workspace, but trust me, it’s where the magic happens especially if you want to keep your wrists happy. According to OSHA ergonomic guidelines, proper adjustment can significantly reduce the risk of strain and repetitive motion injuries. Ergonomics studies emphasize that an ergonomic setup not only prevents injuries but also enhances overall comfort and productivity. Here’s what you should do:
By making these adjustments, your workspace setup will support your musculoskeletal health and help keep your wrists, shoulders, and spine aligned.
Remember: a proper ergonomic setup helps prevent discomfort and injuries over time.
Now that you’ve sorted out the height and angles of your desk and chair, it’s time to think about what you’re actually using your keyboard and mouse and how they can help keep your wrists in that perfect, neutral position.
Think adjustable: height‑adjustable desks set to your elbow height, around 90–110° (which means your elbows are bent comfortably, supporting ergonomic posture) keep your wrists happy and shoulders relaxed.
Adjust your desk to elbow height (90–110°) for comfort and relaxed shoulders.
Keyboard trays with a slight negative tilt, where the front is higher than the back, help reduce wrist extension and keep your forearms straight, according to OSHA ergonomic guidelines. Proper ergonomic setup reduces the risk of Repetitive Strain Injury (RSI) caused by prolonged improper wrist positions.
For mice, vertical designs with a handshake grip cut down on pronation (turning your palm down) and ulnar deviation (bending your wrist toward the pinkie side) these awkward twists can contribute to conditions like carpal tunnel syndrome. Incorporating ergonomic design principles into your mouse choice can further enhance wrist comfort.
Positioning your mouse right next to your keyboard helps maintain your natural posture, reducing strain on your wrist joints and forearm muscles.
Using large mousepads can also support wrist comfort during prolonged use, preventing excessive movement and repetitive stress.
The goal is to select tools that support a neutral wrist posture, minimizing the risk of repetitive strain injuries such as tendinitis or nerve compression syndromes.
Invest in equipment designed with adjustable features, and remember to regularly evaluate your setup to maintain ergonomic efficiency.
When your tools are properly aligned, you work more comfortably and reduce the likelihood of developing musculoskeletal issues.
Getting into the habit of taking microbreaks is one of those small changes that can make a surprising difference. Yes, just a quick pause every 20-30 minutes can give your wrists a real breather. According to OSHA ergonomic guidelines, these breaks help reduce the risk of repetitive strain injuries such as carpal tunnel syndrome.
Here’s what I do:
Honestly, these little microbreaks aren’t just good for your wrists they keep you moving, alert, and far from the dreaded “desk fatigue.” Incorporating regular wrist and upper limb microbreaks is an effective way to protect your musculoskeletal health during long periods of desk work. Consistent microbreaks can significantly reduce strain and promote healthier ergonomic habits.
You’ve probably felt that dull ache or a tiny, persistent soreness in your wrist after a long session at your desk that’s often the first sign your body is trying to tell you something’s off. All right, pay attention. If your wrist feels tender when you press around the radiocarpal joint or at the base of your thumb, or if it worsens with certain movements, that’s your cue to take a break. According to OSHA ergonomic guidelines, these are common early signs of wrist strain.
Maybe there’s some warmth or slight swelling appearing these are early indicators of tissue stress or inflammation. You might also notice tingling or numbness in your fingers, especially at night. Research on nerve compression suggests that tingling and numbness could indicate early signs of median nerve irritation, such as in carpal tunnel syndrome. Proper ergonomics and wrist positioning can significantly reduce the risk of developing more serious injuries.
Additionally, understanding how to optimize your hand and wrist alignment can play a crucial role in preventing further strain. Now, don’t just ignore these signals. Respond by performing gentle wrist stretches, adjusting your hand and wrist positioning, or taking short microbreaks every 20 to 30 minutes.
For example, wrist flexion and extension stretches can alleviate tension in the flexor and extensor tendons. Catching these signs early is crucial; it’s how you prevent more serious conditions like tendinitis or nerve compression from developing into chronic pain or injury.
By addressing these ergonomic pitfalls, you can significantly decrease wrist discomfort and prevent repetitive strain injuries.
All right, let’s talk about how you can keep your keyboard posture in check during long stretches of work. First, ensure your feet are flat on the floor or resting on a stable footrest, and your knees are bent at approximately 90 degrees that is, directly underneath your hips and with your thighs parallel to the ground, which helps with circulation and reduces strain.
Sit back so your pelvis is fully supported by the chair with lumbar support, and maintain an upright, neutral spine according to OSHA ergonomic guidelines to minimize the risk of musculoskeletal discomfort. Proper seating posture can also improve your overall comfort and productivity during extended typing sessions.
Relax your shoulders by gently pulling them downward and away from your ears, and let your upper arms hang close to your sides. Your elbows should be positioned at an open angle of about 90 to 110 degrees to support your forearms comfortably and reduce strain per Mayo Clinic recommendations. Additionally, ergonomic adjustments to your workstation setup can significantly help in maintaining a healthy posture and preventing discomfort.
Keep your torso facing forward to prevent twisting or unnecessary spinal rotation, which can lead to strain or discomfort. Position your keyboard slightly below elbow height approximately 1 to 2 inches (about 2.5 to 5 cm) lower than your elbow to avoid elevated shoulders and promote natural arm alignment.
It should be flat or with a gentle tilt, placed close enough to prevent reaching, which can strain your shoulders and upper extremities. Keep your wrists in a neutral position aligned with your forearms and floating above the keys avoiding bending or deviation, as research on spinal biomechanics suggests this helps prevent conditions like carpal tunnel syndrome.
You’ll know your wrist is neutral if it’s pretty much in a straight line with your forearm, no big bend up or down.
All right, check your wrist from
Yes, your keyboard can totally influence wrist comfort. If you use an ergonomic or split keyboard, you’ll probably notice less strain because they promote a natural wrist position.
Flat, traditional models often push you into awkward angles, making wrists bend or twist. Smaller or tented keyboards encourage a straighter wrist, helping prevent pain from prolonged, awkward postures.
Basically, pick a shape that fits your natural hand position, or your wrists will remind you you ignored their comfort!
All right, you wanna keep your wrists happy, right?
First, imagine your workspace as a cozy groove for your hands. You’ll want your keyboard centered, with your elbows roughly at 90 degrees, and your wrists floating like they’re on tiny pause buttons never bent or pressed down.
Adjust your seat height so that your forearms are parallel to the floor, and keep your mouse close to avoid that awkward reach.
Regular breaks? Absolutely. Think of them as gentle waves, easing tension before it builds up.
You should take a break every 10 to 20 minutes, ideally microbreaks lasting 30 seconds or so, to shake out your hands and relax those overworked tendons.
Every hour, aim for a five-minute stand-up or walk around yeah, even if it feels weird. These short breaks help blood flow, reduce muscle fatigue, and keep your wrists from turning into stiff, complaining messes.
Trust me, your future self will thank you.
Imagine you’re typing away, feeling fine until your wrist starts to throb it’s probably your workstation setup.
Indicators include wrists twisted or bent, resting on hard edges, or the keyboard too high or low. If your monitor’s too far or you lean forward, your wrists bend unnaturally.
Basically, if your body feels like it’s fighting against your desk, chances are, your setup’s to blame and it’s time for a tweak.
All right, think of your wrists like tiny acrobats balancing on a tightrope. If you set everything just right keyboard height, tilt, support they’ll walk that line smoothly. But if you ignore their needs, they’ll wobble, strain, and eventually fall. So, pay attention to your setup, take breaks, and listen to those early signals. Keep your wrists happy, and your workday will stay steady just like that acrobat who never drops the ball.


