Physical Address
304 North Cardinal St.
Dorchester Center, MA 02124
Physical Address
304 North Cardinal St.
Dorchester Center, MA 02124

Setting up two computers on one desk might seem straightforward, but it quickly becomes a cluttered nightmare if you’re not careful. You need a surface big enough for your monitors and peripherals, and a plan to manage all those cables without turning your workspace into a spaghetti mess.
Picking the right gear that matches your ports prevents frustrating troubleshooting later. Use cable ties or Velcro straps to tame the tangle, and consider a KVM switch or labeling cables so you don’t pull the wrong cord last minute.
Prioritize ergonomic placement your neck will thank you and with a bit of organization, you’ll have a smooth, clutter-free setup that works perfectly for you.
Imagine a desk cluttered with two computers, a chaos of wires, and enough gadgets to make your head spin, and yet, it all somehow works. That’s the magic of a two computers on one desk setup.
You might wonder, “Why bother?” Well, if you do, you’ll find productivity skyrockets.
You get dedicated spaces for work and gaming or separate systems for constant multitasking. It saves you from constantly unplugging and rearranging.
Sure, it sounds crazy at first, but once you fine-tune your layout, it becomes second nature.
Once set up, your dual system becomes instinctive and effortlessly efficient.
The act of keeping everything at your fingertips a mouse here, a keyboard there means no more reaching across the desk for a different machine. It’s efficient, practical, and honestly, way more fun than fighting for elbow room.
To maximize comfort and efficiency, setting up your workstation ergonomically by considering monitor placement, height, and cable management is essential and optimized workspace setup can make a significant difference.

Choosing the right desk space for your dual computer setup is all about balancing space, comfort, and future-proofing because creating an ideal workspace requires careful planning.
You want enough room for your monitors, keyboard, and mouse, but also enough clearance to stretch and breathe. Honestly, don’t cram everything into a tiny corner, or you’ll be bumping elbows constantly.
Think about how you usually work. Do you need quick access to printers, filing cabinets, or other peripherals? Because considering accessibility ensures efficiency and reduces clutter.
First, measure all your equipment’s dimensions such as monitor bases, keyboard width, mouse size, and any additional peripherals.
Then, double these measurements to determine the minimum space needed for comfortable movement and future expansion. For example, if your monitor is 24 inches wide, and your keyboard is 17 inches wide, add extra clearance say 4 to 6 inches for comfortable placement and airflow.
Next, choose a desk that can comfortably accommodate these measurements and allow for some extra space aim for at least an additional 20 inches of clearance behind monitors and 12 inches on each side for movement, because this prevents cramped conditions and promotes ergonomics.
Remember, your setup should grow with you, not fight for space. Create a workspace environment that you look forward to sitting in, not just fitting your current gear into a limited space.
Specific measurement fact:
– Distance from monitor to your eyes should be approximately 20 to 30 inches, because this reduces eye strain and maintains ergonomic viewing comfort.
Common mistake:
– Cramming everything into a small desk: This leads to cramped space, frequent bumping, and discomfort. Instead, select a larger surface that provides sufficient clearance for all devices and movement.
Another tip:
– Ensure your desk height complies with ergonomic standards generally around 28-30 inches for standing desks or adjustable options so that your elbows rest at a 90-degree angle when typing, reducing strain during long work sessions.
Additionally, considering an ergonomic workspace can further optimize your setup for comfort and efficiency.

The first thing you need to do when selecting hardware and accessories for your dual computer setup is to track down the exact specifications of what you already have or plan to buy, because understanding compatibility prevents hardware conflicts later on.
Trust me, there’s nothing more frustrating than realizing your new monitor won’t fit on the arm you bought because you ignored VESA compatibility. Measure your desk space to ensure adequate room for all equipment, and check the ports on both computers such as USB Type-C, HDMI 2.1, and DisplayPort 1.4 to confirm compatibility.
Note:
– The ideal distance between your monitor and your eyes is 20 to 30 inches, with the top of the screen at or just below your eye level, to reduce neck strain and improve ergonomics.
Make sure your accessories are compatible with each other, focusing on matching power supplies and connectors. It’s obvious but easy to overlook; mismatched cables or incompatible power adapters can cause connection failures or damage components.
Ensuring that your computer stands or desks, such as standing desks, are sturdy and adjustable will help maintain ergonomic health and adapt to different setups, especially when managing multiple devices.
Common mistake:
– Using adapters or dongles that aren’t rated for your devices can lead to signal degradation or hardware damage. Instead, choose accessories designed for your specific device models, such as a Belkin Thunderbolt 3 Dock or a CalDigit TS4, which are rated for high data throughput and power delivery.
Here’s the bottom line: you want everything to work seamlessly without a jumble of incompatible adapters or mismatched ports. Save yourself the headache by doing the homework now, verifying all specifications, and ensuring compatibility before purchase because setting up a stable, efficient dual computer workstation depends on it.

Clearing the chaos under your desk starts with a game plan, because a cluttered workspace can hinder productivity and create frustration. You’ve probably spent too long untangling a mess or trying to squeeze gear into tight spots.
All right, start by unplugging everything; this step is essential because it allows you to see exactly what you’re working with.
Use cable ties or Velcro straps such as the Velcro ONE-WRAP system to bundle cords together because it keeps cables organized and prevents tangling. Trust me, this will save your sanity later. The goal? Group cords by function, such as power, data, and audio, and label them if needed because it helps you identify each cable easily in the future. Forget trying to remember which black cable does what a week from now; labeling prevents unnecessary confusion.
Next, invest in a power strip with surge protection, like the Barracuda Power Surge Protector with an 8-outlet capacity and a 900 Joule surge protection rating, because it shields your electronic devices from voltage spikes.
Wrap excess cord length more than 10 inches around the power strip or use flexible cable management sleeves, such as the JOTO Cable Sleeve, because it keeps the workspace neat and prevents tripping hazards.
Measurement Fact:
– To determine proper cable length, leave at least 4 inches of slack for movement and future adjustments, because tight cords can put strain on connectors and cause damage.
Using cable management accessories like cable sleeves or adhesive clips under-desk cable management can further streamline your setup by guiding cords neatly along designated pathways, ultimately leading to a more organized workspace.
This isn’t rocket science, but it sure makes the workspace look professional and prevents accidentally pulling your desk apart when you bump the plug.
Organizing your cables with specific, clearly labeled, and properly managed cords not only improves the appearance of your workspace but also enhances safety and functionality.
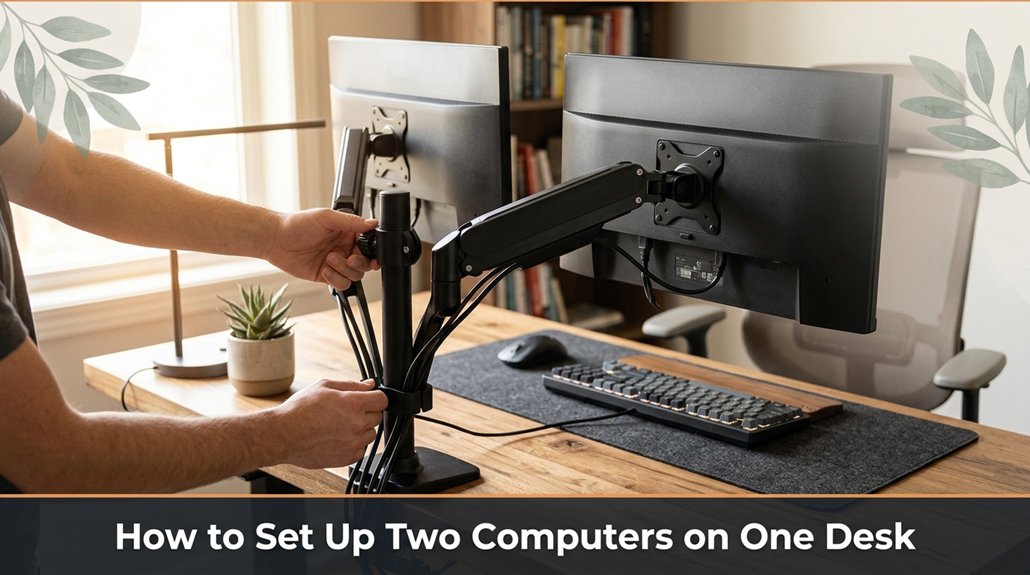
If you’ve ever tried to cram two monitors onto a cluttered desk, you know it’s not as simple as just plopping them side by side and calling it a day. First, choose monitors with compatible stands or consider using a monitor arm this is the move that saves space and makes adjustments easier. Here’s what to keep in mind:
| Step | What to Do | Why |
|---|---|---|
| 1 | Mount both monitors on adjustable arms because this provides flexibility for placement and comfort | Flexibility allows you to position monitors at optimal angles |
| 2 | Raise each monitor until the top of the screen is at or just below eye level because this prevents neck strain | Eye level positioning reduces ergonomic issues |
| 3 | Arrange the monitors at eye level because this promotes a natural viewing angle | Prevents neck discomfort and eye fatigue |
| 4 | Leave a 1- to 2-inch gap between the monitors for visual clarity because this avoids visual clutter and distractions | Enhances focus and reduces eye strain |
Remember:
Optimal monitor placement distance: Position monitors approximately 20 to 30 inches from your eyes for comfortable viewing and reduced eye strain.
Using a dual monitor arm, like the ones recommended, can significantly enhance your setup’s ergonomic benefits. Once you’ve set up the monitors with these guidelines, balance them properly, connect your cables neatly, and enjoy your upgraded workflow.
Managing peripherals in a dual-computer setup might seem straightforward: plug everything in, assign some hotkeys, and call it a day. But I guarantee you, you’ll encounter a snag or two. First, prioritize what needs quick access, like your keyboard and mouse.
Using a good USB hub or sharing switch such as the UGREEN USB 3.0 Switch Selector or the StarTech USB Sharing Switch ensures seamless switching because crawling under the desk to swap cables every time is inefficient and frustrating.
Reliable USB hubs or sharing switches streamline your setup, preventing annoying cable swaps and saving time and frustration.
Next, label your cables if you’re doing it manually. This saves your sanity later because it prevents confusion when troubleshooting or adding new peripherals. Now, assign hotkeys or use a software solution, like Synergy or Barrier, to switch input devices seamlessly this is the secret to avoiding strain from manually shifting peripherals.
Additionally, some peripherals are picky about how they connect. For example, high-quality keyboards like the Logitech MX Keys or mechanical keyboards with Cherry MX switches require stable, high-speed connections to function correctly. Stick with reliable, well-supported gear to prevent issues like lag or disconnection.
Key Measurement and Setup Tip:
– Position your monitor so that the top of the screen is at or just below eye level, approximately 20 to 30 inches from your face, to reduce neck strain and maintain ergonomic comfort.
Because, in the end, smooth management makes your dual-computer setup feel almost effortless despite taking extra time initially by thoughtfully organizing and selecting your peripherals and setup methods. Furthermore, understanding ergonomic support features can help prevent discomfort when working with multiple devices.
Ever wondered whether a physical or virtual KVM switch is better for you? Honestly, it depends on your setup and patience levels.
A physical switch gives you that satisfying click when you switch between computers, because there’s no fuss over network stability or software conflicts. Plus, it’s straightforward plug and play, no weird dependencies.
But it does mean extra hardware clutter.
A virtual KVM runs through software, which sounds handy but can be a pain if your network is flaky or if software conflicts crash your workflow.
If simplicity matters, go physical. If you’re tech-savvy and want sleekness, virtual might suit you just be ready for some troubleshooting.
Either way, don’t expect it to be perfect on the first try. Sometimes, it’s just wiring and testing like assembling furniture that has an extra screw left over.
Configuring your operating systems for seamless switching is often the part where things get a little sticky, because real life doesn’t always match the manual’s comforting timelines. You’ve probably been 45 minutes into setup when you realize step 4 assumes your BIOS is already configured, which it’s not.
First, verify both OSes recognize your peripherals because this ensures all devices function correctly across both systems. Windows and macOS have different quirks, so check Device Manager or System Preferences to double-check device recognition.
Next, enable any multi-OS clipboard sharing or file transfer tools, because virtual network sharing has to be activated for smooth data exchange.
Here’s the thing: don’t expect perfection overnight. It’s all about troubleshooting. Trust me, sometimes you’ll just have to restart and recheck to resolve conflicts or recognition issues.
There’s a good chance you’ve already spent more time than you’d like fussing over the ergonomic basics of your dual-computer setup.
But here’s the real kicker: if you don’t get the comfort part right, you’ll be hunching over each device faster than you can say “carpal tunnel.”
All right, so first, invest in a sturdy, adjustable monitor arm trust me, this is the game-changer.
Highlighted Fact:
Keeping your desk clean and tidy might seem like a small detail, but trust me, it makes a world of difference, especially when you’re juggling two computers and enough cables to start a spider web.
You’ll want to get rid of clutter. It’s simple because using cable clips or ties helps tame those tangled messes.
Tame tangled cables with clips or ties for a clean, organized workspace.
Regularly wipe down your surfaces with a microfiber cloth because dust is the enemy of electronics, after all. Invest in a tray or small bin for everyday essentials like pens, notepads, and chargers so they don’t end up crowding your workspace.
Here’s the thing: don’t be the person who waits until chaos ensues. Keep a cleaning schedule, even if it’s just five minutes at the end of each day. Your future self will thank you when you’re not hunting for that missing USB.
Important measurement:
– Position the top of your monitor so that it’s at or just below eye level, which is typically around 20 to 30 inches from your face, to reduce neck strain and promote ergonomic viewing.
When you have two computers sitting on one desk, things can get confusing, like which cable goes where, or why your keyboard suddenly refuses to switch between machines.
If a peripheral still doesn’t work correctly after testing, replace the cable or reset the device.
Troubleshooting isn’t glamorous, but it saves you hours of frustration.
Yes, you can connect two computers to a single keyboard and mouse, but you’ll need a KVM switch. It’s like a remote control for your setup push a button, and you switch between computers seamlessly.
Don’t forget, the switch needs to support your monitor connections too; otherwise, you’re juggling cables.
Trust me, it saves a ton of desk space and frustration otherwise, you’ll be unplugging and replugging every time you switch.
Power consumption for two computers is like managing a backyard grill both take more fuel than you think.
You’ll want to check each PC’s wattage (usually on the power supply label), then add those numbers up. Plug them into a surge protector with enough capacity, and avoid overloading it.
You wanna prevent overheating? First, make sure your desk isn’t cluttered with cables and stuff blocking airflow.
Use cooling pads or small fans think of them as your computers’ personal air traffic controllers.
Keep your monitors and tower apart closer equals heat buildup.
All right, and don’t forget, give each machine some breathing room; cramped space is like a sauna for electronics.
Keep that setup breezy, and you’ll thank yourself later.
Yes, you can network two computers on the same desk. Think of it like connecting two friends at a party plug in a switch or router, and they start chatting.
All right, put an Ethernet cable from each PC’s port to the switch. Now, enable file sharing and network discovery.
Keep in mind, the exact setup varies based on your OS and hardware, so don’t forget to tweak your settings.
You’ll want a audio mixer or a headphone splitter designed for dual outputs.
Plug each computer into separate inputs, then connect your headset to the mixer or splitter.
Now, you can control which computer’s audio you hear.
I’m sure you’ve been 20 minutes just fiddling with this when the manual promised “simple,” but trust me, this is the cleanest way without unplugging and replugging constantly.
So there you have it. Setting up two computers on one desk isn’t some secret ninja move it’s just common sense, patience, and a dash of elbow grease. Just remember, your desk’s a battlefield, not a cluttered junk drawer. Keep things tight, avoid the spaghetti of cables, and don’t be afraid to switch things up if something bugs you. Now go ahead, conquer your workspace like a pro you’ve got this.


