Physical Address
304 North Cardinal St.
Dorchester Center, MA 02124
Physical Address
304 North Cardinal St.
Dorchester Center, MA 02124

Attaching a monitor arm to your IKEA desk can be more challenging than you expect those particleboards and soft surfaces don’t always hold clamps well. If your lower back is talking to you by 3pm, you know how important a good workspace setup is.
First, find a sturdy, flat spot away from the edges; avoid soft spots or wobbling areas. Now, check your desk’s thickness and material most clamps need a solid grip without crushing the surface. Tighten the clamp gradually, but don’t overdo it or you’ll strip the surface. If you want to avoid wobbles or slips, I’ve got some neat tricks up my sleeve, so stick around.
This article contains affiliate links. If you purchase through them, I may earn a small commission at no extra cost to you. I only recommend products I genuinely believe in.
When attaching a monitor arm to your IKEA desk, the first step is to gather the appropriate tools and parts because having everything on hand prevents unnecessary interruptions during assembly.
You’ll need a power drill, screws compatible with your monitor arm’s mounting clamp or VESA plate, and an Allen wrench or screwdriver, depending on your monitor arm IKEA desk setup.
Check the mounting clamp or VESA plate to ensure it matches your monitor’s specifications VESA mounting patterns are typically 75x75mm or 100x100mm, so verify compatibility before proceeding.
Before starting, collect all tools and parts to save time and avoid losing small components during assembly.
If your desk has pre-drilled holes or a grommet hole for cable management and mounting, this makes installation easier because you won’t need to drill new holes.
If your desk lacks pre-drilled holes or a grommet hole, you may need to drill holes to secure the monitor arm because firm attachment prevents movement and potential damage.
When drilling, ensure you don’t over-tighten screws or the wood may crack; tighten just until the screw threads are snug to secure the mount without damaging the desk material.
Measurement Fact:
The ideal height for mounting the monitor is such that the top of the screen is at or just below your eye level when seated comfortably, typically around 20-30 inches from your face, to reduce neck strain and promote ergonomic positioning.

Finding the perfect spot for your monitor mount isn’t as simple as just sticking it anywhere on your IKEA desk. I’m sure you’ve been 45 minutes into assembling something when you realize step 4 assumed something step 2 never told you.
First, look at your desk’s structure avoid the edges and go for a solid, flat area because a stable surface ensures your mount will stay securely in place. You want the mount to be stable trust me, a wobbly setup is the ultimate distraction.
Prioritize a stable, flat spot on your desk for a secure, wobble-free monitor mount.
Measure the space available on your desk, but don’t stress over exact inches because your setup is unique.
Highlighted measurement:
– Allow at least 2 inches of clearance around the mount to prevent hitting the desk edge or other objects.
Keep in mind your cable management needs and your seating position comfort is still king.
Test the spot by lightly placing the mount: if it wiggles or hits a corner, pick another location. Because a secure placement prevents instability.
When testing, ensure the mount doesn’t wobble excessively, which can cause strain or accidents.
Patience pays off here.
Choosing the right monitor arm is like picking the perfect partner, because it’s all about fit, flexibility, and a little bit of compromise.
You’ve got to evaluate your desk’s weight capacity, because the arm must support your monitor’s weight without sagging or risking damage. Check whether your monitor’s VESA pattern matches the arm’s compatibility, because incompatible setups will prevent proper mounting.
If your setup involves a curved or heavy monitor, you want a sturdier arm with more adjustability, because lighter or flat monitors can be supported by less robust options.
Measure your monitor’s weight and VESA pattern.
Select an arm rated for the monitor’s weight and with the appropriate VESA compatibility.
Think about reach and movement do you need the monitor tucked in tightly or sprawling across your desk?
Because this determines the arm’s maximum extension and flexibility.
Decide on the required reach of the monitor arm based on your workspace layout, because proper reach ensures ergonomic positioning and minimizes strain.
Don’t just buy the fanciest-looking model; verify that the arm is compatible with your desk clamp or grommet mount, because improper mounting can compromise stability and safety.
Look, even simple choices can trip you up, so ask yourself: does this arm let you tilt, swivel, and height-adjust effortlessly?
Because ease of adjustment facilitates ergonomic comfort and productivity.
Check the tilt range (e.g., -5° to +20°), swivel range (e.g., 180°), and height adjustment mechanism, because these features directly impact your ability to customize your viewing position.
For a stable and reliable setup, consider the sturdiness and durability of the monitor arm, especially if you plan to adjust it frequently or use a heavier monitor.

Getting your desk ready for that monitor arm isn’t rocket science, but it does require a little prep work because you’ll save yourself a headache later. First, clear off everything papers, coffee mugs, that mysterious sock because a clean, flat surface is essential for stable installation.
Now, check your desk’s thickness and material. Some IKEA desks have softer surfaces or thicker edges, which can trip up your clamps. Use this quick reference table:
Material | Thickness Range | Special Tips****
Laminate | 1-2 inches | Avoid crushing the surface because excess pressure can damage the finish and compromise clamp integrity.
Solid wood | 0.75-1.5 inches | Use padding if needed to distribute clamping pressure evenly and prevent dents.
Particleboard | 0.75-1.25 inches | Reinforce weak areas to avoid collapse or instability during clamp installation.
Metal | Varies | Clamp firmly, but carefully, because excessive force can deform the material or cause damage.
Glass | Not recommended | Not suitable for clamps because glass can crack or shatter under pressure.
Note:
All right, now you are finally set for step one.
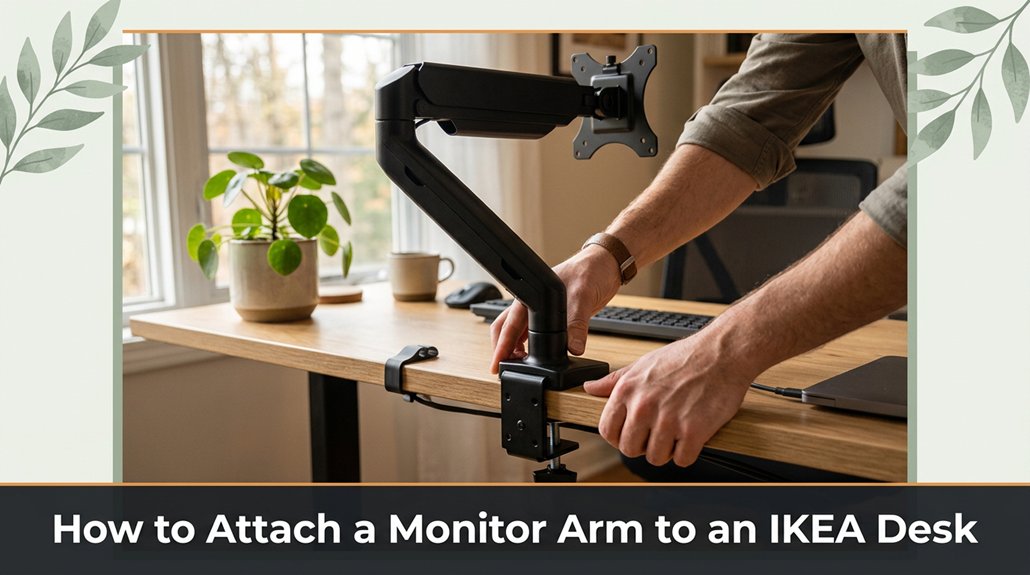
Alright, now that you’ve cleared off the clutter and double-checked your desk’s thickness (because, trust me, that step’s more important than you think), it’s time to actually attach the monitor arm.
First, position the clamp or grommet mount whichever your arm uses on the edge of your IKEA desk. Ensure it’s aligned so the monitor hangs directly in front of you, not angled off to the side or across the room.
Next, tighten the clamp screws. Use enough force so the clamp is secure, but avoid over-tightening, which could crush or damage the desk surface. This keeps the monitor stable without causing damage.
If you’re using a grommet mount instead of a clamp, carefully drill or poke through the desk surface at the designated hole location, making sure to keep your hand steady because any wobbling can lead to misalignment.
Important Fact:
– Measure your desk thickness: IKEA desks typically range from 0.75 inches (19 mm) to 1.5 inches (38 mm). Your clamp or grommet mount must fit within this range for a secure attachment.
Ensuring your monitor is at the optimal height is crucial for preventing neck pain and improving comfort, which makes the correct monitor height essential to your setup.
Good? Great. You’re halfway there.
Sometimes, despite your best intentions, installing a monitor arm can turn into a game of “why won’t this clamp tighten properly.” If your clamp keeps slipping or feels looser than you’d like, check first if you’ve got the right fit for your desk thickness.
Here’s what often trips people up:
All right, so you might need to adjust how tight you’re going, or reposition the clamp, but don’t force it your desk and clamp will thank you. Additionally, ensuring the clamp is within the recommended thickness range is essential for a secure fit and to prevent damage.
When you’ve finally secured your monitor arm to your desk with a firm clamp, the next step is ensuring your screen is comfortable and stable because all the tightening in the world doesn’t matter if you’re craning your neck or constantly readjusting. You want a setup that feels natural, not like you’re stuck in a poor posture commercial.
Here’s a quick table to guide your adjustments:
| Aspect | What to Do |
|---|---|
| Height | Raise or lower the monitor until the top of the screen is at or just below eye level, because this helps reduce neck strain. |
| Tilt | Tilt the monitor to reduce glare and strain; aim for a slight downward angle of about 10 to 20 degrees. |
| Swivel | Turn the monitor to face forward, so it is directly in front of your eyes and you avoid neck twists. |
| Distance | Position the monitor approximately 20 to 30 inches from your face, about an arm’s length away, to prevent eye strain. |
| Stability | Tighten all joints securely, because loose movement can cause the monitor to wobble or shift unexpectedly. |
Specific Measurements & Facts:
Common Mistakes & Fixes:
You probably can’t attach a monitor arm directly to a glass IKEA desk. The clamps usually need solid, non-porous material to secure properly glass isn’t it.
All right, now you could try using heavy-duty adhesive mounts or suction cups, but honestly, they won’t hold up long-term.
Better move the arm to a different desk or add a sturdy wooden or metal panel underneath the glass to clamp onto.
You should aim for a monitor arm with a weight capacity that matches or slightly exceeds your monitor’s weight, typically between 8 to 20 pounds for most setups.
All right, don’t ignore it skimp on this, and your monitor might just take a nosedive.
Now, heavier monitors need sturdier arms.
Trust me, I’ve learned this the hard way: oversize comes with an oversized need for strength.
Yes, you can attach multiple monitor arms to one desk, but here’s the catch: it depends on your desk’s thickness, the weight limits of your clamps, and available edge space.
All right, you’ll need sturdy clamps with enough open capacity.
Now, measure your desk’s edge first too thick or thin and, trust me, it’s a headache.
Usually, with a reasonable setup, two or three arms aren’t a problem, but don’t overload it.
You don’t need special tools for most IKEA desks just what’s in your toolbox. You’ll probably need a Phillips screwdriver, maybe an Allen wrench if your desk has T-slot holes. Double-check the mounting bracket specs; some desks have unique thicknesses or framing.
All right, don’t overthink it. Generally, a standard screwdriver and a little patience do the trick.
Just remember, Ikea’s manuals might be helpful, but expect some improvisation because nothing’s ever as straightforward as the instructions promise.
To prevent desk damage, you’ve gotta be gentle but deliberate.
All right, start by double-checking your drill bit size using too big a bit ruins a hole. When clamping or screwing, don’t overtighten that’s how cracks happen.
Place a mat or scrap wood under your tools if possible, so you distribute force evenly. And honestly, measure twice, drill once because no one wants a desk with a new crater.
So there you have it. Attaching a monitor arm isn’t rocket science, but it’s those little unexpected hiccups like finding the right spot or tightening that stubborn clamp that trip you up. Once it’s done, though, your desk transformation is worth every second. Remember, it’s all about patience, a bit of trial and error, and not taking yourself too seriously when things wobble or don’t line up perfectly. Happy viewing!


