Physical Address
304 North Cardinal St.
Dorchester Center, MA 02124
Physical Address
304 North Cardinal St.
Dorchester Center, MA 02124

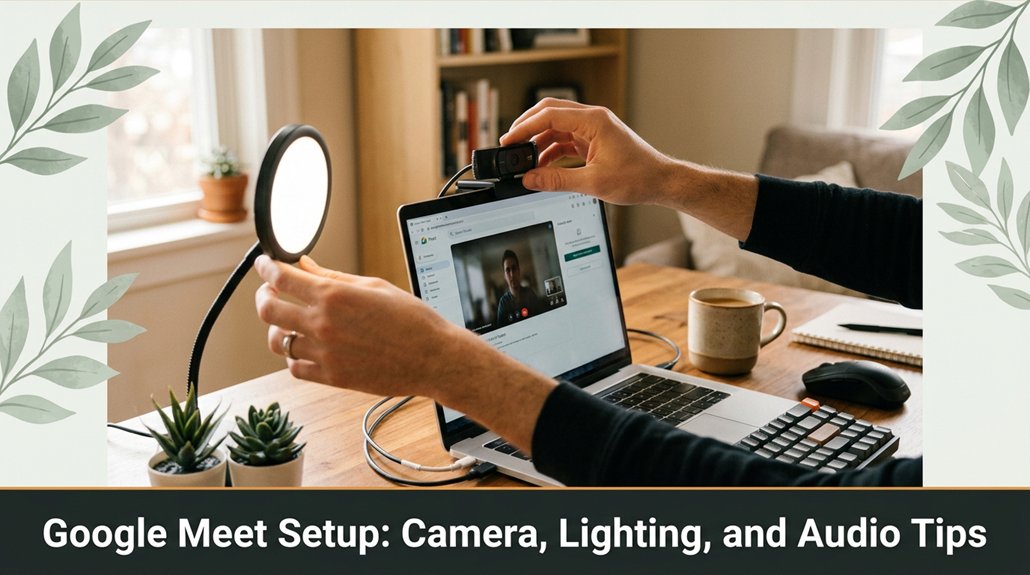
If you want to look sharp and professional on Google Meet, it all starts with how you set up your camera, lighting, and audio. No one wants to be caught off guard by a bad angle or poor sound quality when it’s time to make an impression.
Make sure your camera is at eye level looking up your nose or from a weird angle just doesn’t cut it. Face your light source, preferably natural light, but if that’s not an option, soft front lighting at a 45-degree angle works great.
Use a decent mic, like a USB condenser, and keep it 2-3 inches away from your mouth your laptop mic won’t do the job. And keep your background simple and clutter-free; trust me, it makes a difference. Follow these tips, and you’ll be all set to look confident and professional on every call.
This article contains affiliate links. If you purchase through them, I may earn a small commission at no extra cost to you. I only recommend products I genuinely believe in.
Have you ever sat down in front of your webcam, only to realize your face is cut off or your shot looks like a spy movie? That’s where good Google Meet setup tips come in.
First, position your camera at eye level, because looking straight into the lens creates a more natural and engaging connection. Use a stack of books or a height-adjustable stand if needed; this ensures your camera is level with your eyes.
Second, make sure your background isn’t distracting clutter can diminish professionalism faster than a typo. Keep the background neat and simple, or use a virtual background if your platform supports it.
Third, keep the camera steady by placing it on a stable surface or tripod, because a shaky camera causes distracting movements and looks unprofessional.
Fourth, test your shot before entering the meeting. Adjust your camera angle and framing so that your head and shoulders are visible, with some space above your head. This prevents the awkwardness of appearing to talk to your ceiling fan and ensures your face is well-centered.
Key measurement for camera height:
Position the top of your camera lens at or just below your eye level.

When it comes to looking professional on Google Meet, good lighting makes all the difference because it significantly enhances your video quality more than a fancy microphone or camera angle. You don’t want to look like you’re part of a crime documentary, floating in shadows or glaring into a spotlight.
Start with natural light if you can because it provides soft, even illumination that flatters your face. Don’t sit with your back to a window because it makes you look like a silhouette and reduces visibility. Instead, face the light source or angle it so it hits your face evenly, ensuring clear, well-lit visuals.
If it’s nighttime or your room is dark, use a soft, diffuse light source such as a ring light or a lamp with a lampshade because harsh bulbs can cause glare or uneven lighting.
Fact: The goal is to achieve even, flattering light that makes your face pop out on camera, not one that creates ghostly effects or shadows that resemble a villain hiding in darkness.
Lighting tips for a professional Google Meet appearance:
Specific measurement: Keep the light source 3 to 6 feet from your face for optimal illumination.
Avoid harsh light sources directly above or below your face because they cause unflattering shadows and uneven lighting.

A decent microphone is the backbone of clear Google Meet audio, yet it’s surprising how many folks overlook this step until they’re mid-meeting mumbling or hearing echoes they didn’t sign up for.
Trust me, I’ve been there, holding a microphone with one hand and trying to figure out why it sounds like I’m talking through a tin can.
Choose a microphone that suits your space. USB microphones are simple and plug-and-play, but for better clarity, opt for a cardioid condenser microphone because it primarily captures your voice and reduces background noise, like fridge hums or keyboard clatter.
Look, avoid cheap lapel microphones that clip onto your shirt unless you like muffled sound. A lapel mic placed more than 6 inches away from your mouth will pick up too much ambient noise, defeating its purpose.
Placement is critical. Keep the microphone close to your mouth about 2 to 3 inches away because this proximity ensures your voice is captured clearly without excessive background noise.
For consistent audio quality, position the mic at the same height each time, roughly at your mouth level.
Key Measurement:
– Keep the microphone 2 to 3 inches from your mouth for optimal sound capture.
Ensure your microphone’s directionality is appropriate. Use a cardioid polar pattern to focus on your voice and minimize room echoes, especially if your space has reflective surfaces.
Additional tips include avoiding low-quality clip-on mics, which can produce muffled or distorted sound because their small diaphragms are less sensitive and more prone to picking up clothing rustle.
Instead, opt for a reputable model like the Rode NT-USB Mini or the Blue Yeti Nano, which provide clearer audio.

Setting up a background that looks good on camera might seem straightforward, but trust me, it’s one of those things where the devil is in the details, and it’s usually in the details you overlook until your boss says, “Can we try that again?” The key here is to keep things simple and intentional.
Choose a clean, uncluttered space because a background filled with laundry piles or half-eaten snacks distracts viewers and looks unprofessional. Hang a simple piece of art or a plant behind you nothing too busy or visually noisy. Avoid distracting patterns, high-contrast finishes, or bright, reflective surfaces such as mirrors or glossy picture frames. These elements can cause visual noise or glare, reducing the overall clarity of your appearance on camera.
Position yourself so that your face isn’t dead center but still clearly framed. Specifically, position yourself with your eyes approximately one-third of the way down from the top of the frame, following the rule of thirds, to create a balanced composition while keeping your face prominent.
Test your setup by livestreaming or recording a short clip because even after all that, you’ll still adjust several times before it feels right.
Important measurement:
– Sit at a distance of approximately 20 to 30 inches from your camera because this distance helps keep your face in focus and prevents background distortion.
Step-by-step setup instructions:
Common mistakes to avoid:

Here’s the thing about setting up your Google Meet space: it’s tempting to just throw everything together and hope for the best, but that usually leads to some classic pitfalls. You might think positioning your camera at eye level is enough, but then you realize your face is overshadowed or your background is a mess.
First, avoid clutter in your frame because it distracts more than you think. A tidy, intentional background helps keep the focus on you.
Keep your background tidy and intentional to stay focused and avoid distractions during your meetings.
Second, check your lighting because your face shouldn’t look like it’s in the witness protection program. Position a soft, diffuse light source in front of you, roughly at eye level or slightly above, to illuminate your face evenly and reduce shadows.
Third, skip the half-hearted audio setup because poor sound quality makes everything worse but is easy to fix. Use a quality microphone or headset, and test your audio levels before joining important meetings.
Fourth, don’t ignore background noise or echoes because they sabotage focus faster than a bad connection. Use noise-canceling features in your microphone, close windows during calls, and consider adding soft furnishings or soundproofing if echo persists.
Additionally, ensuring your camera is at a proper camera height and angle can greatly improve your on-screen presence and professionalism.
Specific measurements and tips:
Trust me, fixing these now saves you a headache later.
Getting your Google Meet setup right doesn’t have to be a scene straight out of a sitcom, but I won’t lie the many times I’ve spent 20 minutes trying to get my camera angle just right only to realize I forgot to plug in the microphone are impressive. Here’s the thing: keep this checklist handy.
First, check your camera because a clean lens and proper lighting are essential. Ensure the light source is in front of you as opposed to behind, which causes silhouette effects.
Next, test your microphone because relying solely on your computer’s built-in audio can result in poor sound quality. Use an external mic like the Blue Yeti or Rode NT-USB, and make sure it’s selected as the default device in your computer’s audio settings.
Then, assess your lighting setup. Position a light in front of you, facing you, so your face is well illuminated. Avoid having a bright window behind you, as backlighting can shadow your face. Optimal ring light placement can dramatically improve your video quality by eliminating harsh shadows and glare.
Highlight: Light should be placed facing you, at an angle of about 45 degrees, to evenly illuminate your face without creating harsh shadows.
Keep desktop clutter hidden because a tidy workspace ensures a professional appearance, and clutter can be distracting during the meeting.
Organize cables neatly because tangled cords can be visually distracting or cause accidental disconnections; use cable clips or sleeves for tidiness.
Finally, close any unnecessary applications to prevent notifications or popup disruptions that could distract you or other participants. This helps maintain focus during your meeting.
You can cut back background noise by enabling noise suppression in Google Meet settings. Click the three dots, select “Settings,” then “Audio,” and turn on “Noise Cancellation.”
All right, that helps, but most of the time, you’ll want to invest in a decent microphone kind of like steering clear of that voice-distorting conference mic from 2009.
Also, close windows, turn off appliances, and try to find a quieter space. That way, your voice stays clear and annoying sounds stay away.
Think of your camera like a good pair of glasses you want clarity, right? Adjust the resolution to the highest setting your device supports this sharpens everything.
Make sure the focus isn’t auto-flitting; tap to lock it if needed. Brighten your shot by tweaking exposure or ISO trust me, it’s worth fiddling with because fuzzy video is nobody’s friend.
All right, test and tweak until you see yourself clear as day.
You gotta tilt your monitor slightly, so glare hits it at an angle instead of straight on.
Adjust your screen brightness and contrast too bright and reflections pop, too dim and you strain.
Use an anti-glare screen protector if things stay stubborn.
All right, I know, it’s a dance between your room lights and screen position. The key: experiment until you find that sweet spot where you’re not fighting reflections every time.
Imagine you’re about to join a call, and suddenly your audio sounds distant or echoey.
All right, plug in your headphones first. Then, hit your device’s sound settings, find the test or recorder option, and speak into the mic if you hear yourself clearly, you’re good.
If not, check your mic connection and volume levels. Honestly, this quick test prevents a 20-minute troubleshooting session during the call.
You gotta check your internet speed first run a speed test, and aim for at least 5 Mbps upload and download.
Wired Ethernet beats Wi-Fi every time trust me, those dropped signals are the worst.
Close unnecessary apps to free up bandwidth, and if you’re struggling, restart your router it’s like giving your connection a quick coffee break.
All right, do that, and your video calls should glide smoothly no more buffering surprises.
Alright, you’ve got the tools, you’ve adjusted the angles, and your setup finally looks less like a disaster zone. Remember, it’s about blending form and function your background shouldn’t distract and your lighting shouldn’t blind. You’re now ready to impress without the ‘what was I thinking’ moment halfway through. Just sit back, relax, and pretend your camera angle is a Vogue shoot. Easy, right? Now go conquer that meeting fame awaits.


