Physical Address
304 North Cardinal St.
Dorchester Center, MA 02124
Physical Address
304 North Cardinal St.
Dorchester Center, MA 02124

Your back and neck are crying out for relief, and standing all day can help but only if your setup is right. First, adjust your desk so your elbows are at a comfortable 90 degrees think elbow height when you’re standing.
Position your monitor so the top is just below eye level, about 20-30 inches away, to keep your neck relaxed. Make sure your keyboard and mouse are within easy reach and level with your elbows. Support your feet with supportive shoes and use a good anti-fatigue mat to reduce strain.
Shift your weight often to avoid stiffness, and keep a close eye on your posture ears aligned with shoulders, knees slightly bent, core engaged. Remember to take regular movement breaks. Follow these steps, and you’ll find standing through your day not only healthier but more comfortable stick with it, and there’s plenty more to learn.
This article contains affiliate links. If you purchase through them, I may earn a small commission at no extra cost to you. I only recommend products I genuinely believe in.
Alright, let’s talk about how to get your standing desk set up so it doesn’t feel like you’re doing an awkward dance with your workspace.
When learning how to set up a standing desk, the goal is comfort. You want your elbows at about a 90-degree angle because this position promotes ergonomic neutrality and reduces strain.
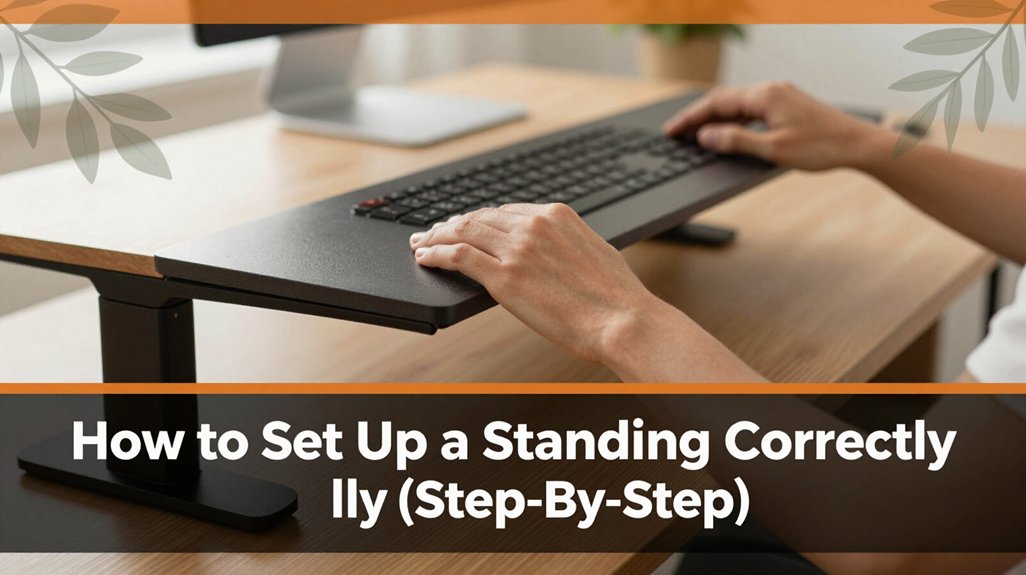
The keyboard should be directly in front of you, not pushed to the side, so your shoulders stay relaxed. Position the keyboard so that the top is roughly level with your elbows, at a height of approximately 25 to 28 inches from the floor, depending on your height, because this ensures your arms are at a comfortable typing angle.
Keep your keyboard directly in front, level with your elbows to stay relaxed and prevent shoulder tension.
The surface height should hit your elbows around wrist level because if it’s too high or too low, your back and neck will protest later.
Key measurement for desk height:
Elbow height: For most adults, this is approximately 25 to 30 inches from the floor, but measure your own elbow height standing, and set the desk accordingly.
And don’t forget your feet wiggle around, find that sweet spot where you’re balanced because a stable, comfortable stance prevents fatigue and promotes better posture. Ensuring your workspace allows for easy movement and adjustments is essential for maintaining proper ergonomic setup.
—
Specific setup steps:
By following these detailed setup steps and measurements, you’ll avoid common mistakes like desk or monitor heights that cause neck strain or shoulders to tense up.
Proper ergonomic setup helps you stay comfortable and focused during longer work sessions while preventing chronic discomfort.
When it comes to setting your desk and monitor height, the goal is to make everything feel natural like your workspace is just an extension of your body, not a stubborn obstacle.
You want your monitor at eye level so your neck stays relaxed, not strained. Honestly, if you find yourself craning your neck or looking down too much, that’s a sign you need to adjust.
Now, imagine standing upright, shoulders relaxed, eyes looking straight ahead without tilting your head. That’s where your monitor should be.
Set your monitor so that the top of the screen is at or just below your eye level because looking slightly down is less fatiguing on the cervical spine than looking straight ahead or upward.
Position the monitor approximately 20 to 30 inches from your face to reduce eye strain and maintain a comfortable viewing distance.
All right, don’t forget, your arms should be close to your sides with elbows bent at about 90 degrees because this positioning reduces tension and promotes ergonomic comfort.
Adjust your monitor height and distance until your head, neck, and shoulders can breathe comfortably and naturally.
Proper monitor height is essential for maintaining ergonomic comfort and preventing fatigue, so take the time to get it just right.
 1")
Your keyboard and mouse might seem like tiny tools or afterthoughts on your desk, but trust me, they’re the unsung heroes. If they’re not positioned right, your body has a way of reminding you with aches and fatigue.
Here’s the thing: your keyboard should be at a height where your elbows are bent about 90 degrees because maintaining this angle reduces strain on your shoulders and neck. Your wrists should stay straight not bent up or down to prevent repetitive strain injuries like carpal tunnel syndrome. Think of it as a gentle plateau under your hands, not a ramp into discomfort.
Keep your keyboard at elbow height with wrists straight to prevent strain and discomfort.
Your mouse should be close enough so you don’t stretch awkwardly for it, with your wrist in a neutral position because reaching or twisting increases tension and aches. Switching to an ergonomic mouse setup like a vertical or trackball mouse can also significantly reduce the risk of repetitive strain injury (RSI).
Specific positioning tips:
Ergonomic setup:
Proper positioning helps keep your shoulders relaxed and your body happy all day.
 2")
Now that you know how to set up your desk so your arms and eyes are happy, let’s talk about your feet because if your feet aren’t comfortable, nothing else will be either.
Think about it: you’re standing, usually for quite a while, so your footwear and mats matter.
You want shoes that give your feet support, not just style points. Sneakers with arch support or cushioned insoles work wonders. Ditch high heels or flip-flops unless you’re into the torture.
All right, then there’s mats. Standing on a hard floor all day is no joke, and a good anti-fatigue mat is like a little life raft for your feet. It redistributes pressure and keeps your legs happier, so you can stand longer without feeling like your feet are going to revolt.
Important Fact:
Use an anti-fatigue mat at least 3/4 inch (19 mm) thick to effectively reduce pressure on your feet and legs.
Step 1: Select footwear with proper support.
Choose sneakers with firm arch support and cushioned insoles, because supportive shoes reduce fatigue and discomfort.
Step 2: Avoid wearing high heels and flip-flops, because they lack proper support and can cause pain or injury over time.
Step 3: Place a high-quality anti-fatigue mat on the floor where you stand, because it helps decrease fatigue and prevents soreness.
Step 4: Ensure the mat covers the area where you stand most frequently, approximately a 3-foot by 2-foot space, to provide maximum support.
Additional Tip: Investing in high-durability, waterproof, and stain-resistant anti-fatigue mats ensures long-term comfort and easier maintenance in busy environments.
Common Mistake:
Standing directly on hard flooring without any support causes foot soreness and leg fatigue.
To prevent this, always use an anti-fatigue mat designed for prolonged standing, and choose supportive footwear with appropriate arch and heel cushioning.
Maintaining good posture while standing might seem simple stand upright, right? but it’s actually a bit more of a balancing act than most of us realize. You want to keep your head aligned with your shoulders because proper head positioning reduces neck strain and maintains spinal balance. Keep your shoulders stacked directly over your hips to support this alignment; if your shoulders drift forward or backward, it causes upper back discomfort and disrupts overall posture. Think of your body as a well-built tower: if one part leans too far forward or backward, everything gets out of whack.
Here’s a quick visual:
| Good Posture Tips | Common Mistakes |
|---|---|
| Keep your head level, with ears over shoulders, so your gaze remains straight and comfortable, preventing neck strain. | Slouching or jutting your chin forward, which compresses the cervical spine and causes neck tension. |
| Slightly bend your knees about 15 to 20 degrees because this provides a natural wrist for your weight and reduces lower back pressure. | Locking your knees completely, which can cause blood flow restriction and stiffness. |
| Distribute your weight evenly between both feet roughly shoulder-width apart, with feet pointing forward and shift weight from heel to ball of foot. | Leaning forward or backward excessively, which causes imbalance and muscular fatigue. |
| Keep your ears aligned with your shoulders to maintain neutral cervical spine posture, minimizing neck and shoulder stress. | Hunching shoulders forward, leading to rounded upper back (kyphosis) and shoulder tightness. |
Important Measurements and Formulas:
All right, remember: your body’s like that friend who always wants to help but sometimes overreaches so stay balanced and aware. Regularly check your posture by using a mirror or asking a colleague to observe from behind, ensuring your body remains aligned throughout your day.
Absolutely, sitting or standing in one spot for hours on end is like trying to hold a plank position at your desk because it can lead to muscle fatigue and stiffness. The key is to keep your body moving and take regular breaks. Here’s what you can do:
Specific duration for breaks and movements:
Common mistakes to avoid:
Tip: Movement breaks are your secret weapon against stiffness and fatigue, so make them a regular part of your daily routine.
If you’re not careful, standing at your desk can turn into a new kind of daily discomfort rather than relief, especially if you fall into some common pitfalls.
You might find yourself leaning forward, putting strain on your neck and shoulders because you’re trying to get closer to your screen for clarity.
But really, you’re arching your back in a way that signals tiredness.
Or maybe your hips and knees are locking up from standing too stiffly, making every shift feel like a test of patience.
All right, avoid standing in one position for too long because your legs and lower back will thank you.
And don’t forget to keep your monitor at eye level, or you’ll be craning your neck like a confused owl.
1. Leaning Forward While Standing
Because leaning forward causes neck and shoulder strain, position your monitor so that the top of the screen is at or just below eye level, approximately 20 to 30 inches from your face.
Lower the monitor until the top aligns with your eye level, because this reduces the need to crane your neck and prevents poor posture.
2. Standing in One Position for Too Long
Standing for more than 20 to 30 minutes without shifting your weight can cause fatigue in your legs and lower back.
Alternate your stance or take brief seated breaks to prevent stiffness and discomfort.
3. Locking Your Hips and Knees
Standing with legs locked causes unnecessary strain and discomfort.
Keep your knees slightly bent about 5 to 15 degrees and shift your weight from one leg to the other every few minutes, because this improves circulation and reduces fatigue.
Ever notice how, after switching from sitting to standing a few times, your body starts to feel like a confusing game of musical chairs? It’s like your muscles are saying, “Hold up, I wasn’t expecting this.”
To make the change smoother, keep these tips in mind:
To make the change smoother, remember these simple tips to keep your muscles comfortable and safe.
Key fact: Maintain a standing position with your hips at about 90 degrees and your feet flat on the floor, approximately shoulder-width apart, for ergonomic comfort.
All right, the trick is to avoid the quick snap between sitting and standing. Your muscles and joints need time to catch up, so take it slow and stay mindful.
You’ll want an anti-fatigue mat that’s plush enough to cushion your feet but firm enough to keep you stable.
Look for one with good arch support, like those gel or foam-filled options your lower back and legs will thank you.
All right, avoid super slippery surfaces, especially if you tend to shift around.
And honestly, a little bit of cushioning can make those longer standing sessions way more bearable.
To prevent leg and foot pain, you gotta move around, friend. Shift your weight every time you notice discomfort, and don’t just stand there like a statue.
All right, you need supportive shoes or anti-fatigue mats, because standing all day on hard surfaces is like asking your feet to do a marathon without prep.
Keep your knees slightly bent and avoid locking them.
Basically, treat your legs like royalty they’ll thank you.
You’re gonna want your desk height to match your elbows at a roughly 90-degree angle when you stand. For some, that’s about waist level; for others, a bit higher or lower.
All right, I know it sounds simple, but if it’s too high or too low, your shoulders or back will resent you. So, find that sweet spot where your forearms rest comfortably, and your neck stays relaxed yeah, that’s the winning height.
All right, you want your monitor at eye level, right? Think of it like this: your screen should be about arm’s length away, with the top of the monitor roughly at your eye line so you’re not craning or staring down.
Adjust the height using your desk or monitor stand. If necessary, tilt the screen slightly back your neck will thank you, and you’ll avoid that “crane-on-a-flagpole” feeling, guaranteed.
You should try simple exercises like gentle stretches, ankle rolls, or heel-to-toe walks to keep your legs and back moving.
All right, you’ll notice your calves get tight or your shoulders tense those are clues to shift position.
I’ve found that switching between standing and sitting, then lunging or bending your hips occasionally, helps blood flow and keeps your muscles from turning into lead weights.
Alright, so you’ve set up your standing desk and are ready to roll. Just remember, it’s all about finding that sweet spot where your body feels supported not like a marionette with tangled strings. You’ll stumble, sure, but that’s part of the process. Stick with it, listen to your body, and don’t be afraid to make tiny tweaks. You’re not just standing; you’re giving your back some much-needed love think of it as the best kind of investment.


