Physical Address
304 North Cardinal St.
Dorchester Center, MA 02124
Physical Address
304 North Cardinal St.
Dorchester Center, MA 02124

If your lower back is talking to you by 3pm, you already know this is a problem worth solving. You want your Steelcase Leap V2 to truly support your body, but figuring out how can feel tricky.
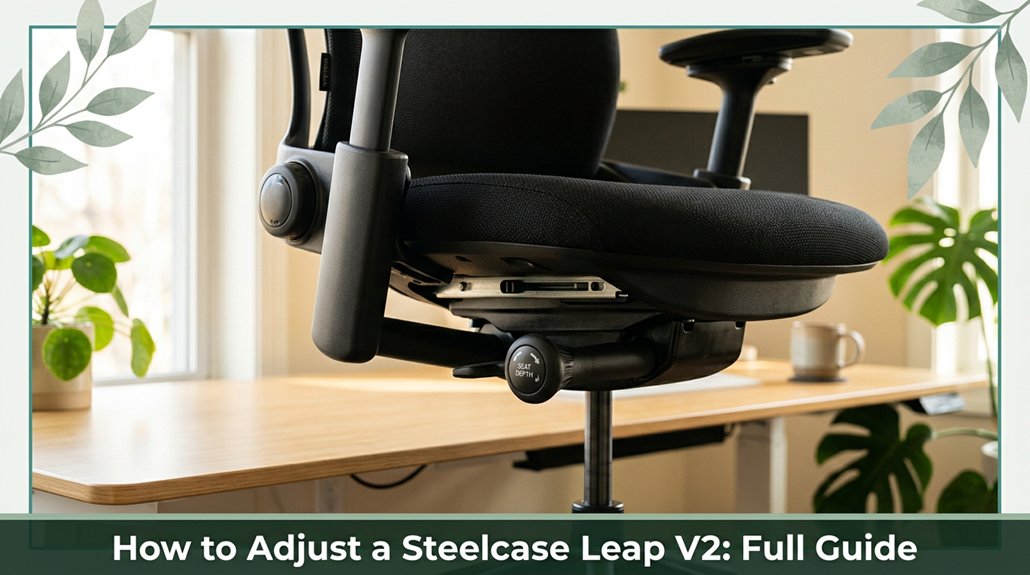
Start with the seat height sit fully back and lift or lower the lever until your hips are level with your knees no one wants to sit at a weird angle. Then, adjust the seat depth so there’s about 1-2 inches between your knees and the edge.
Next, tilt, tension, and lumbar support should match your spine’s natural curve easy tweaks that really pay off. Want to get comfy and avoid that “stiff after hours” feeling? Stick around; there’s more to fine-tuning your setup.
This article contains affiliate links. If you purchase through them, I may earn a small commission at no extra cost to you. I only recommend products I genuinely believe in.
Here’s the thing: if you’re not adjusting your chair properly, you might as well be inviting discomfort and long-term health problems to crash your workday party.
When you adjust the Steelcase Leap V2 correctly, it lines up your spine to a neutral posture. According to ergonomic research, this reduces lumbar disc pressure by up to 30 percent, which means less stress on your lower back a common area of pain, especially after hours of sitting.
Proper adjustment of the Steelcase Leap V2 reduces lumbar disc pressure by up to 30%, easing lower back pain during long hours of sitting.
Proper seat depth keeps your knees in a comfortable 2–3 cm gap (about an inch or so), preventing hamstring tension and circulation issues. Proper seat depth can also help reduce fatigue and improve circulation during extended periods of sitting.
If you calibrate your lumbar support at the L3–L5 region (the middle to lower lumbar vertebrae), you can lower lower-back muscle activity by approximately 15 percent, according to recent studies on spinal biomechanics. Maintaining correct posture throughout your workday further enhances these benefits, promoting overall spinal health.
Small adjustments like these lead to significant health benefits.
Remember, a properly adjusted chair supports your cervical, thoracic, and lumbar regions, reducing the risk of conditions such as sciatica, thoracic kyphosis, and lower back strain.
Your back will thank you for paying attention to these details, especially during long work sessions.
Adjusting the seat height on your Steelcase Leap V2 might seem straightforward at first, but getting it just right can make all the difference between feeling like you’re sitting in your chair and actually feeling supported. So, here’s the scoop: locate the lever on the right rear side of your seat. Sit down with your full weight; this helps in accurately adjusting the height to your ergonomic needs.
Then, pull the lever up to lower the seat, or stand up, lift the lever, and slide the seat up to raise it. Release the lever to lock it in place. All right, now, check your posture: your hips should be level with your knees, and your thighs should be parallel to the floor following ergonomic guidelines for optimal lumbar and sacral support.
Proper seat height helps reduce strain on the lumbar spine and improves overall ergonomic alignment, especially for those who sit more than 6 hours a day. Proper adjustment ensures that your seat height promotes spinal health and reduces the risk of discomfort or musculoskeletal issues. Ergonomic benefits also include better circulation and decreased muscle fatigue throughout your workday.

When you sit in your chair, the last thing you want is to feel like your legs are trying to escape or that your circulation is turning into a blocked highway. Trust me, I’ve been there those numb legs and weird pressure on the back of your knees are no fun.
That’s why setting the seat depth correctly is a game changer. You want about 1–2 inches of space between your knees and the front edge of the seat just enough to avoid pressure on your popliteal fossa and keep blood flowing, according to OSHA ergonomic guidelines.
To check if you’re at the right depth, sit fully back in the chair and slide your fingers into that gap. Two fingers’ width equals roughly an inch, which ensures proper clearance. Adjusting the seat depth to maintain this gap keeps your hips at a near-vertical angle, supporting comfortable, healthy circulation.
According to research on spinal biomechanics, maintaining proper seat depth prevents compression of the lower back and optimizes posture. This adjustment alleviates pressure on the soft tissues at the back of the knees and promotes adequate blood flow. Proper seat depth reduces the risk of numbness or swelling during long periods of sitting.
In short, setting your seat depth correctly about 1–2 inches of space helps maintain healthy circulation and makes prolonged sitting much more comfortable.
Your chair’s tilt and tension adjustments are like the secret sauce for making your workday comfortable and surprisingly customizable. You’ll love how easily you can switch from upright support to relaxed recline with a quick flip of the lever paddle, choosing from five preset angles.
These angles typically range from an upright position (around 90 degrees) to a recline angle that may be up to 135 degrees, which helps reduce lower back strain during extended sitting periods.
Want to stay active? Crank the tension knob clockwise to resist leaning back, or loosen it if you prefer a gentle sway. According to OSHA ergonomic guidelines, proper tension adjustment helps support the thoracic and lumbar regions by providing appropriate resistive force aligned with your body weight and sitting habits. Here’s the key: the backrest tension is separate from the tilt release, so you can fine-tune firmness without changing your preferred recline position.
Additionally, lumbar support plays a crucial role by maintaining the natural inward curve of your lower back, which prevents strain during long hours of sitting.
| Adjustment Type | What You Do |
|---|---|
| Tilt angle | Use the front-right paddle to select your preferred angle whether upright or reclined up to 135 degrees (which means leaning back slightly, not sitting bolt upright) |
| Recline lock | Lock the backrest in place or open it to tilt freely to your desired angle |
| Tension control (backrest) | Turn the tension knob clockwise to increase resistance, helping secure your upper back comfortably, or loosen it for easier movement research on spinal biomechanics suggests this supports the lumbar and thoracic regions based on your sitting posture |
| Armrest adjustments | Change height, depth, pivot, or width as needed to support your arms properly and reduce shoulder strain |
| Tension & lock combo | Mix and match these settings to find your perfect, personalized sitting feel |

All right, let’s talk about your lumbar support, which is the small pad nestled in your chair’s backrest. You want it to match the natural curve of your lower back, specifically around the lumbar vertebrae (L3 to L5). According to OSHA ergonomic guidelines, proper lumbar support helps maintain spinal alignment and reduces the risk of lower back pain.
Adjust your lumbar support to match your lower back’s natural curve for better spinal alignment and comfort.
To adjust it, slide the lumbar handles up or down while sitting small adjustments are effective without disrupting your posture. Aim for about 1 to 2 centimeters of space between the pad and your back when you’re upright, which ensures adequate support without compression. More than that, and the pad may not provide enough support; less than that, and you might feel squeezed or restricted.
Feel for even pressure across your lower lumbar spine to avoid uncomfortable single-point contact. This ensures the support is distributing pressure evenly and supporting the vertebral column appropriately.
The tension knob on the lumbar support can be turned clockwise to firm support or counterclockwise to soften it, according to research on spinal biomechanics suggesting that supportive tension should allow a slight anterior pelvic tilt. You should set the lumbar support to provide enough resistance to tilt your pelvis forward slightly similar to the natural lordotic curve but not so much that it feels like pushing through concrete.
Properly adjusted lumbar support prevents excessive lumbar lordosis or kyphosis, which can lead to discomfort or musculoskeletal issues over time. Achieving this balance is crucial, especially considering that adjustable components enhance overall comfort tailored to individual needs. Remember, the goal is to achieve a balanced, supported seated posture that promotes spinal health and comfort.
Adjusting your armrest pivot mightn’t seem like a big deal, but trust me, it’s a game-changer. Imagine your arms swinging naturally while typing or clicking; aligning the pads inward or outward can make that happen. You want the armrest pads to follow your arm’s natural motion, which can reduce shoulder strain and help prevent discomfort after long periods of sitting, according to OSHA ergonomic guidelines.
The pivot adjustability, up to 45°, helps you find the optimal angle where your arms are supported without feeling confined or boxed in. This range allows you to accommodate different arm movements and body postures, especially useful for those with shoulder or cervical issues. Just release the lock, tweak the angle, and lock it again.
Doing this while seated is ideal because your weight on the chair stabilizes the adjustment.
When your armrests are properly aligned, you’ll wonder why you didn’t do this sooner. Ergonomic armrest adjustment can significantly improve your overall posture by maintaining proper shoulder and upper limb alignment, helping to prevent musculoskeletal discomfort during extended work sessions.
You should reevaluate your chair adjustments at least once a year, or whenever something feels off like that nagging neck ache or a weird shift in comfort.
Think of it as tuning up your bike; if you ignore it, things might break or cause discomfort. Also, after big moves or if your body changes, check in sooner.
Regular little tweaks keep you comfortable and prevent those “why does my back hate me” moments.
You can’t lock multiple recline positions at once, no matter how tempting it sounds your chair’s design is like a one-stop shop, only letting you lock one angle at a time.
Think of the paddles as bouncers at a club they won’t let in more than one at a time. So, you’ll have to pick your favorite, then fine-tune with tension or accessories if you want more “locks” in your comfort routine.
You want the tension set for those long hours, right? Honestly, aim for that medium range (around 50%). That way, your lumbar gets enough support without feeling stiff, and your shoulders don’t start bouncing like a trampoline.
Adjust it a bit every hour if needed your body changes, and so should your seat. Trust me, a comfortable tension keeps your spine happy and makes those marathon workdays a lot less brutal.
You’ll know your lumbar support is properly aligned when you feel a gentle, consistent contact between the pad and your lower back’s natural curve no gaps, no hotspots, just steady support.
All right, look for that nice 1–2 cm gap and check if the pad touches your spine comfortably as you sit upright. Trust your touch and your mirror; if it feels like your lumbar’s getting a hug, you’re there.
You should tweak your desk setup based on what feels natural.
If you’re sitting at a high desk, lower your seat to keep hips and knees aligned nobody wants to feel like they’re on a roller coaster.
For standing desks, make sure your monitor’s eye level and your keyboard’s close so your neck and shoulders stay happy.
You want your body to feel supported, not like it’s doing all the heavy lifting.
Alright, once you get your chair dialed in just right, it’s like upgrading from a tricycle to a Harley you’re cruising smoothly, not bouncing around or hanging on for dear life. You won’t just feel a little better; you’ll feel like your spine’s been given a pep talk. So, go ahead, take those few adjustments seriously. Your body will thank you and honestly, you might even enjoy work a lot more.


