Physical Address
304 North Cardinal St.
Dorchester Center, MA 02124
Physical Address
304 North Cardinal St.
Dorchester Center, MA 02124

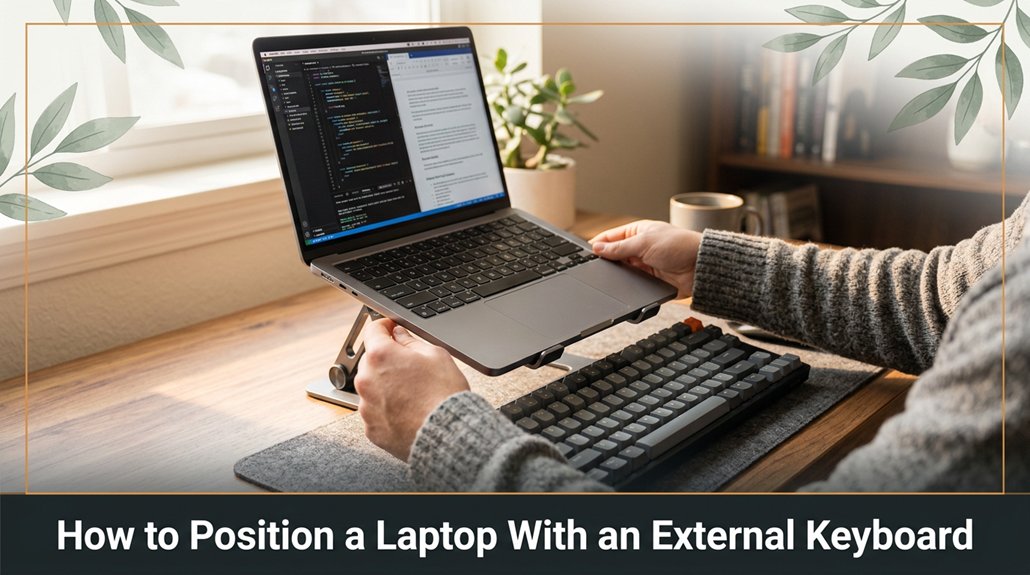
If your neck aches or your wrists feel strained after a long day of working on your laptop, there’s a simple fix that can make a big difference. Start by stacking your laptop on a sturdy riser or stand so it’s at eye level trust me, balancing it on your desk’s edge isn’t going to cut it.
Then, position your external keyboard so your elbows are at 90 degrees and your wrists stay neutral like you’re about to shake hands with your keyboard. Tilt the keyboard just a bit to reduce wrist strain, and keep everything close enough to avoid stretching. If you set it up right, your neck will thank you and hey, there are more tricks to perfect ergonomics beyond this point.
This article contains affiliate links. If you purchase through them, I may earn a small commission at no extra cost to you. I only recommend products I genuinely believe in.
Honestly, figuring out the perfect eye level for your laptop can feel like chasing a unicorn everything adjusts, and yet, it still feels slightly off. That’s where your laptop external keyboard setup comes into play because proper positioning is essential for ergonomic comfort.
First, raise your laptop on a sturdy stack such as thick books, a specialized laptop stand like the Rain Design mStand, or a height-adjustable riser because this elevates the screen to your eye level. When doing this, ensure the top of the monitor is at or just below your eye level, because looking slightly down reduces strain on the cervical spine.
Elevate your laptop on a sturdy stand or books to align the top of the monitor with your eye level for better ergonomics.
Next, position your external keyboard and mouse because your elbows should stay close to your sides, forming roughly a 90-degree angle to prevent shoulder and wrist strain. Place the keyboard on a desk or surface that allows your forearms to be parallel to the ground.
Key measurement:
– Your monitor screen height should be adjusted so the top third of the monitor aligns with your eye line.
Now, small adjustments are necessary to feel natural and comfortable. Tweak the height of your laptop stand and keyboard until your neck remains relaxed, and your posture is upright and supported.
Avoid common mistakes such as looking up at the monitor because it causes neck strain set the monitor height so the top third is at eye level. Also, avoid craning your neck downward or upward, as it increases discomfort position the screen so the top third aligns with your eye line.
Ensure your elbows remain close to your sides and at about a 90-degree angle because it supports ergonomic wrist and shoulder posture. Additionally, investing in ergonomic accessories like a monitor arm or a properly adjusted USB-C hub can greatly enhance your setup.
Using a laptop without raising it can cause awkward neck angles use a laptop stand or stack to elevate it.

The importance of proper external keyboard placement often gets overlooked until you’re halfway through a long typing session and start feeling that weird numbness creeping into your shoulders or wrists.
Believe me, I’ve been there thinking, “This can’t be right,” while my hands go numb and my back tightens up.
Here’s the thing: if your keyboard isn’t positioned correctly, it throws your entire posture off. You want your elbows at about a 90-degree angle because this minimizes strain on your shoulders and forearms.
Keep your wrists straight because bent wrists can lead to repetitive strain injuries like carpal tunnel syndrome. Position the keyboard at a height where you don’t have to reach or hunch, which typically means aligning the keyboard’s top surface with your elbow height.
This helps maintain a neutral wrist position, reducing fatigue during long typing sessions.
Specific Measurement Fact:
– The ideal keyboard height places the keyboard surface at or just below your elbow height, which is approximately 2 inches below your seated elbow when your arms are relaxed at your sides with elbows bent at 90 degrees.
Proper placement isn’t just about comfort; it’s about avoiding nagging aches that make you regret that extra hour of work.
Additionally, understanding ergonomic positioning can help prevent overuse injuries and support long-term comfort.
Many people struggle because they overlook these details, leading to discomfort and potential injury over time.
Adjust your keyboard height and position carefully to maintain a neutral, ergonomic posture and support your well-being during extended computer use.
Building the perfect workspace starts with choosing the right desk and chair because, let’s face it, no amount of ergonomic keyboard positioning will save your back if your furniture fights you at every turn. You want a desk that’s sturdy, not wobbling with every typing tap, and a chair that supports your lower back without pushing you into a pretzel.
Ensuring your workspace has the right black desk setup enhances focus and creates a sleek, modern aesthetic.
All right, now you’re halfway there. You’ve got the foundation next, we fine-tune for comfort.

Your external keyboard isn’t just an afterthought; it’s the foundation for comfort during hours of typing, so it’s worth taking a moment to arrange it properly. You want your hands to fall naturally on the keys without reaching. Here’s a quick cheat sheet:
| Key Position | Hand Placement | Comfort Tip |
|---|---|---|
| Center | Wrists straight | Keep wrists neutral to reduce strain |
| Slightly Left | Left hand | Align with shoulder to avoid shoulder tension |
| Slightly Right | Right hand | Avoid overreaching to prevent shoulder fatigue |
| Forward Edge | Palm resting | Use a wrist rest if necessary to maintain neutral wrists |
| Back Edge | Key edge | Keep elbows close to your sides to maintain proper posture |
Raise and tilt the keyboard to suit your comfort:
– Keep the keyboard flat or tilt it gently, as tilting too steeply can cause wrist strain.
Keyboard Tilt Tip:
Gently tilt the keyboard between 0° and 10°, depending on personal comfort and ergonomic preference.
Position the keyboard approximately 10 to 15 inches from your body, so your elbows stay close to your sides when typing.
Ergonomic Best Practice:
Maintain your wrists in a neutral position, with wrists straight and hands slightly below elbow height, to reduce the risk of repetitive strain injuries.
Additionally, adjusting your keyboard height relative to your elbows ensures optimal arm and wrist alignment, further minimizing strain.
Why Proper Arrangement Matters:
Correct positioning minimizes undue stress on joints and tendons, prevents fatigue, and enhances typing efficiency during long work sessions.
Adjusting your laptop screen angle is often overlooked, but trust me, it’s where many setups go awry leading to that unavoidable neck crick after a few hours.
All right, here’s the thing: you want your screen at eye level, not looking down or up. You might even need a riser or stacking books if your laptop’s too low. Think about this:
Look, this isn’t just about comfort; it’s about avoiding that annoying neck pain that hits around 3 p.m. Trust me, once it’s right, you’ll wonder why you didn’t do it sooner.
Specific measurements and tips for optimal screen angle:
Common mistakes to avoid:
– Looking down at a laptop placed below eye level, which strains the neck and causes discomfort because it forces you to cran downward, putting excessive stress on cervical muscles.
Instead, elevate your laptop or use a riser so the top of the screen is aligned with your eyes.
– Positioning the screen too high, making you tilt your head back, which leads to neck soreness because it hyperextends your neck muscles.
Aim for the top of the screen to be level with your eyes.
– Not adjusting the tilt, resulting in glare or distorted images, because improper tilt forces you to squint or crane your neck.
Adjust the screen’s tilt so the display is directly in your line of sight for clear visibility.
When it comes to preventing wrist pain, you might find yourself fighting with the keyboard like it’s a stubborn poker game.
All right, first, keep your wrists straight because bent or angled wrists increase strain and risk of injury. Don’t sag or dive your wrists downward; maintain a neutral position. Rest your forearms comfortably on the desk or ergonomic wrist rest; if they float or you’re angling up or down to reach the keys, you’re setting yourself up for trouble.
Lower the keyboard to the correct height so your elbows remain near a 90-degree angle when you type, because this minimizes tension in the shoulder and wrist muscles.
To determine the ideal keyboard height, measure from the surface of the desk to your elbow crease while seated with your shoulders relaxed and forearms parallel to the ground.
Adjust your keyboard height if it’s too high or too low, ensuring this 90-degree elbow angle. Position the keyboard so that your hands hover just above the keys, not drop or stretch out, because this helps keep your wrists aligned naturally.
Everyone’s hands are different, so tweak the keyboard’s position until it feels comfortable but not strained. The main goal is to keep your wrists in a neutral position, like you’re gently holding a baseball, not trying to crack a whip.
Key facts:
All right, you’ve got your monitor in place, and now it’s time to position the screen at a comfortable distance because squinting at tiny text or craning your neck causes headaches faster than you can say “ergonomics.” The general rule of thumb is that your eyes should be about an arm’s length from the screen, which is roughly 20 to 30 inches.
Highlighted Fact:
Position the monitor 20 to 30 inches from your face.
First, ensure the top of the monitor or screen is just below your eye level because looking slightly downward reduces strain on your neck and shoulders.
Position the monitor so the top is just below eye level to ease neck and shoulder tension.
Second, adjust the monitor height so that the top of the screen is at or just below your eye level.
Third, sit back comfortably, ensuring your eyes naturally land on the middle of the display when you look straight ahead.
Remember, even with specific measurements, it’s about feeling right. If your eyes feel strained or your neck aches, make adjustments accordingly.
Common Mistakes and How to Correct Them:
Adjust until these conditions are met, ensuring a comfortable and ergonomically sound workspace.
Imagine holding a monitor stand or docking station in one hand, trying to figure out how it’s supposed to sit on your desk without wobbling or blocking your view in an awkward way. You’ve probably spent 15 minutes fiddling with screws that feel looser than they should be.
Here’s the trick: all stands and docks need stability, so tighten those clamps firmly but avoid stripping the threads.
Adjust the height so your laptop’s top is roughly level with your eyes, because this reduces neck strain and promotes good posture. For precise placement, position the top of your monitor or laptop screen 20 to 30 inches from your face, at or just below eye level.
If your stand is adjustable, experiment with tilt and angle to find a comfortable viewing position. Remember, most people waste time obsessing over perfect angles, so aim for a comfortable, stable setup instead.
Once the stand or dock is stable and properly adjusted, carefully place your laptop on it. The goal is easy viewing with minimal neck strain, meaning the screen should be at or just below eye level, and the viewing angle should reduce glare and discomfort.
Special note:
Welcome to your desk setup adventures, where precision and stability make all the difference.
You’ve probably seen people hunch over their laptops with their necks craned downward, as if they’re peering into a tiny smartphone. That’s a common mistake. Here’s what happens: if you tilt your monitor too low, your neck becomes a magnet for tension.
Your shoulders creep upward to compensate for the awkward position, causing muscle strain and fatigue. Your wrists bend unnaturally, creating strain that can lead to carpal tunnel syndrome. Your eyes strain from looking down for hours straight, leading to discomfort and potential headaches.
To fix this, raise your screen to eye level because that aligns your neck in a neutral, relaxed position. Lower the monitor until the top of the screen is at or just below your eye level, which typically means about 20 to 30 inches from your face.
Keep your keyboard at a height where your elbows are bent at roughly 90 degrees and your forearms are parallel to the ground, because this minimizes wrist and shoulder strain.
Specific measurements and tips:
Remember, a good ergonomic setup isn’t just a luxury it’s essential for comfort and health. Avoid vague adjustments like “making it comfortable” and instead use these precise measurements to create an optimal workspace.
Don’t let poor posture turn your workspace into a source of discomfort set up properly and maintain good habits to prevent aches and injuries.
Support accessories like wrist rests and laptop stands might seem like minor upgrades, but trust me, they can make a world of difference especially if you’ve ever played the “awkward wrist bend” or “porkpie hat neck” game for hours. You know how it goes: you fiddle with your setup, trying to get everything in the perfect spot, only to realize your wrists are protesting or your neck’s stiff as a board.
All right, grab a wrist rest make sure it’s at the right height so your wrists stay straight because improper wrist positioning can cause strain and discomfort.
Next, position your laptop stand to raise your screen until your eyes stay level ideally, so the top of your monitor is at or just below your eye level because looking slightly downward reduces neck strain.
Measure your setup to ensure proper alignment and prevent unnecessary reaching or straining.
Specific measurement fact:
– The top of the monitor should be at or just below your eye level.
Step 1: Place your wrist on the wrist rest when typing or using your mouse, because this supports natural wrist posture and prevents bending.
Step 2: Adjust the height of your wrist rest to align with the height of your keyboard or mouse surface, usually about the same as your desktop height.
Step 3: Position your laptop stand so the screen is approximately 20 to 30 inches from your face because this distance minimizes eye strain and promotes comfortable viewing.
Step 4: Tilt the laptop slightly, if adjustable, to reduce glare and maintain a neutral neck position.
Common mistake and correction:
Sometimes, the biggest trouble with an external keyboard isn’t the keyboard itself, it’s the discomfort sneaking up after a few hours of typing. You might feel wrist pain, shoulder tension, or even neck strain.
Here’s what trips people up:
Look, these issues happen because we ignore the little details that make a big difference.
First, make sure your keyboard is at elbow height because a proper height allows the forearms to be parallel to the ground.
Important measurement:
*Position your keyboard so that your elbows are bent at approximately 90 degrees when typing, with wrists straight and relaxed.*
Second, adjust the tilt of your keyboard to keep your wrists in a neutral position because bending your wrists can lead to strain and discomfort.
Third, consider using wrist rests. It’s like a cushion for your wrists you didn’t know you needed because they provide support and help maintain proper wrist position.
Fix these, and you’ll thank yourself mid-afternoon.
Getting into a routine that keeps your posture healthy isn’t just a good idea; it’s the only way you’ll stick with it. You need consistency, like brushing your teeth, because otherwise, the habit will slip away.
Set specific times for example, in the morning and late afternoon to check yourself. Because these are times when you can remind yourself to correct or maintain your posture.
Use reminders, alarms, or notifications on your smartphone any method that works for you to prompt these check-ins.
Track your progress to stay motivated seeing small wins reinforces your commitment and makes maintaining good posture more achievable. Remember, this isn’t about perfection; it’s about making small daily improvements.
| Motivation | Frustration | Reward |
|---|---|---|
| Stick to it | Hunch creeping | Feel great |
| Daily check | Neck ache | Confidence |
| Small wins | Slump | Better posture |
| Routine works | Soreness | Comfort always |
Common Mistakes and Corrections:
Key Measurements to Remember:
You gotta give your external keyboard a little grip.
Place it on a non-slip mat or a piece of shelf liner trust me, that stuff sticks without damaging. If it still slips, consider a keyboard with rubber pads or add some double-sided tape underneath.
Obvious, right? But sometimes, we overlook the simple fixes.
Now, you’re not mid-typing, chasing your keyboard across the desk victory!
All right, you want to tame your desk chaos, huh? Start by using cable clips think of them as tiny jailers keeping cords out of sight and bite-sized.
Use a power strip with a flat profile to keep everything consolidated. Velcro straps become your best friends, bundling chaos into neat little sausages.
Finally, route wires along desk edges or underneath to hide the mess because a clean desk isn’t just good looks, it’s peace of mind.
You want a keyboard that’s comfy for your fingers, right? First, look for one with a slight tilt your wrists will thank you.
Mechanical keys feel better if you type a lot, but if noise bugs you, choose quieter membrane or scissor-switch ones.
Make sure it’s the size you prefer compact for desk space or full if you need dedicated numpad.
Basically, try a few, pick what feels natural, and don’t settle for discomfort.
Yes, you can use a lap tray for external keyboards. All right, but here’s the thing most lap trays aren’t designed for keyboard use, so you might end up with a wobbling mess.
Choose one with a flat, sturdy surface and enough space for your keyboard and mouse if needed.
Just keep in mind, comfort varies, and you might need to experiment to find what doesn’t turn into a chore after five minutes.
You should recheck your position every 30 minutes or so.
Trust me, you’ll start to feel muscle tension or neck strain if you stay static too long. It’s like a bad relationship you think it’s fine until suddenly, you’re aware of every flaw.
Adjust your keyboard, monitor, and chair to keep your posture healthy. Do it regularly, and you’ll avoid nagging pains that wreck your evening.
So, you’ve got your keyboard and laptop sitting pretty now, like they’re ready for a cozy night in except it’s your workspace. Just remember, perfect posture isn’t built in a day. Keep tweaking, stay mindful, and sooner than you think, this setup will feel like an extension of your own body. Most importantly, don’t forget: a good position is like a good joke timing and setup make all the difference.


