Physical Address
304 North Cardinal St.
Dorchester Center, MA 02124
Physical Address
304 North Cardinal St.
Dorchester Center, MA 02124

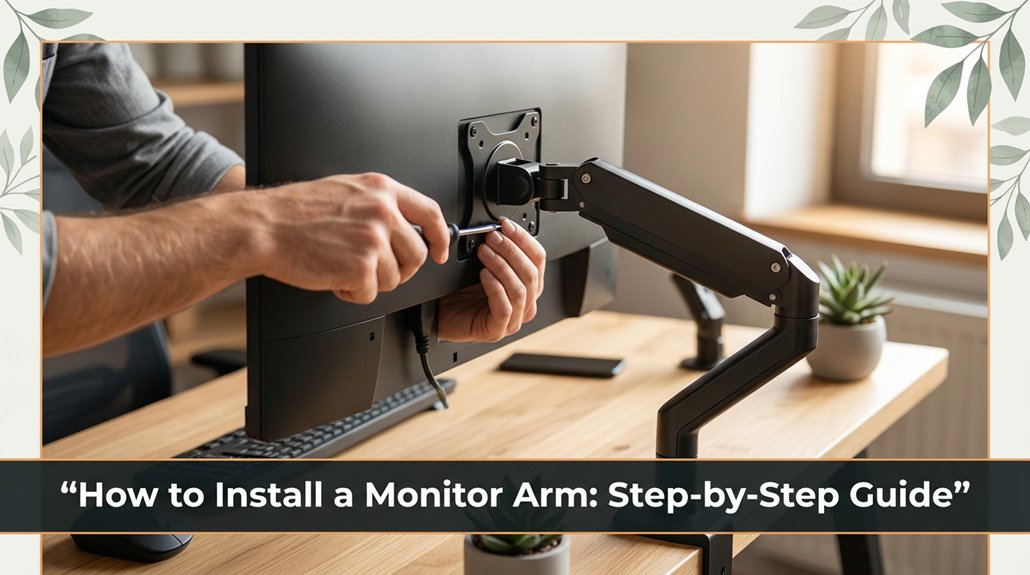
First, you’ve probably held the monitor arm in one hand and tried to tighten the clamp with the other, only to realize it’s not as straightforward as the manual says. Before you start, measure your desk to ensure there’s enough space behind for the arm to extend fully without obstruction.
Attach the mounting plate or clamp securely just be careful not to over-tighten, or you might strip the threads. Next, mount your monitor, check that everything’s level, and adjust for your most comfortable viewing angle. Follow these steps, and you’ll avoid common pitfalls, making your monitor arm stable and set up in no time.
This article contains affiliate links. If you purchase through them, I may earn a small commission at no extra cost to you. I only recommend products I genuinely believe in.
Honestly, it’s easy to get caught up in nifty features or flashy designs, but what really matters is making sure it fits your setup.
Think about your monitor’s weight and size because an arm that can’t support the monitor’s weight or dimensions won’t hold it securely and may cause the monitor to sag or fall. For example, if your monitor weighs over 15 pounds or has an irregular shape, verify that the arm can support at least that weight and accommodates the monitor’s dimensions.
Choose an arm that supports your monitor’s weight and size to prevent sagging or falling.
Check how much space you need for movement because some arms provide full flexibility, allowing you to adjust height, tilt, swivel, and rotation, while others are more limited.
Consider if you need horizontal reach of at least 20 inches or vertical adjustability of at least 12 inches, depending on your workspace and preferred viewing angles.
When you know what you need, learning *how to install monitor arms* becomes much simpler.
Follow the manufacturer’s instructions carefully, ensuring the clamp or grommet mount fits your desk thickness typically between 0.4 and 3 inches to secure the arm firmly because a loose attachment can cause instability or damage your desk.
Standout Facts:
Common mistakes include selecting a monitor arm that can’t support your monitor’s weight, which leads to sagging or falling.
For example, using an arm rated for 10 pounds for a 20-pound monitor causes instability and risks damage. Instead, choose an arm rated at least 50% higher than your monitor’s weight.
Another mistake isn’t considering the space for movement, which results in restricted positioning and discomfort.
For instance, an arm with only 8 inches of vertical adjustment may not be sufficient if your desk height differs significantly from your eye level; opt for one with at least 12 inches of vertical reach.

If you don’t want to find yourself in the middle of the installation with a sock drawer’s worth of tools you’ve never seen before, now’s the time to gather what you’ll need.
All right, grab a Phillips screwdriver, and maybe an Allen wrench if your monitor arm requires it. You’ll probably need a level trust me, it’ll save you from wonky monitors and a tape measure if you want perfect placement.
Note: Check your monitor arm’s instructions for any specialized tools required for assembly, such as a hex key or specific mounting anchors.
Now, you might think you can wing it been there, tried that but you’ll thank yourself later for a few minutes of prep. The right tools make the job smoother, faster, and less frustrating. Plus, they help prevent mistakes like tightening screws backwards or stripping bolts.
Important Measurement:
Position the monitor arm so that the top of the screen is at or just below your eye level, which is generally 48 to 52 inches from the floor, depending on your height, for ergonomic comfort.
Common Mistake to Avoid:
Tightening screws with the wrong screwdriver bit, which can strip the screw head. Always use the correct Phillips or Allen wrench as specified.
Why Preparation Matters:
Gathering the right tools before starting ensures a smoother installation process because it prevents unnecessary interruptions and helps maintain proper alignment and secure attachment. Additionally, selecting a compatible monitor size and weight support is crucial for a secure and stable setup, as specified in the adjustable dual monitor arm features.
Taking these steps now guarantees a safer, more efficient setup and a more comfortable workspace.

Measuring your desk space before mounting your monitor arm might seem straightforward, but trust me, it’s where a lot of people jump the gun usually because the manual promises a quick install and reality hits the “oh no” moment.
Here’s the thing: Your setup is unique. You need to take into account your monitor’s size, the arm’s reach, and clearance for adjusting.
Measurement Fact:
The arm’s reach should be at least 12 inches longer than the width of the monitor for optimal movement and adjustment.
A too-tight fit will turn your sleek new arm into a fragile paperweight.
Grab your mounting hardware and hold it up to your desk. Now, take a good look at whether your clamp fits snugly around the desk edge or if you need to adjust the mounting plate because a proper fit ensures stability.
This is where many people get stuck it’s all about positioning. You want the clamp or plate to be flush and tight, not wobbling or slipping, because a secure connection maintains monitor stability and prevents accidents.
Tighten everything little by little, alternating sides if it’s a screw clamp, because even pressure helps ensure the clamp holds evenly. Don’t crank so hard that you crack your desk or strip the threads; trust me, I’ve been there.
If your setup includes a mounting plate, make sure it’s aligned so your arm can swing freely because proper alignment prevents unnecessary strain and allows full adjustment of your monitor.
Double-check your measurements: the top of the monitor screen should be at or just below your eye level, which is typically about 20 to 30 inches from your face, to reduce neck strain and improve ergonomic comfort.
Important Measurement Fact:
Monitor top at or just below eye level, 20 to 30 inches from your face.
To achieve this, ensure your monitor height is aligned with optimal monitor height standards that can help prevent neck pain.
Now comes the part where you actually attach your monitor arm to your desk or wall. First, tighten the clamp or mounting plate securely, because a loose arm can wobble or detach, causing damage or injury. Make sure the clamp feels snug but not so tight you strip the threads; stripping threads can ruin the mounting and compromise stability.
Next, double-check your desk thickness or wall stud placement to ensure your mounting hardware fits properly. Desk thickness measurements vary; for most standard desks, a thickness of 1 to 2 inches is typical. Wall studs are usually spaced 16 inches on center, so locate the stud to securely anchor the arm, especially when mounting to drywall.
Remember, the manual claims this takes 20 minutes, but realistically, it will likely take longer, especially when you’re balancing a wrench and holding your breath.
Tighten everything firmly but gently, because overtightening might strip or crack mounting components, leading to costly damage. Choosing a monitor arm with appropriate weight capacity ensures stability and durability during use.
Key fact:
– When tightening clamps or mounting plates, aim for a snug fit without exceeding manufacturer recommended torque levels, which are often 10-15 ft-lb for typical monitor mounts.
Follow these steps carefully for a secure, stable installation that minimizes wobbling and maximizes ergonomic benefits.
Once you’ve got your monitor arm securely attached, it’s time to mount the actual monitor. First, check your monitor’s VESA holes most are located at the back, centered, and compatible with your arm’s mount.
All right, unscrew the VESA plate if it’s not already attached because this allows you to attach the monitor directly to the mount plate.
Line up your monitor’s holes with the mount plate on the arm, then secure it with the screws provided don’t over-tighten, or you’ll crush the mounting holes, which could damage the monitor or cause it to detach.
Next, gently hang the monitor onto the arm’s mounting bracket.
No, this isn’t some fancy art installation; just swing it into place and ensure it clicks or settles securely, so the monitor stays firmly in position.
Remember, this isn’t the moment to rush your monitor needs to stay put especially after you start adjusting the position.
Tip: Position your monitor so that the top of the screen is at or just below your eye level when seated comfortably, which typically means approximately 20 to 30 inches from your face.
Common mistake: Forcing the monitor onto the arm or over-tightening the screws can damage the mounting holes or cause instability.
Instead, gently align the holes and tighten the screws just enough to secure the monitor without applying excessive force.
Adjusting your monitor for comfort might seem straightforward, but don’t underestimate how much a small tweak can save your neck and eyes in the long run. You want it at eye level no craning or looking down. The top of your screen should be just below eye height, about a 15-degree downward gaze.
For comfort, position your monitor just below eye level with a slight downward gaze to reduce strain.
Keep the monitor about an arm’s length away; too close or far creates eye strain.
Highlight:
Position the monitor approximately 20 to 30 inches from your face.
Steps for proper monitor adjustment:
Common mistakes to avoid:
Troubleshooting monitor arm installation issues can feel like solving a riddle where the clues keep changing, but don’t worry most problems boil down to a few common culprits.
First, check if you’re using the right mount for your desk because compatibility is essential for secure installation. It’s surprising how often people assume one size fits all, then hit a wall.
Next, make sure everything’s aligned before tightening screws because misalignment can prevent a stable hold. I’ve held a monitor arm in one hand and the clamp in the other, only to realize I skipped that step.
All right, sometimes the clamp just won’t tighten enough.
If the clamp won’t tighten enough:
Recheck your desk’s thickness or surface type because a mismatch here can prevent a firm grip. Measure your desk’s thickness; standard desks typically range from 1 to 3 inches in thickness. If your desk exceeds this range, select an adjustable clamp or consider a different mounting method.
Additional tips for effective installation:
Patience is your best friend because letting parts sit for a minute or two after snugging prevents stripping or uneven tightening. When tightening, do so gradually and alternately on each side to promote even pressure distribution.
Ensure the monitor arm is mounted on a stable, supportive surface to prevent wobbling or accidental dislodging. Lastly, verify the weight capacity of your monitor arm ensure it can support your monitor’s weight, measured in pounds or kilograms as specified by the manufacturer.
Common mistake to avoid:
Attempting to tighten the clamp with excessive force this can strip the threading or damage the clamp. Instead, tighten just enough to secure the arm firmly without overdoing it, and check for stability periodically.
A monitor arm isn’t a set-it-and-forget-it device; it’s more like a pet that needs a little attention now and then.
After you’ve installed it, you must keep it happy so it doesn’t sag or squeak.
Here’s what to do: regularly check and tighten any screws or joints because they loosen over time especially if you adjust the monitor daily.
Loosened screws or joints can cause the arm to sag or become unstable.
Lubricate moving parts with a small amount of silicone spray because squeaky arms are annoying and can hinder smooth movement.
When lubricating, avoid over-applying, as excess lubricant can attract dust and grime.
Keep the arm and mounting base clean by wiping them down with a soft cloth.
Dust and grime buildup can make all components harder to move smoothly and may lead to premature wear.
Important facts:
Even if you’ve double-checked every screw and verified that your monitor arm feels solid, a workspace still won’t be ergonomic or stable if you don’t pay attention to how everything is set up overall.
First, adjust the monitor height so that the top of the screen is at or just below your eye level because looking slightly down reduces strain on your cervical spine.
Lower the monitor until the top of the screen aligns with your eye level.
Align your monitor so the top is at or just below eye level for optimal comfort and reduced strain.
– The recommended distance between your eyes and the monitor should be 20 to 30 inches, depending on the size and resolution of the screen, to reduce eye strain.
Next, pinch your shoulders down and back. Your neck shouldn’t be craned forward because that posture causes neck strain and tension.
Make sure your chair supports your lumbar curve because proper lumbar support maintains the natural inward curve of your lower back, preventing discomfort and long-term injury.
Ensure that your lumbar support is positioned to fill the curve of your lower back.
Keep your keyboard and mouse close so that reaching for them doesn’t require extending your arms more than 10-12 inches, because excessive reach can cause shoulder and arm fatigue.
Position the keyboard and mouse within 10 to 12 inches from your body, allowing your elbows to stay close to your sides while typing or using the mouse.
Avoid the mistake of placing your keyboard too far away, which forces you into shoulder elevation and extension, leading to fatigue. Instead, keep these tools close enough to maintain relaxed shoulders.
Remember, it’s tempting to throw everything together and call it a day, but a little fine-tuning makes a significant difference.
This isn’t just for comfort; it’s also crucial for avoiding back pain, which tends to worsen if overlooked until it becomes severe and hard to manage.
Yeah, you can install a monitor arm without drilling if you choose a clamp-style model.
All right, pick one with a sturdy clamp that fits your desk’s thickness usually between 0.5 to 2 inches. Now, you just tighten the clamp onto the edge of your desk.
Look, most clamps work great unless your desk is thick or made of a material that’s impossible to grip. Honestly, I’ve spent more time adjusting than installing, so don’t sweat it.
Generally, monitor arms support between 4 to 20 pounds. You’re probably thinking, “Well, that’s quite a range,” and you’re right. Check the specs each arm’s support depends on its build and mounting method.
All right, if your monitor’s just above 4 pounds, no worries. But for larger screens, look for a heavy-duty arm rated for 20+ pounds. Otherwise, don’t push your luck that’s asking for a one-way ticket to frustration.
Yes, there can be compatibility issues with adjustable monitor arms. You might find that some arms don’t fit certain monitor sizes or mounting patterns like VESA incompatibility.
Your monitor’s weight or thickness could also be a problem if the arm isn’t rated for it.
All right, check your monitor specs first. Honestly, a quick look at the arm’s compatibility list can save you hours of frustration later.
You want to hide cables when using a monitor arm? Easy. You clip them behind the arm’s cable management system most come with channels or clips.
Wrap the cables neatly with Velcro ties, then tuck them into those guides. All right, avoid overstuffing the channels that’s how you turn tidy into a spaghetti mess faster than you think.
Ultimately, neat cables mean less clutter and fewer accidental yanks.
Yes, you can, but it’s trickier. Curved or textured desks make clamping a little more complicated because they can prevent the base from sitting flush.
All right, you’ll want to use a clamp with a padding or a custom mounting solution. Maybe even some shims.
Honestly, expect some trial and error. Don’t be surprised if you need to get creative that’s just part of the fun.
So there you have it. You’re now that person confidently tweaking their monitor arm, not fighting with it like I once did. Just remember measure twice, tighten once, and don’t forget to breathe. Soon enough, you’ll marvel at your perfectly positioned screen and wonder why you ever settled for less. Whatever weird obstacle pops up, just keep going you’ve got this. And honestly, it’s way more satisfying than troubleshooting that first wobbly arm.


