Physical Address
304 North Cardinal St.
Dorchester Center, MA 02124
Physical Address
304 North Cardinal St.
Dorchester Center, MA 02124

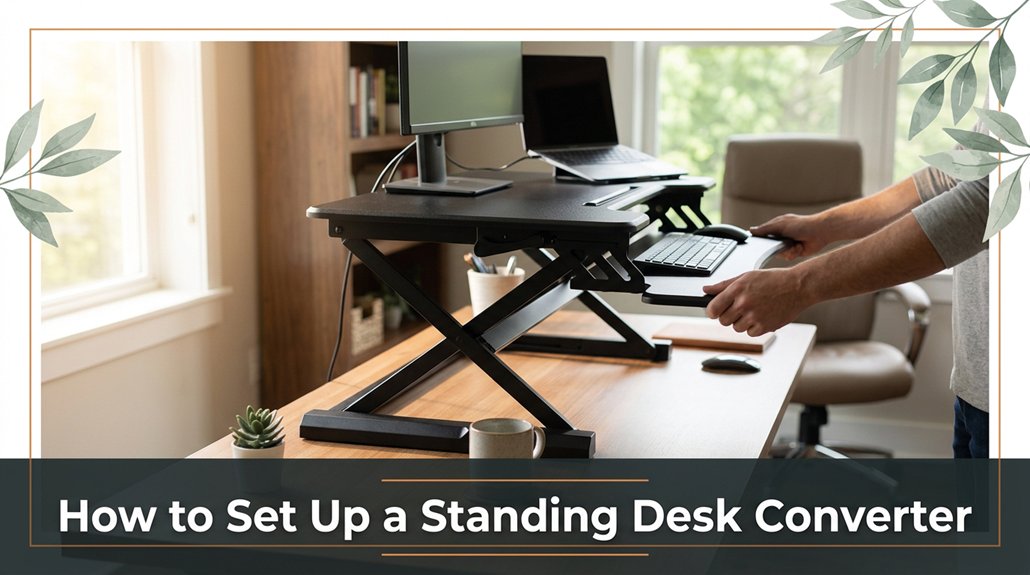
Your standing desk converter can make a real difference, but only if it’s set up correctly from the start. First, measure your desk’s width and depth trust me, avoiding the surprise of a converter that’s too big or too small will save you frustration later.
Adjust the converter’s height so your monitor’s top is at or just below eye level most people forget this or set it too high, which can cause neck strain. Make sure your elbows are bent at around 90 degrees and your wrists stay straight for comfortable typing.
Tidy up your cables bundle and label them so everything stays within easy reach. Once you’ve made your initial adjustments, tweak the height and position for maximum comfort taking your time here really makes a difference.
Gradually adding standing time and fine-tuning your setup will help you avoid back pain and make standing more sustainable. Stick with it, and you’ll soon have a setup that feels natural and supports your workday comfortably.
This article contains affiliate links. If you purchase through them, I may earn a small commission at no extra cost to you. I only recommend products I genuinely believe in.
Alright, so let’s talk about why you’d even want a standing desk converter setup in the first place.
You might’ve heard standing desks are healthier, and sure, that’s true but it’s also about avoiding that numb butt feeling after hours of sitting. You want to stretch your legs without juggling a bunch of furniture or permanently swapping desks.
Using a standing desk converter gives you flexibility, quick height adjustments, and a much-needed break from the chair.
A standing desk converter offers easy height changes and a welcome break from sitting.
Honestly, the benefits include less back pain, increased focus, and the energy boost that comes from not slouching like Quasimodo.
Proper setup is crucial because it ensures ergonomic comfort and reduces strain. Setting up your converter might look straightforward, but missing a step can make your workday more annoying than it needs to be.
Trust me, proper setup makes all the difference.
Key Measurement Tip:
Set the height of the converter so that the top of your monitor is at or just below your eye level when standing. This minimizes neck strain and encourages good posture.
Step-by-step setup instructions:
Choosing the right standing desk converter isn’t just about grabbing the fanciest model on the shelf or the one with the most bells and whistles. You need to think about your space, your work habits, and how much hassle you’re willing to tolerate.
Before you start shopping for your perfect standing desk converter, you need to get familiar with your workspace and I mean really get to know it. Grab a tape measure or ruler. Measure the width and depth of your desk where you’ll place the converter because accurate measurements ensure a proper fit.
Note:
Don’t guess these dimensions. Yes, it’s tempting to eyeball them, but precise measurements are crucial. You want the converter to fit comfortably without hanging over the edge or blocking drawers, which can hinder accessibility and stability.
Next, check if your workspace has any obstructions such as lamps, cables, or clutter because these can interfere with placement or movement of your converter.
Also, note if your desk has an uneven surface, a lip, or a beveled edge because these features can complicate stability and alignment. Prepare accordingly to avoid issues when setting up.
Important Measurement and Setup Fact:

Adjusting the height of your standing desk converter might seem straightforward, but trust me, it’s where many people get tripped up. You want your elbows to form a 90-degree angle easy, right? Not so much when you’re juggling your phone, coffee, and all that.
Specific Adjustment Tips and Measurements:
Common Mistakes and How to Fix Them:

Your monitor’s eye level is the secret to preventing neck strain trust me, you don’t want to spend your days looking up or down like a confused owl.
All right, you’ve got your converter adjusted; now, place your monitor so the top of the screen is roughly at eye level because this position helps maintain a natural head posture and reduces neck fatigue.
No, that doesn’t mean the middle of it trust me, I’ve spent way too long fiddling with this.
Look, your eyes should hit the top third of the monitor when you’re sitting upright because this positioning minimizes the need to tilt your head up or down.
This way, you avoid craning your neck or squishing it down.
Key measurement:
*Position the monitor so the top of the screen is at or just below your eye level.*
Of course, everyone’s different some folks prefer the actual eye level, and others like it slightly lower.
The key is that you don’t tilt your head up or down all day because maintaining a neutral neck position prevents musculoskeletal discomfort and strain.
Proper monitor height is essential for optimal neck alignment, ensuring comfortable and sustainable working posture.
Common mistake:
– Looking at the monitor with the top of the screen significantly below eye level causes you to tilt your head upward, leading to neck fatigue.
Solution:
Raise the monitor until the top of the screen aligns with or is just below your eyes.
Common mistake:
– Placing the monitor too high, with the top above eye level, results in tilting your head downward, causing strain.
Solution:
Adjust the monitor so the top is at or slightly below eye level, maintaining a natural head position.
The first thing you want to do is position your keyboard and mouse so they sit comfortably in front of you, not off to the side or too high or low.
Trust me, if they’re raised too much, your shoulders tense up; if they’re too low, your wrists cringe.
Where exactly should they be? Your elbows should form about a 90-degree angle no more, no less because this promotes a neutral arm position that reduces strain.
Keep your wrists straight, not bent or twisted, because bent wrists increase the risk of repetitive strain injuries like carpal tunnel syndrome.
Key measurements and facts:
Step 1: Lower the keyboard and mouse until they’re at a height where your elbows maintain about 90 degrees because this minimizes shoulder and arm tension.
Step 2: Position the keyboard and mouse directly in front of you, not off to the side, because this supports symmetrical muscle use and reduces awkward reaching.
Step 3: Adjust the height so that the top of the monitor is at or just below your eye level, with the monitor approximately 20 to 30 inches from your face, because this reduces neck strain and promotes comfortable viewing angles.
Step 4: Make sure your shoulders are relaxed and your upper arms are close to your torso to prevent tension and fatigue.
Step 5: Check your posture by sitting upright and ensuring your back is supported by your chair’s lumbar support, because this maintains spinal alignment and reduces lower back pain.
Make adjustments until you feel like you’re ready to type all day without fighting your workspace.
Your long-term comfort depends on it, so don’t forget to test your setup by actual typing and make incremental changes as needed.
Taming the chaos of cables and accessories can feel like trying to herd cats, but trust me, once you get a system in place, it’s a game-changer. First, use cable clips, twist ties, or Velcro straps whichever is readily available to bundle cords that run in the same direction, because this reduces tangling and keeps your workspace tidy.
All right, don’t let your power strip sit behind your desk where you can’t see it; mount it underneath your desk or on the side using mounting brackets or adhesive strips. This prevents accidental unplugging and makes the power strip more accessible.
Now, label the cables with printed tags or reusable labels trust me, you’ll thank yourself later when troubleshooting or unplugging devices.
Look, loose cables are trip hazards and make the whole setup look cluttered, which impairs productivity and increases the risk of falling. Keep accessories like your phone stand or notepads within arm’s reach but not cluttering your workspace. Place them on designated areas such as desk organizers or wall-mounted holders to maintain a clean environment.
Key measurements for ergonomic workspace placement:
Avoid common mistakes, such as letting cables dangle freely under your desk, which causes clutter and trip hazards. Never run cables across walkways or under rugs, as this can cause tripping or damage to the cords. Instead, route cables along the edges or beneath your desk using cable organizers or raceways designed for cable management.
Once you believe you have everything physically set up, it’s time to test and fine-tune for maximum comfort, because that’s where most setups fail.
Sit at your desk, then stand up. Is your monitor at eye level? If not, raise or lower the monitor until the top of the screen is at or just below your eye level, because looking slightly down reduces neck strain more than looking straight ahead or upward.
Ensure your monitor is at eye level to reduce neck strain and promote better posture.
Adjust your keyboard height if it feels awkward, ensuring that your elbows are bent at about 90 degrees and close to your sides, to avoid unnecessary shoulder tension.
Remember, comfort depends on your body; what works for someone else mightn’t work for you.
Check your wrist position are your wrists straight, not bent up or down? Are your shoulders relaxed, not hunched?
If anything feels off, make slight adjustments because small changes can significantly improve ergonomic support.
Feel the pain or discomfort in your neck or shoulders? Adjust your setup to alleviate tension.
Find yourself leaning forward or slouching? Raise or lower your desk until your back is flush against the chair and your monitor is directly in front of you, because maintaining an upright posture reduces spinal strain.
Struggling with your mouse? Reposition it so that your arm remains close to your body, and your wrist stays straight, to prevent repetitive strain injuries.
Still stiff or uncomfortable? Continue experimenting with small modifications until your workspace feels natural and supportive, because sustained comfort enhances productivity and reduces fatigue.
Shifting from sitting to standing isn’t as simple as hitting a button and hoping for the best. You’re more likely to spend ten minutes adjusting your monitor or squinting at the height adjustment, like it’s a puzzle.
First, start slow because easing into standing helps your body adapt without discomfort. Stand for about 10-15 minutes, then sit back down, so your muscles don’t feel punished or overstressed.
Next, don’t forget to move around because standing still all day can be as harmful as sitting constantly. Your joints need variety to stay healthy.
Make tiny adjustments to your standing height throughout the day. For example, your elbows should be close to a 90-degree angle when your hands are on the desk. This position ensures ergonomic comfort because it reduces strain on your shoulders and arms.
The height for the monitor should be raised until the top of the screen is at or just below your eye level because looking slightly down reduces neck strain.
Take regular breaks to stretch to improve circulation and prevent stiffness.
Important Measurements:
Maintaining your standing desk converter isn’t something you can set and forget, because regular upkeep ensures it remains functional and safe. You’ve got to check in regularly to keep it in tip-top shape.
Tip: Ensure all adjustment knobs and locking mechanisms are secure to maintain stability during use.
Important measurement: The recommended gap between the monitor and your eyes should be approximately 20 to 30 inches, with the top of the monitor screen at or just below eye level, to reduce neck strain.
All right, it’s not rocket science just a few minutes now save headaches later.
Yeah, you can use a standing desk converter on pretty much any desk.
But here’s the catch not all desks are equal.
All right, if your desk’s surface is sturdy and wide enough, you’re good.
If it’s wobbly or too small, you’ll want to double-check the converter’s footprint.
Otherwise, you’ll find yourself balancing your laptop like a circus act, which isn’t exactly efficient or safe.
They say “everything in moderation,” and that’s true here. You should aim to stand for about 15-30 minutes every hour, then sit for the rest.
Yes, it varies depending on your body, your workspace, and your energy. All right, set a timer if you’re like me because time flies fast, and before you know it, you’re glued to your chair again.
Balance is key, friend.
Yes, standing desk converters suit most setups, but not all. You’ll need to check your monitor’s size and weight obviously, if it’s a massive 32-inch, you might need a sturdier model.
Make sure your keyboard and mouse have enough clearance when raised. All right, if your computer’s tower is a mess or your cables are a rat’s nest, you’ll want to sort that first, or everything becomes a balancing act.
Look for safety features that act like a sturdy shield anti-slip pads, locking mechanisms, and height locks. You want stability, not a rollercoaster.
Obviously, quick-release locks are convenient, but make sure they lock tight enough to hold your setup firm.
Adjustability matters too, so you don’t end up fighting your converter every time you want to stand or sit.
Think of it as your safety net trust it to keep you steady.
Yes, you can switch easily between sitting and standing. Most converters have a smooth adjustment mechanism pneumatic or spring-loaded that lets you lift or lower with a gentle push or pull.
All right, here’s the trick: you’ll need to adjust it gradually to avoid sudden drops or awkward positions. Trust me, the first few times feels awkward, but once you get the hang of it, flipping from sit to stand is just a matter of a quick lift or lower.
Look, setting up your standing desk converter might seem straightforward, but don’t be surprised if it takes longer than the manual claims hands up if you’ve wrestled with a stubborn clamp or misjudged the height by an inch. Just remember: measure twice, adjust once, and don’t rush the cable organization. You’ll get there. And trust me, once you find that sweet spot, it’s worth every frustrating minute. Keep it simple, keep it steady.


